Sunday, December 25, 2016

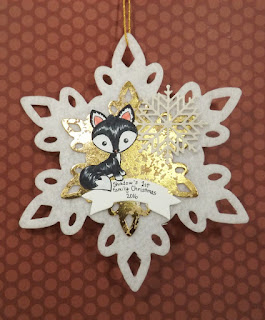
Christmas Ornament for my Husky

This was the handmade gift I made this year: an ornament for our husky. While it's not her first Christmas by any stretch, it's her first with us. I used my Accucut Craft snowflake builder die set to cut the felt and gold snowflakes. Then I used my new Echo Park detailed snowflake.

I used a banner from the matching dies to a CTMH stamp set. It's attached to an animal but I just cut the banner part out and wrote on it myself. For Shadow, I used my Your Next Stamp fox stamp to colour it like our husky, complete with her dual coloured nose.

I received some wonderful handmade cards this Christmas too. (More on those later.) We had a nice time with family today. I hope everyone spent their day with good people and warm moments.


MERRY CHRISTMAS everyone!

Saturday, November 12, 2016

Santa is coming...

It's time to start working on those holiday cards! I need about 30 for the holidays but I tend to end up with between 5 and 8 by this time of year. So, it's time to hunker down and start making the rest! My last workshop of the year is always a holiday season kick off workshop! We will be making 3 holiday cards and here's one:

I used three different tree stamps. The Santa and reindeer sleigh stamp is from (correction:) Hot Off the Press. It's from a wonderful set full of houses to make a whole village scene. I also used my brand new sentiment stamp from Close to My Heart.

I got this idea from a Stampscapes video. It's a fairly easy card to make many of!

Tuesday, October 25, 2016

Balloon Animals Birthday Card

I have now made all 4 sizes of birthday box cards that I would use: 4.25 x 5 inches in both vertical and horizontal and 5 x 7 inches in both vertical and horizontal.

I've awed over lots of cards that are vertical that are just over-flowing with all kinds of lovely and fun stuff. I guess I'm just not a big embellisher. Mine never seem to come out so full looking. This is as much as I could stuff in the card and still get my fingers in there to place them!

I used my CTMH balloon animal stamp set. I've gotten pretty good use out of this set since buying it. The animals are quite fun to work with! The sentiment is a different CTMH set. I also made some presents to tuck in here with scrap rectangles and one bit of a border punch that I think looks like a poofy bow.
I used my MISTI to stamp these images because they are solid. I wanted to make sure I got full impressions! The patterned paper I chose actually has a lovely bit of clear sheen over the spots. I thought it looked like party confetti.

Of all the 3D shaped cards I've made, I think these box cards are my favourite with the step cards as a close second. It's really neat how this card easily folds flat for mailing.


I must say, I prefer the horizontal cards. There's more room to work with inside and there's a better space on the back to put your sentiment. Next on my bucket list of 3D cards to try will be a shadow box card!

Sunday, September 18, 2016

Husky Treat Bags

When I make a batch of dog cookies for our Husky, I always get more than I think I will use in the two weeks they are good for. (She could eat them all but she shouldn't!) So, I give some away to my fellow doggie parents at work and at my husband's work. I was really enthusiastic the first time and made these baggies.


I used a tutorial from Pootles for the treat bag. It's actually quite a decent size. It looks so good when made out of patterned paper!

I used the fox from Your Next Stamp's Woodland Cuties stamp set (with matching dies) and coloured it like my Husky. (I am going to get SO much use of out this image!)

I was pretty pleased with it. It holds 5 to 10 cookies. I made the cookies with a dog bone cookie cutter but we always break it into smaller pieces when we give her some as treats. I'm thinking that the next time I make these cookies, I will just cut the dough up into little, bite size squares. (I keep looking for a mini heart-shaped cookie cutter, but I can never find little ones.)


How did I do colouring Shadow? Here is my muse:

Sunday, August 28, 2016

Silver and Purple Wedding Mini Album

I went to a wedding this July. It was planned a long time ago. It seemed like we had forever to plan for it. It's amazing how time gets away from us! I started this wedding scrapbook mini album in April and finished it the day before the wedding in mid-July. LOVE how it turned out!

I sunk much of the time into coming up with the design. It uses my ribbon-slide binding, but I've modified it for stability so that the ribbon doesn't scrunch up. The wedding colours were silver and purple. The large flower on the cover came purple but all the rest were white and I coloured them with my Copic markers. I put two tones of glitter grey gears in there for a masculine touch.
This "mini" album is not very mini. The pages are 9 x 7 inches so that the couple can fit 4 x 6 photos in portrait or landscape orientation. The pages will fit 5 x 7 inch photos in portrait but landscape will only fit on the photo mat pullouts in each page and on the inside of the front and back covers.

Each page has a pocket flap (with a Kraft Tex hinge) and an inside pocket.

When you open the flap, there's an inside pocket with a large photo mat.

There's a total of 5 pages. If only 1 photo goes on each page (since you can fit two 4 x 6 photos in landscape on some), the album holds 37, 4 x 6 photos.

I did a lot of stamping, die cutting and heat embossing on this album. I wasn't there for the gift opening, so I hope the groom and bride really liked it. I included some "his and hers" tags in hopes that they would both capture some memories together in it. The couple waited a very long time to find this happiness, so it was a very special wedding.

The album looks much better in real life, but the closest I can get you to it is a video walk-through! Hop over to my Vimeo channel to see this wedding scrapbook mini album in action!

Sunday, August 21, 2016

Summer of Love!

This summer has had me creating pretty steadily. I attended a wedding in July and my in-laws had their 50th wedding Anniversary on August 20th. I helped to design some of the decorations: the banner, the place-setting cards, the table numbers and the favour boxes. I did the design and cutting. My mother-in-law did the assembly. On top of those two things, a former co-worker of mine also got married on August 20 and another former co-worker asked me to make his card.

So, here are three version of the same wedding shaker card!! The first one was for the July wedding. The colours were purple and silver (grey).

This one had the most filling and the most variety of filling. I've been trying to get better at not over-stuffing my shaker cards! The two stamps (The heart and "together") were from Close to My Heart sets that my sister loaned me. The "Happy" is a die-cut from Your Next Stamp. It's finicky to work with, but oh so pretty!

I had a package of white flowers from Michael's. I coloured one with my copic pale purple/grey marker. I think it turned out well. Then I had two colours of grey glitter paper to cut out with my memory box gear dies to add the touch of a male element to the card as we attended from the groom's side.

The next version is the one I made for the former co-coworker. Her colours were beige/gold, so I'm told.
This card is a 5x7 so that I could fit the spray and the couple. I wrote a poem on the inside that ended with "Now and Always" so that I could use this stamp!

These flowers I sponged with honey yellow ink to make them gold-ish.

Yellow and a light green were the colours of my in-laws wedding party. Gold is the theme for a 50th anniversary. So, for that version of this wedding shaker card, I embossed the heart in a "pearl lustre" colour which looked kind of pale gold to me.
This one is also 5x7. Thank heavens for 5x7 embossing folders! I had progressively less and less time to make these cards. This one probably has the least shaker stuff in it. I could have added more but I'd rather too little than too much! At least you can get movement!

The anniversary party went well. My in-laws renewed their vows with their two children each participating and their only grandchild too. It was really lovely.

What's kept me the most busy has not been these three cards and the room decor. It's the wedding mini (or not-so-mini!) albums I made! I have videos of both to post in the future! (I am so proud of them, it hurt a little to give them away! Hence, the videos so I can return to them for future inspiration too!)

Monday, July 18, 2016

Sheltering Tree Sympathy Card

A co-worker of mine recently lost some close family members. I needed to make her a sympathy card. I want it to look soft, but not sad. I searched around the internet and found one like this. I used what I had to re-create it. I liked how the grey was a softer neutral than black.

The stamp set (tree, ground, blossoms, sentiment) are all from Stampin' Up!'s Sheltering tree set. I added some Wink of Stella sparkles to a few of the blossoms (hard to see in the picture. Click to enlarge it.) I used my new pink stamp pad from Close to My Heart. I would have liked to have used more than one pink colour but I have only one. I used second generation stamping but it hardly shows on such a light colour. You can see the second generation stamping on the two ground swooshes though.

I finished it with a glitter, silver heart to brighten up the grey.

My co-worked got it later than I'd hoped, but she let me know it was appreciated nonetheless.

Sunday, June 26, 2016

Holy BUCK! Father's Day card

I went for something punny this year for father's day.

The deer head I got at Michael's in their sale bin. The banner is from a CMTH set. The ovals are Stampin' Up! nesting dies and the branches are a Martha Stewart punch. The "herd" is from Frog Whisker's stamps.

I gold embossed the buck on the black patterned paper. Unless it's in sunlight, it's a little hard to see. I put the ovals on foam tape so the branches could be behind it.
It turned out to be fairly easy to make! I wish the banner were bigger. I want to find a way to make a "Holy Buck, Dude!" version. Guy cards are so hard to think of!

Thursday, June 16, 2016

Humourous Masculine Birthday Card

When I saw this sentiment stamp set from Your Next Stamp, one single sentiment made it worthwhile. I thought it would be perfect for masculine birthdays, both young and old. My dad celebrated his birthday in May and this is what I made him:

I used a nested stitched rectangle from Your Next Stamp to make the yearbook/Polaroid type frame.

The sentiment says: "Birthdays are like boogers - the more you have the harder it is to breathe." I thought it was funny! My dad did too. I felt it went well with the little monster stamp too.

I LOVE this Lil' Monster's Balloon stamp from Annabelle Stamps. So sad they closed up shop. (Looks like you can still get this monster set here though while supplies last! --> LINK) I coloured the monster with alcohol markers, practicing to leave some white space as highlights.

I like this result so much I made a variant into a shaker card. You can see that one in my shop.

Sunday, May 22, 2016

Dog Cookies! Made by me!

I've been creating - just not out of paper. I found a "vet approved" dog treat recipe online - which I also passed by the vet in our family - and decided to use this long weekend to bake. If you know me, then you know that I consider the kitchen a foreign land - a place I pass through from time to time, but not that I would call home!

Well, I went and picked up the ingredients - and they weren't cheap, since the quantity they are sold in was WAY over the quantity I needed for a single batch. I thought I had everything but, as I was stirring all the stuff together and it was thickening into a dough, I realized... I don't have a rolling pin.

Mommy to the rescue! I scooted downstairs and borrowed my in-law's.

Here's the result:

One batch of peanut butter cinnamon cookies! The dough smelled pretty good too. Did Shadow eat them?

Well, we broke one in half so we could each give her a little. She eagerly went for it and then immediately drew back. It was as if she was thinking, "OOOO Cookie! Wait... what the... ... This is *not* my normal cookie." She timidly kept taste testing it from my husband's hand and, eventually ate it. So, I called her for my half. She was hesitant, but took it. As she chewed, a piece fell out of her mouth with a great big glob of drool. So, I count that as: She liked it.

I have also been creating with paper a little and not just cards! Somewhere down the line, you can look for something different!

Sunday, May 15, 2016

Baby Elephant - Mother's Day Card

When I saw the Bella Sleeping stamp by Wild Rose Studio, I had to have it. It could work for a new mom OR dad card, so I thought it was useful, but I knew I wanted to use it for Mother's Day. My mother loved elephants and the way the baby's hold their momma's tails. My own mother has passed but I still have mothers in my life!

I wasn't quite sure how to frame it though, so I hunted around the Internet for ideas. I liked the idea of a doily and sparkles in the flowers, so I went with that.

The stamp itself is tinted to suggest some colouring and it is so sweet. So, I mimicked it as closely as I could with my Copic markers. I used the cool grays from C1 to (I think) C8. I spent about 20 minutes just colouring!
I got use my new CTMH ink pads in yellow, pink and blue. The yellow and pink are in the background and the blue is on the sentiment. The background I stamped from an old Stampin' Up! background stamp set I have. I rarely use it. It was one of the first SU! stamps sets I bought, thinking it would be so versatile to make my own patterned papers. I has 4 mini designs in it. Turns out, I think I've used it about 3 times or so. There's just so much beautiful patterned paper out there that I rarely make my own!

I used my MISTI to stamp the sentiment frame in blue. Then I overstamped it with clear versamark ink so I could emboss it with clear embossing powder. The frame and sentiment fit together because they are from a CTMH stamp set.

I liked the spring colours in this card. I made another using more pink and purple for my step-mother's card too.
I filled one side with roses using 2 colours of my Local King Rubber Stamp watercolour markers. The sentiment fit so nicely in the other side of the heart. I like how it turned out too. In stead of a patterned paper background, I used an embossing folder.

We spent mother's day doing a birthday party barbeque since my dad and my nephew's birthday's spanned the weekend. My sister brought me flowers for being a first time fur-mom. She made a lovely gift card with it, which I'll show later. I've already shown the party train card I made for my nephew's birthday. I've still got pictures of my dad's birthday card to show too!

Sunday, May 8, 2016

Birthday Train!

It's my nephew's birthday today. I was struggling with something to do for his card, but then I found the CASology challenge: MOVE. I decided it was time I dug out the train stamp I bought years ago and never used!

I paired it with a couple of teeny party bears I have from Dreamerland crafts. They fit perfectly in the little train cars!

I used a lot of different supplies on this one! 3 stamp sets: the train (Hot Off the Press), the bears (Dreamerland Crafts), and the sentiment (Your Next stamp). I used my Misti to line them up. I used scrap papers on the background, layered on scrap and then cut them with my new stitched rectangle die (Your Next Stamp). Plus, I coloured it with 3 different alcohol marker brands too: Copics, Bic, and ProMarkers.

Hooray for challenges to start your mojo!

Sunday, April 17, 2016

Baby Scrapbook Mini Album from Envelopes

I have a new video to share today! I started this album a year ago. I finished it a couple months ago, but I'm just getting around to filming now because I finally have the two things I need: quiet and sunlight! (Sunlight being the harder thing to come by! Thank heavens for a beautiful day.)

I made this mini album from A6 envelopes cut from heavy gold foil paper with my Accucut Craft die. I put a skinny 1/8th of an inch gutter between each page so they are not totally squished against each other.

I used a neutral colour scheme of browns to go with the gold and accented with some blue-greens. This is a (very late) gift for a co-worker with two little boys. True to my style and since I expect the photos will take up most of the room, it is only lightly embellished. I designed a onsie die cut specifically for this album. I wanted it to be a journalling spot and the die cuts I have are too small.


This is my Ribbon-Bound Triple Envelope Scrapbook Album. I taught a class to my creative crew for it and I've shown other albums I've made in this style. It doesn't matter what size envelope or whether you have triangle or rectangle flaps. It works with all styles.

I put a large tag in each envelope too. That's where you can put some photos in landscape orientation. (One page is not embellished as well as the front and back covers, so a landscape picture could go there too.)

I also put one of my die cut dinosaurs in here, which I had designed for another project.

Want to see the whole thing? Watch my baby mini album walk-through video on my Vimeo channel.

Sunday, April 10, 2016

CTMH Balloon Rabbit Shaker Card

When I saw the February stamp of the month from Close To My Heart, I knew I wanted it. It's perfect for birthdays and babies and any sort of wild thing saying!

My sister was born in the year of the Rabbit. So, I made her a balloon rabbit birthday shaker card. I originally wanted to use a soft purple, but I made the rabbit pink.

I got a MISTI for my birthday, so I used it to stamp this rabbit. I have trouble getting perfect coverage  on the first try with solid stamps. Furthermore, I used Spun Sugar distress ink. Distress inks are not designed for solid, perfect coverage. So, I actually stamped it three times with my MISTI to get this nice, even solid image.

I cut the bunny out by hand and used my grass die to line the bottom of the partially cut circle. I used sequins, beads and a little heart confetti inside my shaker. I got the beads at the dollar store!

I think my sister liked it. I know I liked shaking it around. The sound adds an extra dimension to the card! The paper was a nice foiled paper from SEI that I've had for years. I've been saving bits of it because I liked it so much. I think it went perfectly with the balloon animal party theme.

We just got back from ScrapFest Kitchener. I picked up some more nesting dies that will work well for shaker cards. I got lots of other goodies to play around with too. I did more make'n'takes this time, which added to our time spent at Scrapfest compared to other years. The bonus of a make'n'take is the chance to sit here and there! You have to scope them out early though, or else you end up standing in a long line before you get a small sitting break.

Can't wait to play!

Wednesday, March 9, 2016

Love You with Red Roses Tri-Shutter Card

Here's another of the Tri-Shutter cards we made in class. This one I had the creative crew do from scratch (i.e. no die cut!). It's always hard to use the Xacto knife well (especially on black), but so worth the effort!

For this one, I used the clay-coated glossy paper I got at Scrapfest from Local King Rubber Stamps (out of B.C.) This paper stamps SO well. We used watercolour markers with a direct-to-stamp application. We huffed before stamping (instead of spritzing the stamp). It seems to lock the ink under the gloss and the sentiment comes out amazingly crisp! Everyone was impressed!

The trick is to colour the whole stamp with a lighter colour and then add some spots of a darker colour directly over top of your lighter colour already laid down on the stamp. I used red as my lighter colour and then brown as my darker shade. Each person in my class tried different colours: light pink and darker purple, purple and dark blue; pale pink and purple.

I made a mask for the rose stamp out of acetate. I used stazon ink on it and a repositionable glue dot on the back. I really like that kind of mask because it is easy to clean of and lasts longer than a post-it note mask.

You can really see the gloss in the second picture. The sentiment is a mash-up of two sentiments by Avery Elle. "Love" was its own stamp. "You" came from a "For You" sentiment. We taped over the "For", inked it, removed the tape and then stamped the "You". Positioning on an oval was a little bit tricky. For my birthday, I asked for a MISTI! That would have made stamping the sentiment easy peasy! I'm always afraid to stamp the sentiment last and risk ruining the whole piece. With the MISTI, I'll be able to see how it's going to turn out before putting the ink on! Can't wait to find the time to try it out!

I figured this card would work for a mother's day card or siblings/besties just as well as it would for couples!

Monday, February 15, 2016

WILD Birthday Tri-Shutter Card

I was supposed to use this long (Family Day) weekend to develop the three Tri-Shutter cards for my workshop later this month. Well, I got 1 of 3 done! This one I made for my father-in-law's birthday. It's not always easy to come up with cards for men. So, as this design came together in my mind, I decided to make it a Tri-Shutter so I can use it in my class!

I knew I wanted to use an oval on one of the Tri-Shutter cards, so that was the first idea. I really liked the little raccoon from the last card I made, so I wanted to do another little animal. That was the second idea. I was trolling around for inspiration and I saw this card on the SplitCoast Stampers. That gave me the idea of how to suggest a simple ground and sky design. (Mine is pretty faint in the pictures but visible in real life!)

With those three bits of inspiration, I made this (click for larger view):

I water-coloured the fox by colouring directly on a solid stamp. I coloured the whole fox red, the scarf in teal and the present in a pale purple. Then I went over the areas I wanted to with a black sharpie pen.

The inside, I wrote on a tag I designed and cut with my ScanNCut:
Tri-Shutter cards don't leave a lot of room for sentiments, so this one was short and sweet. However, if you really wanted do, you can use the back panel for additional sentiment space. It is completely covered when the card is shut.
Although I coloured directly on the stamp, I did take an ever-so-slightly damp paintbrush and smoothed out the red a touch. Red is pesky if you make a mistake so I had to exercise extreme restraint and just touch it up a little - not to perfection.

The fox stamp was from the Michaels' sales bins. The sentiment is from a Close to My Heart set and the "WILD" die cut letters is from a very old Quickutz alphabet called Eliza. The ovals are Stampin' Up! dies. The Tri-Shutter base is my Accucut Craft die. I do know how to make one from scratch, but I'm hit and miss with an exacto knife, so having the die is a real plus!

I have an idea for the second Tri-Shutter design for the class. Now to make it happen and to find a third idea!