Sunday, June 24, 2012

Paper Scraps - Tags

At my last paper crafting workshop, we made some gift-y items: a little holder that can hold a thank-you note with a gift card or a small (flat-ish) treat and a matchbook notepad that would make a great stocking stuffer or goodie-bag item.  Our "bonus" items were gift tags.

I used my Accucut Craft tag die cuts.  One is shaped like a shipping tag.  You can get them at most craft stores.  I dumped out my paper strip scraps on the table and everyone sorted through them to find some coordinating items.  The idea for this came from a Two Peas in a Bucket Member (username: Scrappy Jedi) from this "Use Your Scraps" post on her blog.  These were the tags that I came up with:


My friend, Debbie, let me have some of her new Prima flowers she got in bottles at a Michaels Craft Store on clearance.  I put silver sprinkles from Annabelle Stamps in the flowers.


I also used my smaller Accucut Craft tag:


I included ribbon on one of them.  I used this shape and technique to make a tag for a new mini album I'm working on.  Here's a look at that one:


I put a sticker at the top of this one and I heat embossed a stamped image with black embossing powder.  We probably used up 20 of my patterned paper strips.  I easily have enough to make hundreds of tags!

So, share your ideas for using tags with me!  I use tags for gifts and for mini albums... what else?

Sunday, June 17, 2012

Father's Day 2012

Happy Father's Day to all the dad's out there.  As always, I made my card too late to mail one to my dad.  I did give him a call though.  I started on my father's day prototype last night until the wee hours of the morning.  After the third failed attempt, I decided I needed to sleep on it.

Went at it again today and came up with something acceptable and then made a card to match.


I made a small photo wallet from a Tyvek envelope.  Tyvek is a trademarked plastic fabrication by Dupont.  It is water resistant and tear resistant.  I bought a small box of 6x9 envelopes from U-Line with the intention of using them as hinges for mini albums to stand up to much use flipping though pages and not tearing around binder rings.

Ever since I saw this faux leather wallet tutorial on SplitCoast Stampers a couple years ago, I've always wanted to make one.  (I even snagged some pop tabs from my husband's empty Coke cans to use as buckles.)  I wasn't totally fond of the long wallet shape though and it does make me think of an eyeglasses case more than a wallet.  I did use the embossing technique from it on my bi-fold wallet though.  (I think I should have used brown though!)


I used glossy accents on the key on the front and back.  The map and compass paper are the two sides of a patterned paper by Reminisce.  (It's really pretty!)  The key is from a single sided paper from Michaels Recollections line.  I fussy cut the keys out.


This wallet has five pockets and five tags.  I only decorated one side of the tags.  The wallet is just over 4 inches by 3 inches, so it will hold wallet sized photos.  More than one will fit per pocket, but I felt 5 was a nice complete set.


Two pockets fold out and the other three are stuck down on the main body.  (I didn't have any black velcro.  I had to use white.)  I distressed all the edges of the papers with my Making Memories scraper and inked them in Walnut Stain distress ink.  I also inked the Tyvek envelope.  That was not fun.  The ink seems to not truly dry.  So, I inked it and then wiped it vigorously with a paper towel until only a small bit was coming up. (If I had been successful last night, I would have let it dry overnight and see if that made any difference.)


The tags are all metallic brown cardstock.  I fussy cut the elements from the papers.  They white keys are embossed.  The white keys and the clock-face and hands I stamped from a Close to My Heart stamp set.

My father-in-law didn't flip through the pockets or look at the tags but I'm sure once has some pictures for it, he will figure it out.

Thursday, June 7, 2012

Santa Express Post Box

I posted my dark lace long mailbox earlier, but it wasn't the first attempt at a mailbox.  The first one, I wanted to be a full blown post box.  I wanted to make it Christmas red and have a drawer type opening and a "locked" compartment in the back.  The idea was was, children would drop their letter to Santa in and it would magically go to the North Pole over night.

As a play Post Box, I thought if I made an opening in the back, my nephews could pretend to be the mail man who has to "unlock" the box to take out the mail.

This is what the prototype looked like:

I always intended legs for it, but at this point I was focusing on that drawer drop box opening.


I used a wooden knob I got in a pack on sale at Michaels Craft Store and painted it black.  I used a magnet closure and a metal washer.  If I do this style again, I will place the drawer sides in a slit in the face of the post box so they don't flop around.  Also, I will cut in to the face of the post box to make the top only a semi-circle so the door doesn't appear flat in a rounded top.


I like the back "locked" compartment.  It's big and fun for children to pretend to get the mail.

After I finished building the basic box, I was exhausted for ideas.  I didn't know what papers to use to embellish it and I realized I should have embellished the panels before assembling it.  Oh well, that's what a prototype is for.  (I may finish this one yet.)

I decided to simplify.


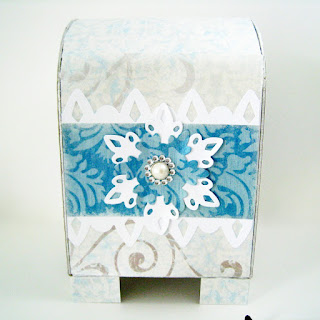
Taller and slimmer was the needed shape.  No drop box opening, just a drop slot.  The body cavity opening is in the front and uses a simple tuck-tag design.


I used patterned cardstock to build this one.  That makes it pre-decorated.  I just had to add some embellishments.  (I did that before assembling this time!)


 A side with embossed trees.


The other side, below, just plain.


The back below.


I used chipboard to make the sides and bottom.  The cardstock is a thick DCWV Luxury Stack cardstock.  I've had this paper for 5 years.  Fantastic to use it up!  I painted the edges of my chipboard with a Ranger pearl white paint dauber.  I like the texture of the dauber tip and the pearl white matched the paper flawlessly.  I also painted the edges of the darker blue cardstock (best visible in the close up of the embossed trees).

I submitted this to the Accucut Craft Grandemark challenge in the chipboard category, but I didn't win with any of my submissions.  I still quite like it.  I hope I find the time to make another before November.  I want to give one to each of my sister and sister-in-law's household for their boys to write their letters to Santa.  I know most kids email Santa these days AND get a response too (quite cool) but I like the tradition of a letter to Santa.  Your own genuine wishes in your own genuine hand writing.  The idea of seeing it progress year over year along with your fondest desires just tickles my fancy!

Saturday, June 2, 2012

Quilled Butterflies - Dream in Colour

The inspiration for this paper quilled butterfly card comes from the Etsy Paper Twirlies Team photo challenge inspiration.  The photo is a quilt by a fellow Etsy Seller, Clothescapes.  This was the inspiration photo:


What I liked about this photo is - most obviously - the rainbow colours!  This quilt has it all from deep purple to bright orange.  A rainbow of colour grounded on a neutral white was the easiest part of the inspiration.  To work in more of the quilt, though, I really like the idea of a repeating motif.  So, here's the card I came up with:


I graduated the colours using the butterflies: purple-blue, green-yellow and red-orange.  The cardstock is a textured cardstock to simulate the fabric of the quilt.  I also polka-dot embossed the mounting squares to add more texture and inked around their edges to provide more separation from the background.

I made the little rolled flowers for another project but didn't end up using them.  So, I blobbed some red Stickles glitter glue in the centres and added them to my card.

It was fun participating in this challenge!  There are a lot more photo inspiration challenges in the line up, so we'll keep our paper quilling creativity flowing.  Check out the Paper Twirlies Blog to see all the other entries inspired by this quilt!