Wednesday, November 27, 2013

My Snowmen on Facebook!

Some snowman decor I made  was nabbed and highlighted as a sample on the Accucut Craft Facebook page!
I don't have a Facebook account myself.  You can read about my holiday snowman decor in an earlier blog post.  Accucut Craft has a Black Friday sale, so you too can own the die cut I used to make these snow people!

Wednesday, November 20, 2013

Red and White Christmas Card

I finished the colour challenges for the Kards for Kids 2013 hand made holiday card drive!  I was inspired by the cards made by my Creative Crew over the weekend in a fundraising event for the foster dog and dog rescue group, the Southern Ontario Animal Rescue.  Two of Monika's three cards featured circles.  I am a circle lover! (Circles feel like a natural phenomenon to me.)

One of my card samples had ornaments hanging in a window-like shape.  Monika put hers in a framed circle.  The other card of hers used a negative cut out of a circle to frame a penguin.  Then I watched this card making video from Gina K. Designs.  I have been drooling over the stamp in that video since I saw it in this earlier embossed card video from Gina K. Designs.  (It's in unbelievably fanciful!)

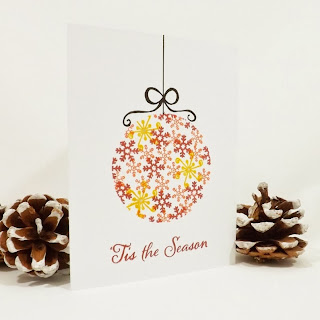
Well, somehow all these design elements came together and gave me a great idea!  I used a circle negative cut out and individual snowflake stamps to make my own stamped hanging snowflake ornaments!  Here's the first mask:
I followed this design and made two monochromatic versions: one blue and one red.  The red and white one I am submitting to the Kards for Kids drive as one of their colour challenges.  I'm going to send along the blue one too.


I just drew the ribbons on myself.


It was a tad difficult to squeeze them all on to the portrait card.  I prefer portrait oriented cards because I find they stand up better.  So, I decided to make one, big, bold ornament like the Gina K. Designs one:
https://www.etsy.com/ca/listing/170064867/hand-stamped-christmas-card?ref=shop_home_active
I am quite happy with how this Christmas card turned out!  I can imagine it in all colour pallets, even black and white could look nice.

Sometimes it's great to craft with others to get inspired in unexpected ways!

Sunday, November 17, 2013

Holiday Cards Workshop 2013

My Creative Crew and I just finished our 6x6 One Sheet Wonder (OSW) Holiday Card Workshop.  Most people followed my OSW very loosely, using them for inspiration instead of reproducing them in their entirety.  We ended up with quite a creative variety of Holiday cards and Christmas cards.  Some people finished all 6 cards and others only 3 or 4.  I asked each participant to choose their favourite card for show and tell.  (It was very hard to choose in some cases!)

So, I have seven cards to present!  Here they are in alphabetic order.  (Click any image to enlarge the view.)

Claire
Claire's "Winter Cheer" snowman card is quite cute and I think it was the first one she finished.  The felt snowman is adorable and mounted on a shimmery paper.

"Lady Hamilton"
Debbie's "Joy" card features the lovely little Christmas tree stamp that I picked up at the Michaels Craft Store not long ago.  She used a snowflake embossing folder (by Darice) in the background.  I think this card is very well balanced.
Lara
Lara was using cards from Studio G. that had a scalloped edge, so she had a little less room on the card front to work with.  No matter, this simple but graphically impressive reindeer card takes care of that!  I like the clever framing of the sentiment around the ribbon tail background.

Monika
One of two new additions to the Creative Crew, Monika put a lot of effort into the design of this Christmas ornament card.  She used die cutting, punching and heat embossing to make this card.  (Methinks I have a fellow tool junkie in the making!)  I think that keeping the colour scheme simple on this card combines perfectly with the intricate background paper.
Nicole
My other new addition to the Creative Crew for this workshop is Nicole.  She was the brave one to make her "happy Holidays" sentiment the focal part of the card.  It's something I've often thought about but have yet to accomplish!  The bling on this card brings out the shine in the metallic ink used on the sentiment.  It's important to bring that sentiment to the eye when it doubles as the focal and she did a great job of it.
Norma
Speaking of bling... Norma really blinged it up on this Penguin card!  She used a black and white paper and them framed her penguin on silver glitter paper.  The snowflakes on the patterned paper really burst when paired with the glitter frame and using red instead of white in the middle creates the Christmassy feel!

Terri-Lynn
I guess mother and daughter think alike!  Like her mother, Norma, Terri-Lynn's penguin card also uses glitter and reds to make her design pop.  Her "Merry Christmas" card is a stunning red and white classic.  I think the layers on this card definitely add to the interest.

There were so many great things about this workshop:
  • I got to introduce new people to my paper fanatics!
  • We raised $47 for the Southern Ontario Animal Rescue, which means I almost hit my annual fundraising goal.  (Missed it by only a hair.  Participants did donate extra personally too so, combined, the total Crew met the goal.)
  • I was inspired to make something new - more on that in a future post!
 There you have it: seven very different holiday cards all made from the same basic starting designs.  I hope these handmade cards inspire you to get in gear and start crafting your Christmas!

Sunday, November 10, 2013

Black & White Christmas Tree Card

Today, I am sharing another Christmas card I made for for the children at Toronto's Sick  Kids Hospital as part of the Smiley Team for Kards for Kids.

I had to go to the Michaels Craft Store to pick something up for a specific project.  Since when do I go to Michaels for something specific and not also look at EVERything else and pick up 3x the items I originally went for?  Yeah.

So, I picked up some cute holiday stamps by Studio G.  (I love that stand they have at Michaels - it always has SOMEthing good for $1.50!)  I got a swirly kind of tree and I used it to make some Christmas Gift Tags.  I liked how it looked so much I decided to use it on the next Kards for Kids challenge I've been meaning to tackle.  (Check out the full list of Holiday Card Challenges over at the Kards for Kids blog.)

The Black & White Challenge is from this inspirational photo. I kept with the black and white theme and thought my new tree would be perfect since there are also trees in the inspiration photo!

I didn't put a sentiment on this one so that it's not strictly the religious version of Christmas.  I tried something that's been on my technique bucket list for a while.  I followed a tutorial from Gina K. Designs for the pillow top stamped background.  The inner background is a stamp from Stampin' Up!  The tree is the stamp I got on the cheap at Michaels.  I stamped it right over the words in Versamark ink and then used black embossing powder.

I used a black card base from Michaels I picked up on a previous trip.  I didn't realize  I had grabbed a package without envelopes.  (That explains the great price! lol!)  Michaels' cards are not true standard sizes.  This one was 4.5 x 6.25 inches.  So, all I did was trim it down to 4.25 x 5.5 inches and then it will fit in any of my A2 envelopes.

I really liked how this designed turned out, so I tried it several different ways on some shaker cards.  (I'll post those at a later date.)  I hope you'll play along with the Kards for Kids Holiday Card Challenge!

Saturday, November 2, 2013

2013 Halloween Costumes

We had a costume contest and a pumpkin decorating contest at work on Halloween this year.  We had a decent number of people dress up.  I have two costumes that I alternate wearing when I give out candy: my demoness (favourite!) and my witch.  My witch hat doesn't fit, so I needed to get another.  I got one on sale today at Target for $0.90!!  It's a little too big but I can stuff something in the rim to make it sit better.  It's only plain, so we'll see if I feel like getting some felt and netting next year to dress it up.

The Most Creative Costume prize went to our IT person, Justin.  Take a look at his super creative, instantly recognizable character costume his wife helped him make:


It's BEAKER from the Muppet Show (if you are old enough to remember it).  It was a very well executed costume!  Here we are together:
Justin is already a tall guy so the mask made him very very tall.  Some smaller children were afraid to approach him (also not knowing who the character is).  Small children are sometimes afraid to approach with my wings and fangs too.

My husband doesn't give out candy - it's my job.  He did take our nephew out and around the neighbourhood though and he dressed up in his camouflage.  Our nephew was a red ninja this year.  Our nephews in a neighbouring city were a red army guy and a little lion, so I'm told.

Hope everyone had an enjoyable Halloween!  Now, on to Christmas!