Wednesday, December 11, 2019

Floating Element Aperture Card - Winter Birthday

I needed to make my mother-in-law a birthday card. I saw a tutorial by Mixed Up Craft. In her spinner version tutorial (that I linked), she links back to her floating element tutorial. I don't like square cards, so I made the 5 x 7 version but used the popped up sentiment bit from the spinner version.


It's basically a twist on a regular shadow box card. Instead of putting the aperture on a flat side of the box, you put it on the corner. That allows you to use acetate to "pop out" of the aperture and to have the sentiment to the same with a very clever "bridge" piece behind it.
You end up with this clever diamond shaped card that folds perfectly flat for mailing. Love it! I've already figured out the dimensions for an A2 version too.
I used my Nuvo Embellishment mousse on some cardstock and then cut the snowflakes out. I wanted to add just a touch of shine. The gifts are made from paper scraps. I love using my scraps to make gift boxes for cards. It works for birthdays and Christmas!


I think I will be making more of these! I think I will go ahead and figure out the dimensions for a landscape version of both sizes. The A7 will have to be constructed out of a front and back piece but the A2 can fit on a single piece of paper. To be honest, now that I think about it, I think a two piece construction might be simpler anyway, so it's easier to figure out what outside and inside areas need paper!

So many possibilities with this design!  I hope you are inspired too!

Sunday, December 8, 2019

Hugs Fox (Husky)

I wanted to make an uplifting card for my husband. I always check out fox stamps for the potential to turn them into our husky dog. It has to have the right nose markings.

This one comes from the Woodland Cuties set by Your Next Stamp.
I have a couple of mini leaf punches, so I punched out a pile of leaves to put her in. The tree is actually just a branch die, but it fit my card as a bare fall tree.

I coloured my husky with a selection of Copic Markers in toner greys. It was a hit and brought my husband a smile. I made a more girly version for my mother-in-law. It's the exact same layout but I varied the patterned paper and the mat colour for a more feminine touch.


Sunday, November 17, 2019

Stash Busting - using scrap paper strips and a card sketch

The papers in the rubber stamping and scrapbooking scene are so pretty. Sometimes, it's hard to part with even the scraps! In the beginning, I had so few supplies, I always salvaged all the scraps I could. Today is a different story, but I still have that mindset of needing to hoard my scraps.

I find card sketches are a great way to use up scraps! On these cards, I used Little Tangles Sketch #72 by Neat and Tangled.


I made this one for my husband's birthday. He was born on Halloween, so the monster theme works. This monster stamp set is by C.C. Designs. I added a balloon die cut from a Stampin' Up! punch. I used my fancy gold mirror card for the oval on this one.

I love that stuff! That's the kind of thing I would hoard, so I've been making a conscious effort to use what I love. What good does it do if it just sits in my stash? (Other than make me happy when I open my drawers and see it - but the point to cardmaking is to make other people happy too!)

I made two other cards with this sketch too.
I used a Spellbinder's oval die on this holiday card. (I think I know who will get this one!) I have tonnes of Christmas paper scraps. I think I could make my entire holiday card list out of scraps alone! Again, I used some precious specialty cardstock, this time in a satin finish rose gold. I also used a very lovely, thick gold metallic cardstock as the mat. I like that stuff so much, I cut the centre out of it with a stitched rectangle to keep. I cut a second stitched rectangle out of white cardstock to fill the void so that my striped piece wouldn't sink.

The stamp is a retired image by Your Next Stamp. (Luckily, the still have the same bunny available, just holding a heart instead of a gift.)

On the last card, I used non-shedding glitter paper. (I somehow acquired so much glitter paper, it doesn't all fit in my drawer, which means I'm over the limit!)
This bear stamp is a retired one from Kraftin' Kimmie stamps. I coloured it with my Copic markers on Bazzill Kraft cardstock. (In fact, all three cards were coloured with my Copic markers). If you use a base colour that is close to your lightest Copic shade, then I find there's less work in getting a good blend because the base colour will hide those imperfections. It's a good tip when colouring die-cuts to add depth. (OR, you could just make all your die cuts white all the time to save on cardstock and colour them all yourself.) I think using a coloured base adds something different - makes it a smidgeon more visually interesting.


And while I'm proud of using up some scraps, these three cards hardly made a dent! I've been making cards with sketches for quite a stretch now, trying very consciously to use up scraps. I'm making progress (but it's not nearly as fast as I accumulate new stuff. Shhh! Don't tell!)

Tuesday, August 13, 2019

Fetching the Christmas Tree

Here's another Magic Picture Changer card I made using the Lawn Fawn Die. I'm putting this one into the Interactive Card challenge for Lawn Fawn too. For this one, I used Lawn Fawn's row of houses snow-capped from the Simply Celebrate Winter stamp set.
I don't have a Lawn Fawn car, but I have one from Hot Off the Press. So, that's what I used to put in front of the houses. I coloured everything with my Copic Markers and I used my newest holiday die-cut sentiment.
I set the card on glitter snowflake cardstock and used a gorgeous red glitter cardstock for the sentiment. I got the snowflake glitter in a paper pad from Michael's one year (on sale after Christmas) and the red cardstock was from Dollarama. I really like the contrast between the snowflake paper (especially the navy stamping I did) and the red sentiment.
Now, the Magic Picture Changer die is a little pricey. So I did not buy the add-on die that creates a nice front panel with a window for the mechanism piece. (I'm glad Lawn Fawn separated those pieces to help keep the main die cost down.)

I have a set of stitched rectangles from Your Next Stamp. So, I used the one that matched the width of the Magic Picture Changer, but it's a bit longer. My panel is the piece with the navy blue snowflakes. I stamped white cardstock with a background snowflake stamp to make that piece. I cut a window in it with a 2 inch square die. Then I used the frame from the main Magic Picture Change die set to cover the window. That inside space is about 1.75 inches.

I really like my homemade cover panel. The extra length makes it fit with an even border on the front of the card base.

This picture changer is next level! I love having an interactive surprise waiting for the recipient. I have seen tutorials on how to do it with an Xacto knife, but my blade skills are not nearly good enough do that! Especially after colouring up the images, you want something that is sure to cut perfectly! I definitely would not ever attempt a card like this without the Lawn Fawn die!

Saturday, August 10, 2019

Birthday Presents for you!

Lawn Fawn is having an interactive card challenge (Challenge #58)! I recently bought the Magic Picture Changer Die and made a few cards from it. This one is a birthday card that is going to my nephew. The raccoon is from a Your Next Stamp woodland set. The row of gifts is from Lawn Fawn.


I coloured each image at the same time (i.e. the raccoon's head on both the before and after picture, then the raccoon's body, then his tail, etc.) to try to make them look as similar as possible. I used my Copic cool greys on this critter. I tried to leave the area around his eyes and snout as light as possible, based on looking at some raccoon faces online. They do have a white rim there above the eye mask.
I used a medley of sentiments: A Recollections die for the "happy", a Frantic Stamper stamp for the "birthday", and a Hello Bluebird stamp for the "for you". I drew the grassy hill in myself. I wish I had used pencil crayon for the blades of grass. I would have gotten finer flicks. Oh well! You can't see the grass on the "after" picture anyway with all those gifts in front!


It was a bit finicky to work with this die. I have some suggestions of how to make this die better:

  1. Make the pull tab longer with a crease fold so you can fold it over in two to strengthen it. I had to cut two (the second one slightly longer to tuck in past the slit opening) to reinforce it.
  2. Make the "tracks" wider. It's hard to fold 1/8th strips and you need ultra precision with your tape or glue. I would have made them at least 1/4 inch. OR, make them cut out with a die as separate strips to adhere as tracks instead of folding them over. I have a 1/8th strip cutter die from Accucut Craft and I did use that on one of them. I had done something wrong on the folded bits and tore them back up but then they were mangled. So, I cut new strips with my strip cutter and adhered them down. That was easy.
I would also like to see a bigger one. The changer window area is quite small. Based on the success of this die, I wouldn't be surprised to see it get a big sister in the future!

Thursday, August 8, 2019

Dragon's Birthday Gift

Here's another challenge card. This one is for the Kraftin' Kimmie Stamps Challenge #492: Green. I will be going to my first Kraftin' Kimmie stamping/scrapbooking retreat this year. I have a few Kraftin' Kimmie sets and one is these Darling Dragons. Dragons + Green works perfectly for this challenge entry!

I used Paper Craft Crew Card Sketch # 325 for this card. I added a little gift from the dragon using a stamp in a Hello Bluebird set of stamps that I have.
(Click photo for larger view.)

I used a scrap strip of patterned paper. The sketch called for a bigger piece at the bottom but my strip was narrower. I chose to place it higher and border it with two 1/8th strips of metallic black cardstock. I used my 1/8th strip cutting die from Accucut Craft to make the strips perfect.

I coloured this dragon with Copic markers and also added the iridescent medium to its spine and tummy. I used a Sakura sparkly pink gel pen on the gift's ribbon.
(Click photo for larger view.)

I masked the gift first and then stamped the dragon after so that the gift would be in front. I heat-embossed the sentiment in white on the dark navy paper. The paper scrap has glitter in it as well, but I didn't get it in the photo. A tiny scrap of silver glitter paper finished the card off.

Monday, August 5, 2019

Shimmer Dragon

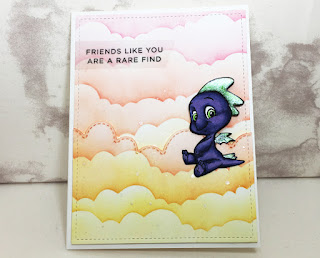
It's been a long time since I have participated in any card challenges. I saw the current CASology challenge #348: Shimmer and knew I had lots of stamps I could make shimmery! I like the CASology challenges because clean and simple is my style. I like to minimize bulk so that my cards are more mail-able. I am too late to actually join the challenge, but it's fun to play along nonetheless!

I have fairies, unicorns, and dragons that I can add shimmer to. I chose the very cute C.C. Designs Rubber Stamps dragons for this card. I've seen many rainbow ink-blended cloud backgrounds and I decided it was time to try one myself! I used my homemade cloud stencil and 3 colours of dye inks. I coloured the dragon with my Copic markers.


For shimmer, I used an iridescent medium by Liquitex that is designed to be mixed with acrylic paint. I applied it with a paint brush to the dragon's spines and wings. I tilted the card in this picture so you could see the shimmer. I also splattered some among the clouds. It comes in a large bottle and you can get it at Michaels with a coupon. When my Wink of Stella pen runs out, I think I'm going to put this stuff in it! It has the same effect. The only differences to me are that 1) it doesn't come in a waterbrush, 2) it has more of a white or silver shine, 3) it's cheaper by volume.


The bottom section of cloud is a panel I used a cloud border die on and then popped up on foam tape. The sentiment is from a Hello Bluebird stamp set with a Yeti. I stamped it on vellum and and ran it through my Xyron 1.5 inch sticker maker to adhere it.

It was nice to be inspired by a challenge to make this card. I think it turned out pretty cute!

Saturday, July 13, 2019

Christmas in July Shaker Cards

I try to sneak at least one Christmas card into my workshops each time. Those are by far the biggest batch of handmade cards I send in a year. So, for our July shaker card class, I made sure one was Christmas.

Another could be Christmas but it could work for a winter birthday too. The summery card is a "just because" kind of card.

I was inspired to make shaped shaker kits like the ones from Queen & Co. If you've got a Xyron sticker maker and some nesting dies, you're good go. Else, you can buy the whole kit and kaboodle from Queen & Co.

I really liked Queen & Co.'s All Bundled Up kit. I love the chubby little penguin in it. But it also has this cute winter hat, or tuque we would call it here in Canada. I like watching CardsandCoffeeTime's youtube videos. She's on the Queen & Co. design team and I really liked her version of the hat card (<--- click="" her="" p="" post="" see="" to="">
I don't have the kit or dies, but I have a half circle by Frantic stamper. So I used that and made my own shaker hat!
This shaker is filled with seed beads from Dollarama or Dollar Tree.

For card number two, I've been a fan of collage front cards for a long time, but never wanted to invest in the cost of the dies. I finally bought a couple when I found a good sale on Accucut Craft's website. I got the dies for only a little more than the wafer thin, chemically etched dies, but these are steel rule. So, I can cut chipboard and thin wood and other materials if I wanted to collage a home decor piece or something.

These are colour blocking dies, but they are also called collage dies or cover panels. I bought one in A2 (4.25 x 5.5 inches) and one in A6 (4.75 x 6.25 inches) as I make my cards those two sizes almost exclusively. Here's the A6:
I *love* how this card turned out. I used glitter cardstock from Dollarama or Dollar tree. It's thin, but pretty and doesn't shed. I used a handful of paper scraps for the backdrops and then a mix of beads and sequins inside. This type of collage card is *excellent* to use up small scraps! I coloured the bunny with my Copic markers.

Here's the A2 card. I just had to use these penguins from Hello Bluebird. (I love the storybook style of drawings for Hello Bluebird's stamps!) This one is not a shaker. I wanted to see how well it looked just flat instead of a shaker. Isn't it cute? Mommy and Daddy penguin are by the mistletoe while the kids have a snowball fight.


Back to the shaker cards! Our last shaker card for the workshop was a springtime Yeti (a.k.a. abominable snowman, a.k.a. sasquatch). I could have coloured him brown like a sasquatch but I didn't.

He is also a Hello Bluebird stamp, along with the sentiment. I wanted to show my creative crew how, if you use vellum instead of acetate for the shaker window, you can tone down what's behind it. Here, we stamped on the vellum, but you could stamp on a strip of paper and lay it across the vellum. (If you stamp on vellum, you must use Stazon or other archival/permanent ink because vellum is non-porous.) Because the vellum tones down the shaker filler, we used all sequins in this shaker. There's a mix of 5 warm coloured sequins in there.

We used my homemade cloud stencil and some Dollarama make-up brushes to create the sky. The round balloons are from a Stampin' Up! punch that I have and the heart shaped one is from a Marianne Design die set. Again, I used Copic markers to colour the Yeti and the bluebird.

The crew enjoyed this workshop. Having the shakers as a whole kit really made them go faster for the participants. Hooray for Queen & Co. for doing the heavy lifting and offering simplicity to their shoppers which inspired me to do the same for my creative crew.

Sunday, June 16, 2019

Give a Poem a Home - Father's Day 2019

Hi Crafty Internet!
Happy Father's Day to all the dad's, grand-dad's and guardians out there. For my dad this year, I made an interactive handmade card. I've seen these referred to as flip it cards and also as Swing Cards, but there are other kinds of swing cards out there now.

The interactive part comes from a shape cut in the front. You fold the card front one way and the shape the opposite way so that, when you open the card, the shape rights itself into a flat sheet of paper, revealing the back side of the shape.


So, on the front, my card says "You're out of this world." On the back, it says: "Happy Father's Day."

Most swing cards do not have the extra flap. But I didn't like the idea of squishing my sentiment behind just 1 half of the shape. So, I put a flap on mine so I could fit a larger sentiment. I used Lawn Fawn's "Open Me" stamp on it so that my dad will know it's a tri-fold card.


The inside reads:
With lots of love
And happy thoughts
We hope you know
We love you lots!

Have a very
Happy Father's Day!
We hope good things
Will come your way!

I made the galaxy background on the outside and framed it in my hexagon nesting dies from Marianne Design. (Purchased from Ecstasy Crafts online store.) If you would like to see, I made a video of my galaxy background process on YouTube. I didn't have a big enough Father's Day sentiment stamp, so I dug out my old Quickutz Empire font dies to make this one. I used a star embossing folder instead of patterned paper on the outside. The rocket is a die cut that I cut from some self-adhesive silver metal sheets (also from my very old Quickutz stash.)

I worked out the dimensions for 4 of these flip it cards:
  • A6 (4.75 x 6.25 inches) in portrait and in landscape (portrait one shown here)
  • A2 (4.25 x 5.5 inches) in portrait and in landscape
Actually, I discovered the pattern for making these so that you can make this kind of card in any size. All you really need to know is the starting point and that number is one half the width of your card front.

I had an urge to make a girly version of this design, so I made a birthday card.


I used no patterned paper again. I use more of my galaxy piece and I stamped the pattern. I didn't have the right pink colour for cardstock, so I made it by inking white cardstock with pink ink and added some iridescent acrylic medium to make it sparkly.

I also made the sentiment area so that you can slide the sentiment in or out in case you mess up and need to turn it over or cut a new piece and start again.


These little critters are stamps from Hello Bluebird that I coloured with my Copic Markers. I think they are sweet.

Have you made Flip It cards before? What's your favourite kind of interactive cards?

Wednesday, April 24, 2019

DIY Notepads from Paper Scraps

Got scraps? Make memo pads! I made almost 30 DIY notepads for administrative professional's day. I used plain copy paper cut to size, tissue boxes for covers, and paper scraps for embellishments.

I have a video walkthrough of all the ones I made (minus 2 smaller ones that in had to pop in the mail before filming).

I got the copy paper free and, for my favourite 2 sizes, 10-12 sheets makes 3 pads of 20-24 pages. The pads themselves are very easy to make with loads of video tutorials readily available. Since I am klutzy with a glue gun, I used the slower, Elmer's glue method. I have no idea if these pads will hold up to having sheets torn out or will split into pieces part way through. Only one way to find out - USE them!

What I like about them is that, for cardmakers, when your pad is all done, you can trim the front covers to a smaller rectangle and use it as an embellishment on a card!

I tried to keep all the sentiments positive and happy thoughts.

I even did a little DIY on some embellishments. I made these faux enamel dots with cardstock, gold nail polish, glossy accents (glue) and good ol' scissors.
(Click picture for larger view.)

Want to see them all? Click the picture below to go to my YouTube channel to see them!


Sunday, April 21, 2019

Happy Easter!

I went to the Lindt factory outlet in my part of the city. I love that they carry some Ghiradelli chocolates. I bought some squares and some bars for co-workers as Easter treats. Well, I had to dress them up!

I recently purchased a Marianne Design bunny die set. I don't normally go for bunnies but there's A LOT of versatility in this set.

I put them in the mug because I think that is sweetest. They have the little arched eyes and I knew I could use those on my fox die from Marianne Design too that I use for die cuts that look like our husky. (I just noticed now that I did one set of eyes arched up and one arched down! Oh well, both look okay to me!)

The wrapping paper is just from a kraft roll from Michaels. I stamped all over it with a Stampin' Up! flower set. (It wasn't hard but it took a while to cover the whole paper.) I used a Your Next Stamp tag topper die. It cuts the shape at the top but has no bottom so you can make the tag as long as you want.

Behind the bunnies, I just used a wash of colour. The pink bunny is from a Tombow watercolour marker.
I even made the "enamel dot" heart! I used some acrylic paint and then blobbed some Glossy Accents dimensional glue over it in a heart shape (two tear drops joined together). I let it dry and then cut it out by hand. I think it turned out very well! I love that it's semi-flat - good for mailing. (And it's sparkly because the paint was sparkly.)

I did the same techniques on the blue one.
You can see the dimension of the homemade enamel dots better in the second picture. For this one, I used dollar store nail polish on black cardstock underneath the dimensional glue.

I made a little basket for the squares out of my french fry box die. You basically cut two backs of the die and stick them together and then make little handles. (Sorry, didn't get a picture of that one. It was getting pretty late at night!)

I think they turned out cute and I'm very proud of my dots. They are not perfect circles like manufactured dots, but when they are scattered on a card and given to non-crafters - I'm sure no one will examine them closely enough to notice.

P.S. this project used only scraps! Love it!

Wednesday, March 27, 2019

Copic Colouring - Cute Dragons

Well, I finally did it. I've been mulling over Sandy Allnock's Copic Colouring class series for a couple of years. I really want to take the scenery mini classes but I thought it best to take the Copic Jumpstart class first.

I did take an in-person class in September 2018 with two instructors from the U.S. at a scrapbook store. They gave us the set of makers we needed to use for class. I learned a bit, reinforced some existing knowledge, and attempted to understand light and shadow but it still evades me. I understand the shadows from the main light source. It's where the light would bounce back and hit other areas kinda behind or at the edges of the light source that I always get wrong. And, for some reason, I struggle with cast shadows. Mine always look utterly unnatural.

Anyway, the Jumpstart class lets you use what *you* have. Since the in-person class provided all the markers you needed, it made it seem easy. Sandy's class encourages you to use what you have and find combinations that work. I am not a big experimenter, myself, so I've spent a number of years amassing the markers (or alternates) needed for the class so that I would not have to spend time figuring out something that works before being able to do the lessons. I've also noted down combos I've found in videos over time and, with Sandy's class, I now have a nice and neat way to catalogue them! (More on that later.)

Here's my first stamp image colouring from Lesson #2: Blending. (Click picture for larger image.)

I love these dragons by C.C. Designs Rubber Stamps. I only coloured the bodies at this point. When I finish the rest of them, I think will use them on some cards or notepads or something. I stuck to a blending group for this one. However, now that I have Sandy's catalogue system, I've found a different dragon-green combo I'll probably use going forward.

She gives a blending practice chart. I've put the combos I like on it - most are from class using the alternates that I have, and some from the internet. Then, I cut them apart and put them on a binder ring. That way, it doesn't matter what order I colour them in on the page. Plus, if I do any I don't like, I don't have to worry about "the ugly one" that ruins my page. By cutting them out, you get the added bonus of not having to worry about colouring outside the lines! I can put all the like colours next to each other and hold them to my project to see which one I want to use. It's the same idea as having ink swatches. I now have blending group swatches to catalogue my blends!


For example, the teals are my favourites (the blue-green family). BG72 was one of the first markers I ever bought. I bought it to do softened, winter rooftops on a village stamp I got. Back then, I had no idea about the blending families or even how Copics blend at all. I bought them because they were streakless markers. After this exercise, my BG72 is pretty much all dried out but at least I know what to blend it with now (once I buy a refill for it).

First, I stayed all in the BG family. Then, I tried Sandy's idea of a violet shadow. Rather than an RV, I used my BV04. The shadow has a purplish tinge, but it's okay. So, to get rid of the purplish tinge, I tried a C5 and a C7. I liked the C7 better, so that's what's on the swatch. You can see that the other two give much better contrast in the shadows than the blending family does.

(You can see the back of Sandy's brighter teal combo that uses an RV in the shadow area. Even the backside is pretty!)

I'm on to the light and shadow lesson next. It's not my first try at learning it. We'll see if this style of class helps it sink in!

Sunday, March 24, 2019

Interactive Pull Tab Cards Workshop

Hi Creative Community! I just hosted an interactive card class. We made pull tab cards. I combined things I saw in different videos to make the mechanism that we used. I'll link the best video I saw at the end of this post.

Here are the samples that I made:
(Click any photos for larger views.)

The little reindeer was my favourite. I got that idea from Jennifer McGuire who did it as a double slider card reveal. (Click link to see her video.) The reindeer is completely hidden behind the wreath and pops up when you pull the tab. The wreath and sentiment are from a Stampin' Up! set and the reindeer is from Hello Bluebird ("Yeti or Not" stamp set).

Here are Claire's cards:


I made the coffee mug with the tall dome shaker globe die from Your Next Stamp. I made the handle from a new die set I got by Marianne Design, but you could make it yourself with nested heart dies or punches. The steam and sentiment are also from the "Thanks a Latte" stamp set by Your Next Stamp. The background script is from a background stamp by Gina K. Designs. Then the pull tab is all the way down, the heart-shaped steam is hidden inside the cup. I noticed my steam seems damaged. The hearts don't stamp all the way around like they show on the packaging. It's okay though. Since it's steam, I'm fine with my hearts being incomplete.

Here are Debbie's Cards:


The cloud card was made with one of my new die sets: "Finishing Touches: Stitched Hills and Clouds" by Creative Expressions. It has 3 hills and 2 clouds in the set which are just shy of 6 inches long. That will create a great variety of hills and clouds for the two card sizes I use most often. In the middle, we used a home-made stencil and some Salty Ocean Distress Oxide ink to make the clouds in the background.

Here are Norma's cards:


The balloon basket, critter and sentiments are all from one stamp set by Your Next Stamp called, "Basket Animals", which I believe is retired now. It's not shown in the photos, but when you pull the tab out from the side of the card, the balloon moves sideways across the card front and we stamped a "Happy Birthday" message on the pull tab stick.

Here are Terri-Lynn's cards:

These cards were a hit but they were very time consuming to make, despite me having done almost all of the design ahead of time. Learning how to make the pull tab mechanism was the true focus of the class. I love playing with the result, but I would not mass produce this type of card. These are definitely special deliveries!

If DIY is not for you, many companies make pull tab slider dies (and other kinds of sliders). Two that pop into my head are C.C. Designs Rubber Stamps and Lawn Fawn. If you do want to give the DIY version a go, I really liked this Interactive Bunny Card Tutorial video by Laura Dovalo.

Tuesday, February 26, 2019

Monster Card for Guys

After I made the last mixed media card, I was afraid it was too much. My style is clean and simple, so this mixed media exploration is quite outside my comfort zone. The idea of artistic freedom - that there's no wrong way for mixed media to turn out - is freeing, but not the way I tend to work.

So, I decided to make another monster mixed media birthday card for another February birthday boy and, this time, tone it down quite a bit.

This monster is from the same C.C. Designs Monster stamp set that I used on the last card. I did more ink smooshing and more stenciling on Strathmore Bristol Smooth paper. I really wanted silver circuitry, so I used my silver Nuvo drops this time to stencil. The product is a little thin to stencil with. It leaked under my stencil which made smudged designs and it dried and tore the paper when I removed the stencil. (In this case, it's okay. It added to the texture of the mixed media piece.)

I used some half-backed pearls that I made with hot glue and green glitter nail polish (coated with floor polish for a permanent, shiny finish). I also used a couple snippets of ribbon. I rarely use ribbon, but I have lots of it. So, I was pleased how well the colours in this ribbon matched the piece and it really did add a nice smooth, shiny texture.

I die cut the sentiment from a larger hexagon and die cut some smaller ones to put behind the stamped image that is popped up on foam tape.

I coloured the monster with  my alcohol markers. I have a poor selection of greens, so I used a mix of Copic Markers and Spectrum Noirs. (I have since purchased some more Copic greens!)

I haven't made a handmade birthday card for this birthday boy before. I tend not to for guys because I have 3 nephews so I run out of ideas for guy cards quickly. Thus, my poor brothers-in-law tend to get neglected in the birthday card department. I make for my nephews, my husband and my dad. By then, I'm out of ideas! But, it was time he got a handmade card from me.