Showing posts with label tips and tutorials. Show all posts

Sunday, December 26, 2021

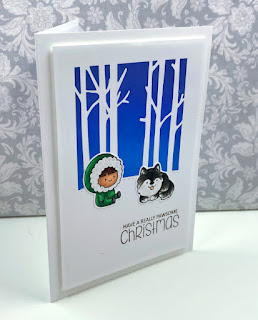
Husky Christmas Card

 Our doggy had a big budget this year! I made a card for my husband to go with the gift our doggy bought him. The gift had to do with walking together in the winter, so I made a nice little winter scene.


Now, I don't ink blend often, but I do admire it! So, I decided to try it out. I bought this Clearly Besotted Holiday Huskies stamp set last year but didn't end up using it. I based my card off of a sample in another Clearly Besotted stamp set called Prancing Plushies. (Click the link to see their samples. Their plushie sets are adorable!)

I started out by cutting my tree masks. I used Avery Repositionable Labels from Staples (Business Depot). I bought a pack of it as 8.5 x 11 full sheets. This stuff is great! I used birch tree dies from Joy Crafts and a stitched hill from Creative Expressions.

Then I used mint tape from Scrapbook.com to mask a half-inch border on my card front. (Mint tape is like Post-It tape.) I used my glass mat grid lines and a ruler to help me get it straight. When the masking was done, it looked like this:

I used 3 colours of Distress Oxides to blend the sky (Salty Ocean, Blueprint Sketch, Chipped Sapphire). I bought these three colours years ago specifically for sky blending. This might be the 3rd time I've used them. (As I said, I'm not big on blending!) I used my make-up brush tool to blend. It look a long time to get a solid blend. In retrospect, I wish I had tried a foam dauber. It would put down ink faster, I think.

Here's what it looked like when the blending was done:


And then.... the big reveal!

From the Holiday Huskies stamp set, I chose two images and coloured them with my Copic Markers.

I had to colour the husky to look like our dog, Shadow! I cut out the images with scissors and then added a sentiment from the same stamp set to finish off the card.

Hubby liked it!


Do you make cards from your pets?


Saturday, August 8, 2020

My Experiments using Hockey Tape in Scrapbook Mini Albums

Hello world! Sorry that I've been MIA from the blog! I am fortunate enough to be able to work full time during the world-wide pandemic, so I haven't found myself with a bunch of free time. But that doesn't mean I haven't been crafting! I have tried to use up supplies and work on projects that I always meant to do but never got around to.

One of those projects I've been working on for several years now is perfecting the mini-album build. Hinges have been the last sticking point: both for the pages and for the album cover. In the last few months I have solved both! I have a walkthrough video of these (scroll to the end), but here are some pictures too.

I found a way to stitch-bind ribbon hinges. I tried a few ways that were not quite perfect but I have tweaked it and now I am happy. For the covers, I found the ribbon too thin. I really liked the versatility of duct-tape for album cover hinges but, after trying it once, I decided against it. It was not quite right.

I've seen people using a "black construction tape" which looks good but you can tear it with your fingers - like masking tape or painter's tape. That seriously worries me. So, I went looking for a cloth tape and, being in Canada, the first thing that popped up was hockey tape!

EDIT: I thought I was the first to think of this supply for paper crafting, but Following The Paper Trail on YouTube used it in Feb 2019. Her video is here: https://youtu.be/f4tMFVxapD4 .

Three of these albums use hockey tape for the spine hinges. I wrapped the outer spine on all but one (the blue one). So, the blue one shows the hockey tape all around the edges. The album on the left is included because of how I've used hockey tape on the inside.

First, let's take a closer look at the hockey tape on the outside covers. (Keep in mind, only one album is actually finished, so you're looking different stages of progress here.)

The blue one shows fully exposed hockey tape hinges. You can see the seams, but if I had made the cover paper a little bigger, you wouldn't notice as much. The flexibility of this cover is amazing!

The black looks particularly good, in my opinion. I wrapped the outer spine of this album with thin paper, but I did not wrap the inside. That hides the hockey tape seams on the outside, but doesn't make the cover too stiff with paper.

I did the same on the red one, but this one I rubbed gold Nuvo Embellishment Mousse on with my finger to give an aged distressed look. The hockey tape takes mediums very well!

Hockey tape comes in "white" too, but it's not a pure "white". I show you in the video. I'm not going to use the white. If I want white covers, I will use kraft-tex. I also show you in the video that I think my new favourite combination is kraft-tex for the covers and hockey tape only on the pages. But the hockey tape on the album cover hinges is far more flexible than the kraft-tex and far more affordable. So, once my stash of black kraft-tex runs out, I use the hockey tape and only buy the kraft-tex in white. (I show you a kraft-tex one in the video.)

Here's how the inside spines look. All three have the hockey tape exposed on the inside. I think it looks just fine!

As you can see, I also used hockey tape on the insides to edge the pages! Since these are proto-type experiments, I needed them to be quick and use materials I have a lot of. Well, I have A LOT of business envelopes. But, envelopes are not very durable, so I used the hockey tape to reinforce them and it looks great, feels great on the fingers, and makes the pages match the cover! Triple win!

On one album (on the left), I painted the hockey tape with a red acrylic, metallic paint. It makes the page feel a little rough - exactly like painted canvas. Once mostly covered by the decorated pages though, I'm not worried about it.

Here's a close up of the flexibility of these spines. I can turn the book right inside out! Because the black one has paper on the outside, it's a little bit stiffer trying to turn it inside out. However, all of these albums stay shut very well when standing up - i.e. no alligator mouth!!

I'm so happy I found this medium! Hockey tape is hard to tear and pretty cheap! It comes in a small range of colours - but that doesn't matter if you can paint it! I forgot to say in the video, it comes in two widths too but I found the narrower one was enough.

CLICK to watch the VIDEO of these prototypes!

Sunday, March 24, 2019

Interactive Pull Tab Cards Workshop

Hi Creative Community! I just hosted an interactive card class. We made pull tab cards. I combined things I saw in different videos to make the mechanism that we used. I'll link the best video I saw at the end of this post.

Here are the samples that I made:
(Click any photos for larger views.)

The little reindeer was my favourite. I got that idea from Jennifer McGuire who did it as a double slider card reveal. (Click link to see her video.) The reindeer is completely hidden behind the wreath and pops up when you pull the tab. The wreath and sentiment are from a Stampin' Up! set and the reindeer is from Hello Bluebird ("Yeti or Not" stamp set).

Here are Claire's cards:


I made the coffee mug with the tall dome shaker globe die from Your Next Stamp. I made the handle from a new die set I got by Marianne Design, but you could make it yourself with nested heart dies or punches. The steam and sentiment are also from the "Thanks a Latte" stamp set by Your Next Stamp. The background script is from a background stamp by Gina K. Designs. Then the pull tab is all the way down, the heart-shaped steam is hidden inside the cup. I noticed my steam seems damaged. The hearts don't stamp all the way around like they show on the packaging. It's okay though. Since it's steam, I'm fine with my hearts being incomplete.

Here are Debbie's Cards:


The cloud card was made with one of my new die sets: "Finishing Touches: Stitched Hills and Clouds" by Creative Expressions. It has 3 hills and 2 clouds in the set which are just shy of 6 inches long. That will create a great variety of hills and clouds for the two card sizes I use most often. In the middle, we used a home-made stencil and some Salty Ocean Distress Oxide ink to make the clouds in the background.

Here are Norma's cards:


The balloon basket, critter and sentiments are all from one stamp set by Your Next Stamp called, "Basket Animals", which I believe is retired now. It's not shown in the photos, but when you pull the tab out from the side of the card, the balloon moves sideways across the card front and we stamped a "Happy Birthday" message on the pull tab stick.

Here are Terri-Lynn's cards:

These cards were a hit but they were very time consuming to make, despite me having done almost all of the design ahead of time. Learning how to make the pull tab mechanism was the true focus of the class. I love playing with the result, but I would not mass produce this type of card. These are definitely special deliveries!

If DIY is not for you, many companies make pull tab slider dies (and other kinds of sliders). Two that pop into my head are C.C. Designs Rubber Stamps and Lawn Fawn. If you do want to give the DIY version a go, I really liked this Interactive Bunny Card Tutorial video by Laura Dovalo.

Wednesday, July 25, 2018

Alcohol Ink Galaxy with Nuvo Embellishment Mousse

Here's the last video in my series of experiments with Nuvo Embellishment Mousse to create galaxy backgrounds. This is my favourite! I was thinking about how much I liked the splotchy-ness of the ink-smooshed galaxies I've seen others make with watercolours. Plus, the black ash Nuvo Mousse is actually a grey. I really wanted try a galaxy with a true black top coat.

However, when you use a water-based ink or paint beneath and a black water-based ink or paint above, it can re-activate the bottom layer and you get mud. Nuvo Mousse works on porous surfaces, but dries permanent. However, it makes the surface non-porous, so you can't put water-based inks or paints on top. There's the aha moment! Alcohol inks will work on non-porous surfaces. So, I decided to put black alcohol ink on top!

This is how it turned out. It looks so neat! The alcohol ink leaves a shiny finish, especially where it is thicker. It looks like the paper is still wet but it's not. In person, it looks almost like a photograph because of the glossy finish.

I haven't made any cards with this piece yet because I don't want to cut it up! I did buy a great rocket die in a set so that I could make things with my experimental galaxies. Perhaps, this piece will find it's way to the front of a card sometime.

Click through to my video on YouTube to see my process for making this background.

(I did try one other technique that I did not film: spritzing black ash mousse through a mini-mister. this created a soft but even cover of the grey mousse on the top layer. I prefer to see splotches of colour coming through more vibrantly in my galaxies.)

Tuesday, October 31, 2017

Nuvo Embellishment Mousse Galaxy with Baby Wipes

Here's a link to the next video where I made the background for the moon card I posted earlier. I used baby wipes (and then my finger too). The mousse is water-based when wet but permanent when dry. So, the moisture in the baby wipe makes the mousse spread very easily.

Watch the galaxy mousse video on my Vimeo channel to see how it works!

Monday, September 25, 2017

Making a Galaxy with my Fingers - video

I recently acquired some pots of Nuvo Embellishment Mousse. I wanted them to make a shiny galaxy. My issue with using ink pads is that the ink will run when they get wet. Yes, some inks, like distress inks and distress oxide inks, have a really neat effect when activated with water, but they are never made permanent. (I suppose you could use a sealant afterward.)

Nuvo Embellishment Mousse is permanent once dry. It will never run and blur if it gets wet. So, I really wanted to try them out. Also, they are opaque and can layer over each other, so its harder to "make mud" out of the colours.

I experimented many different ways and filmed them to share. Here's the first: Making a galaxy using my fingers as the applicator.

To show you something what it looks like, from a different experiment (mousse and baby wipes) I made this card.
The mousse cleans off my fingers easily with a baby wipe (or water and a cloth) when wet. Your finger gives a strong colour, but I found the mousse dried really quickly, so I had trouble spreading it nicely. (Luckily, that matters less when making a galaxy since most of it gets covered up at the end.)
One thing I like about the black is that it's not a solid black. It's more like a very dark, smokey grey. (It's called black ash, so that makes sense!) If you spread it thin or water it down a bit, it allows the colours below to shine through.

I made this card with a Tonic Studios moon die. I plan to give it to my sister-in-law for her son. They often say this phrase to each other. I found the "I love you" and the "To the moon & back" stamps as separate stamps in the same sale bin at Michaels craft store. I knew I had to buy them as a set, specifically to make something like this for my sister-in-law.
I also tried a (yet another) new way of splattering the stars onto the galaxy. I have finally found a way I like - minimal mess, maximum effect, acceptable control. I saw other crafters doing it this way so I tried it and am so happy!

Use this link to go to my Vimeo channel to see how I made this galaxy background and my new favourite way to splatter stars/snow!

Stay tuned for future galaxy background experiments and other ways of using the mousses!

Thursday, September 7, 2017

Photo Sizing for Mini Albums

Ever wonder what size is best for a mini? Some mini albums are really mini (even pocket mini), but some mini albums are not very mini. I think the expression of "mini album" originally meant anything smaller than a 12 x 12 inch album (or perhaps an 8.5 x 11-\ inch album). Lots of brands carry 6 x 6 inch and 8 x 8 inch albums.

Then, Project Life took hold and pocket scrapbooking became popular. 4 x 3 photos are all the rage because of it. Then Instax took off and now there are super mini albums.

Me, I like to work with the standard photo size that the average Joe would get from a photo printing place: 4 x 6. If I have a really nice picture, I might get it in a 5 x 7. So, those are my two basic sizes. From there, you can cut them in half or in quarters.

I show in this video what those sizes look like on an 8.5 x 11 inch piece of paper. Many of us have home photo printers, so we can collage several photos in different sizes and print them together on one piece of 8.5 x 11 inch photo paper. My printer also allows me to put 4 x 6 inch paper or 5 x 7 inch paper in it too.

I also cover how to protect your photos in mini albums. One of the biggest deterrents to making mini albums (other than pocket page albums) is the lack of a photo sleeve to protect your pages. Well, I have a solution that will protect the most important part of your page: the photo. They are called Crystal Clear Photo Mounts and they are sold online by Clearbags.ca. (I am not affiliated with them. I just really like their stuff.)

Head on over to my PHOTO SIZES video on my Vimeo Channel to get the full scoop!

Wednesday, February 15, 2017

Speed Coloured Reindeer in Alcohol Markers

(It's still winter, so I'm still posting Christmas stuff!) This year, my "quasi-mass production" Christmas card was new a baby reindeer die cut from Tonic Studios. I'd been waiting for the right outline dies for trying the stained glass technique with. I found it at Tonic Studios.

But, I didn't do stained glass with this one. I coloured it with my alcohol-based markers. I started out with my Copics, but my E37 (Sepia) colour started to run dry. So, I swapped it out for E57 and that worked okay. Then I decided to try it with my Bic Mark-It alcohol markers and they turned out beautiful too!

(This one used Copic markers.)
I made a video of me colouring these: one with Copic marks and one with Bic markers. You can see the video on my Vimeo channel here ** Speed Coloured Reindeer Video **. (The video is silent and commercial free.) Or, you can watch the HD version on Youtube here ** Speed Colouring Reindeer ** (Youtube has commercials).

Here's how I used them on my finished cards. I started with this more involved version that includes a Spellbinders die cut mat and a bed made from my Martha Stewart Branch Punch. The sentiment I stamped from a Close to My Heart set.

(This one uses Copic Markers.)
Inevitably, as time grew shorter and shorter to get these to the post (yes, several were mailed on December 23rd), I started simplifying the card. So, some people got this version:

(This one uses Bic Markers.)
Since the Bic set had fewer browns, I used two shades per area. Since I have a lot more Copic browns, I used three shades per area. Hence, the Bic version went faster. The Bic version also came out darker just because those were the only colours I had. The lightest brown seems to have a yellowish undertone that I thought gave it a suede look (on the foot pads and the muzzle). It was a nice look.

I really like both markers! I had to lay down a little more ink to blend the Bic markers because I had fewer shade options, but it still worked!

Hope you enjoy the video! Feel free to comment and share if you do!

SPOILER ALERT! I had trouble with my video, so I actually coloured extra reindeer. So, friends and family, some of you who didn't gt this card this year could get it next year!

Thursday, December 31, 2015

Snowflake Scrapbook Mini Album

I got to play with some of my new Christmas goodies while on holidays. I made a new scrapbook mini album.
This time I dug deep for the colour set I wanted to use and I had to use up some of my favourites in my preserves (not hoard... preserves!). I'm glad I did. It looked lovely as a sheet of paper and looks just as lovely in the album! First, I'll show you pictures of the album, then I'll show you pictures of how it came together. For you more visual types, you can see the video walk through of my snowflake scrapbook mini album on my FairyCardmaker Vimeo Channel so you can see all the glitter and shine!

I made 5 pocket pages. Click any photo to see it larger!
I used a brand new binding system I made myself!! I'm calling it the ribbon slide binding system. Here's the first page:
As you can see, this mini holds a maximum size of 3.5 x 5 inch photos (half of a 5 x 7). Here are the second and third pages:
Love that little penguin from my Close to My Heart stamp set. I've used that set a lot (that penguin in particular the most). I've definitely gotten my pennies worth out of it! Here are pages 4 and 5:
That's my C.C. Designs bear. I always do him up as a polar bear. I have yet to do a brown or black bear. (There seems to be little occasion for it for me, but I've gotten good use of it as a polar bear!) Hear are pages 6 and 7:
I used a lot of techniques in this album! I used punches, die cuts, ribbon, stamping and fussy cutting! The snowman here was fussy cut from a lovely collection by Recollections at Michaels which I got for 70% off! Here are pages 8 and 9:
I ran out of purple paper patterns to choose from so I made my own with a Close to My Heart swirls stamp set and some white embossing powder. Here's the last page:
The back cover is just plain. All the tags in the pockets are the same and all blank on both sides.

The Bits and Pieces:
Okay, this is how the album came together:

1. Cut all your pages. Mine are 6 inches wide and 5.5 inches tall. So, I cut Bazzill Kraft cardstock to 6 x 12 inches.

2. Score the pages: Score the 12 inch side in half at 6 inches. Score the 6 inch side at 1/4 inch from either end. (Super hard to see in photo. Sorry!)

3. Punch the holes. I used a centering ruler to figure out where I wanted to place my holes and then made a guide paper. Nest the guide paper into each fold and punch the holes. If you don't have the tools, you can use a yarn needle to pierce and an old, squishy style mouse pad for a piercing mat (or possibly the freezer backing from frozen meats - wash it out and turn it upside down).


4. Trim the edges and reinforce the holes on the inside with Tyvek. (Certain shipping envelopes are made from this plastic composite that behaves like paper except it's water resistant and doesn't tear.) You only need to trim the 1/4 inch off of one half of the page to make the hinges for the pocket.


5. Repunch the holes from the outside.

6. Thread the crochet thread through the holes and tie a knot. I used a dental floss threader to pull my crochet thread though the holes. (My biggest needle's eye was too small for the crochet thread. The floss threader works wonderfully, stands up to abuse and doesn't prick your fingers!)

7. Decorate your pages. Close up the pages to form the pockets and decorate as desired.

8. Build your cover. Use the pages to figure out where you need to punch the holes in the spine. I punched the naked chipboard once, put on the outer paper, repunched the holes, put on the inner paper and then repunched the holes again. I used Tyvek for my spine paper. If I had used anything else, I'd have reinforced the holes with Tyvek first before putting the decorative papers on.


9. Thread your pages. Again, I used the floss threader.

10. Add your pages to your cover. I used the floss threader here too.

Your book is finished!

Monday, May 25, 2015

Makeshift Stamp Positioner

There's a fairly new kid on the block when it comes to stamping tools - the MISTI. What I like most about it is its ability to act as a stamp positioner for overstamping and for stamping on already cut out die cuts. It does more than that, but those are the two things I really liked.  I thought to myself, it's just a shallow tray with a lid. Surely I must have something like that at hand!

Voila! A Stampin' Up! cling mount stamp case! It's shallow and clear. So, I tried it and I'm sharing the results with you on my paper crafting video channel. I think Stampin' Up! sells these cases separately too. I'm expecting a catalogue in the mail, so I'll see! Alternatively, I believe they are similar in size to DVD cases.

Mind you, this case is a lot smaller than the MISTI, so your project size is limited. It will hold a 5x7 card though, and that's plenty enough for me.

Here's the card I made with it. I used the stamp case to get the greeting inside the frame.


This gate fold holiday card is destined for a retirement home this holiday season. I used my Copic hand airbrush tool to spatter the sky: light all over and slightly darker near the hills. I had already done this centre piece but it would have been WAY easier to get the trees straight if I had used my new makeshift stamp positioner!


The MISTI doesn't work with wood mounted stamps. If you really want to use it for them, you will have to convert your wood mounted stamps to cling stamps by unmounting them and them putting them on EZ Mount.

Check out how well it worked for me in my Makeshift Stamp Positioner video on my Vimeo channel. (I apologize for the choppy parts of the video. I had to really cut it down to get the file size to fit my upload limit!)

Friday, April 10, 2015

Mosaic Birthday Cards

I found another way to use up scraps! I previously wallpapered some background mats into patchwork backgrounds. I saw a new background tutorial (by Gina K. Designs on Stamp TV) where there was a randomly created geometric pattern and space between the scraps. I decided to try it out and I really like how it looks! In fact, I made several!

I have two to show you today. For the first one, I used brown as a neutral colour and accented it with red.

I thought it had a masculine look. For whatever strange reason, it makes me think of corduroy! Anyway, the balloons are actually Christmas ornament dies turned upside down! I used crochet thread for the strings, which I tucked into a slit in the sentiment. (Sentiment stamp by Close to My Heart.)

I made a couple for some male birthdays that snuck up on me. Since I liked how those turned out, I decided to delve in to my black and white scraps again and accented with different colours. This one is the red again, so you can see the contrast from the brown:
I'm so happy I have yet another way to use up scraps. This method calls for some very little scraps, so I still have enough paper to last a lifetime, but every little way to use it helps!

Which do you like better?