
It has taken me a very long time to finish, film and edit my first envelope scrapbook mini album, but it is finally done! I'm going to keep this one and put anniversary pictures in it. It's always hardest to part with the first of anything we ever make, isn't it? First, I will show you a few highlight photos and then give a link to a video that walks through all the nooks and crannies of this album.
The whole album is made from scratch using heavy chipboard for the covers and #10 envelopes for the pages. I came in to a few boxes of business reply envelopes when the firm where I work merged with another firm and the name change made all the paper work obsolete. I must have at least 2,000 envelopes and this book uses only five! You can easily accumulate these from the business reply junk mail we all receive. (I'm saving up some brown ones as we speak!) Since I have a couple boxes of the white ones, I could make mini albums all the way through to retirement! (Do you have ideas for paper crafting with #10 envelopes? I'm all ears!!)
Here is the tutorial of how to make the envelope album: http://www.youtube.com/watch?v=l0aLUKuFAfY It calls for larger envelopes but the same concept works for any size.
The bulk of my album was made with Basic Grey's "Little Black Dress" line of paper. I used up some scraps for the rest. On the cover, I used the gate portion of an Accucut Craft Castle Die to look like a mantle clock. (With a little alteration, I think this could look like a photo camera too.)

Every page is the same, structurally: a pocket on the left and a full page on the right and a pocket inside the full page. In each small pocket, I put a tag. I wanted there to be some larger photo mats in this book that could handle full 4x6 inch regular sized photographs. The pages themselves are 4 inches tall and 6 inches wide, so a teeeeeeeny amount of trimming of regular sized photos would still be necessary, but minimal. The rest of the photo spots (on the tags and on the left-side pocket) are all able to hold a wallet sized photo - be it the 2.5 by 3.5 inch size or the 2 by 3 inch size.

You can see on this page the little journaling tags I made. I made the lines myself with the edge of a ruler. I saw this tip on YouTube. Here is the link to the video on how to make your own journaling lines: http://www.youtube.com/watch?v=Iefmf3Uw53g&feature=related
You can also see my little mini envelope on the right. I wrote an envelope tutorial for that myself.
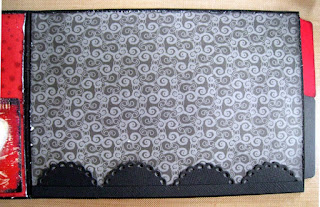
I don't have a lacy border die or punch, so I made my own. Here's my tip on how I made my lace border. I have a lace scalloped circle die by Lifestyle Crafts (Quickutz). I used that and cut them in half.

Then I adhered them on a small strip. No, it doesn't look as good as a true border punch would, but it does the job!
Every envelope page has a tag in it (a total of five double-sided tags). I used the "Cards - Filing" die from Accucut Craft. It has the tab on the horizontal edge of the card. If you watch my envelope scrapbook mini album video, you will see how I was able to move it to the short, vertical edge!

I used stamps from Hampton Art and Close to My Heart in this album. Stickers were from a love set by Sandylion Stickers.
The whole album is made from scratch using heavy chipboard for the covers and #10 envelopes for the pages. I came in to a few boxes of business reply envelopes when the firm where I work merged with another firm and the name change made all the paper work obsolete. I must have at least 2,000 envelopes and this book uses only five! You can easily accumulate these from the business reply junk mail we all receive. (I'm saving up some brown ones as we speak!) Since I have a couple boxes of the white ones, I could make mini albums all the way through to retirement! (Do you have ideas for paper crafting with #10 envelopes? I'm all ears!!)
Here is the tutorial of how to make the envelope album: http://www.youtube.com/watch?v=l0aLUKuFAfY It calls for larger envelopes but the same concept works for any size.
The bulk of my album was made with Basic Grey's "Little Black Dress" line of paper. I used up some scraps for the rest. On the cover, I used the gate portion of an Accucut Craft Castle Die to look like a mantle clock. (With a little alteration, I think this could look like a photo camera too.)

Every page is the same, structurally: a pocket on the left and a full page on the right and a pocket inside the full page. In each small pocket, I put a tag. I wanted there to be some larger photo mats in this book that could handle full 4x6 inch regular sized photographs. The pages themselves are 4 inches tall and 6 inches wide, so a teeeeeeeny amount of trimming of regular sized photos would still be necessary, but minimal. The rest of the photo spots (on the tags and on the left-side pocket) are all able to hold a wallet sized photo - be it the 2.5 by 3.5 inch size or the 2 by 3 inch size.

You can see on this page the little journaling tags I made. I made the lines myself with the edge of a ruler. I saw this tip on YouTube. Here is the link to the video on how to make your own journaling lines: http://www.youtube.com/watch?v=Iefmf3Uw53g&feature=related
You can also see my little mini envelope on the right. I wrote an envelope tutorial for that myself.
I don't have a lacy border die or punch, so I made my own. Here's my tip on how I made my lace border. I have a lace scalloped circle die by Lifestyle Crafts (Quickutz). I used that and cut them in half.

Then I adhered them on a small strip. No, it doesn't look as good as a true border punch would, but it does the job!

Every envelope page has a tag in it (a total of five double-sided tags). I used the "Cards - Filing" die from Accucut Craft. It has the tab on the horizontal edge of the card. If you watch my envelope scrapbook mini album video, you will see how I was able to move it to the short, vertical edge!

I used stamps from Hampton Art and Close to My Heart in this album. Stickers were from a love set by Sandylion Stickers.
wow, this is gorgeous, thanks for sharing details on how you made this!!!!
ReplyDeletePaula
This is a beautiful album Lisa...I don't blame you for keeping it. I often find that the creations that take the longest end up being my personal favorites. ENjoy your new work....
ReplyDeleteRuth
Such a lovely mini album :)
ReplyDeleteI really like how you used the scallop circle punch for the border