Monday, December 30, 2013

Sneak Peak Craft Room Redo

I've had a break this holiday season.  I've used it to re-arrange my crafting room.  This time, I nabbed a free class from Scrapbook.com called Get Organized.  It's a 27 week class that I intended to tackle in a weekend.  Well, it's been about 10 days and I'm not quite done (but close!).  I've gotten all kinds of attractive storage as my Christmas gifts.

By re-arranging the furniture, I was able to add 2 pieces, one of which my hubby assembled (a Billy Bookcase from Ikea that I bought to hold DVDs but that never happened and it has sat unassembled for months)

Here's a sneak peek at what I got from Home Outfitters.

I used one expandable just as is and another in (what I think is) an innovative way.


 You'll spot these under shelf baskets in my new room in a jiffy.

Bet you'll be surprised how I used these stacking pantry baskets!

What are your guesses?  How would you use these in your space?

Sunday, December 22, 2013

Handmade Holiday Wreath

For no particular reason, my sister decided to make a wreath for me!  She gathered all the stuff at Michaels Craft Store when they had their Black Friday deals and put it all together.  She gave it to me when we went for a family skate.  She scented it with pine too.  I'm not fond of the smell, but the wreath is outside, so it's okay!

It's got poinsettias and pine cones, holly berries, and a glitter-tipped, white, wintery, butterfly.  It's not a big wreath, but it's pretty.  We usually decorate the exterior of the house for Halloween, but we do very little for Christmas (just lights).  So, this was a much needed holiday decor injection!


We were kept up with the ice on the trees in the conservation area breaking off the branches.  The damage is so sad to see this morning.  The freezing rain has stopped but high winds are expected.  We fear that when the surviving ice-laden branches start swaying in the wind, we're going hear a lot more branches cracking and crashing down.

The news says many are without power.  Our power lines are underground, so we have been spared (phew!)  I hope we get a few days of warm up to melt some of this ice!

Stay warm.  Stay safe!  Me, I'm keeping inside (no surprise there!) and am in the midst of my (thus far annual) Paper Studio redo!  (And wrapping gifts.)

Wednesday, December 11, 2013

File Folder Card for Mom's Birthday Card

I've been meaning to try out a file folder card since I got my hands on an Envelope Punch Board.  I bought this punch board so I could make envelope sizes outside of A2 but, so far, I've been using it for anything BUT envelopes, it seems!

Here's a card I've made for my mother in law.  I've been trying to come up with an idea for a couple of days and I suddenly just decided I might as well give this file folder card a try!  I've been wondering what to use for an image but another thing on my card-making bucket list was making a card where the sentiment is the focal image.

Voila!
I do like how it turned out!  I used a sentiment from a Close to My Heart stamp set, Stampin' Up! red seam binding and some sprinkles bling from Annabelle Stamps.

Click for larger view.

I'm definitely going to make more of this style of card!!  Google "file folder card" and you will find tonnes of YouTube videos on how to make them with the Envelope Punch Board.

Wednesday, November 27, 2013

My Snowmen on Facebook!

Some snowman decor I made  was nabbed and highlighted as a sample on the Accucut Craft Facebook page!
I don't have a Facebook account myself.  You can read about my holiday snowman decor in an earlier blog post.  Accucut Craft has a Black Friday sale, so you too can own the die cut I used to make these snow people!

Wednesday, November 20, 2013

Red and White Christmas Card

I finished the colour challenges for the Kards for Kids 2013 hand made holiday card drive!  I was inspired by the cards made by my Creative Crew over the weekend in a fundraising event for the foster dog and dog rescue group, the Southern Ontario Animal Rescue.  Two of Monika's three cards featured circles.  I am a circle lover! (Circles feel like a natural phenomenon to me.)

One of my card samples had ornaments hanging in a window-like shape.  Monika put hers in a framed circle.  The other card of hers used a negative cut out of a circle to frame a penguin.  Then I watched this card making video from Gina K. Designs.  I have been drooling over the stamp in that video since I saw it in this earlier embossed card video from Gina K. Designs.  (It's in unbelievably fanciful!)

Well, somehow all these design elements came together and gave me a great idea!  I used a circle negative cut out and individual snowflake stamps to make my own stamped hanging snowflake ornaments!  Here's the first mask:
I followed this design and made two monochromatic versions: one blue and one red.  The red and white one I am submitting to the Kards for Kids drive as one of their colour challenges.  I'm going to send along the blue one too.


I just drew the ribbons on myself.


It was a tad difficult to squeeze them all on to the portrait card.  I prefer portrait oriented cards because I find they stand up better.  So, I decided to make one, big, bold ornament like the Gina K. Designs one:
https://www.etsy.com/ca/listing/170064867/hand-stamped-christmas-card?ref=shop_home_active
I am quite happy with how this Christmas card turned out!  I can imagine it in all colour pallets, even black and white could look nice.

Sometimes it's great to craft with others to get inspired in unexpected ways!

Sunday, November 17, 2013

Holiday Cards Workshop 2013

My Creative Crew and I just finished our 6x6 One Sheet Wonder (OSW) Holiday Card Workshop.  Most people followed my OSW very loosely, using them for inspiration instead of reproducing them in their entirety.  We ended up with quite a creative variety of Holiday cards and Christmas cards.  Some people finished all 6 cards and others only 3 or 4.  I asked each participant to choose their favourite card for show and tell.  (It was very hard to choose in some cases!)

So, I have seven cards to present!  Here they are in alphabetic order.  (Click any image to enlarge the view.)

Claire
Claire's "Winter Cheer" snowman card is quite cute and I think it was the first one she finished.  The felt snowman is adorable and mounted on a shimmery paper.

"Lady Hamilton"
Debbie's "Joy" card features the lovely little Christmas tree stamp that I picked up at the Michaels Craft Store not long ago.  She used a snowflake embossing folder (by Darice) in the background.  I think this card is very well balanced.
Lara
Lara was using cards from Studio G. that had a scalloped edge, so she had a little less room on the card front to work with.  No matter, this simple but graphically impressive reindeer card takes care of that!  I like the clever framing of the sentiment around the ribbon tail background.

Monika
One of two new additions to the Creative Crew, Monika put a lot of effort into the design of this Christmas ornament card.  She used die cutting, punching and heat embossing to make this card.  (Methinks I have a fellow tool junkie in the making!)  I think that keeping the colour scheme simple on this card combines perfectly with the intricate background paper.
Nicole
My other new addition to the Creative Crew for this workshop is Nicole.  She was the brave one to make her "happy Holidays" sentiment the focal part of the card.  It's something I've often thought about but have yet to accomplish!  The bling on this card brings out the shine in the metallic ink used on the sentiment.  It's important to bring that sentiment to the eye when it doubles as the focal and she did a great job of it.
Norma
Speaking of bling... Norma really blinged it up on this Penguin card!  She used a black and white paper and them framed her penguin on silver glitter paper.  The snowflakes on the patterned paper really burst when paired with the glitter frame and using red instead of white in the middle creates the Christmassy feel!

Terri-Lynn
I guess mother and daughter think alike!  Like her mother, Norma, Terri-Lynn's penguin card also uses glitter and reds to make her design pop.  Her "Merry Christmas" card is a stunning red and white classic.  I think the layers on this card definitely add to the interest.

There were so many great things about this workshop:
  • I got to introduce new people to my paper fanatics!
  • We raised $47 for the Southern Ontario Animal Rescue, which means I almost hit my annual fundraising goal.  (Missed it by only a hair.  Participants did donate extra personally too so, combined, the total Crew met the goal.)
  • I was inspired to make something new - more on that in a future post!
 There you have it: seven very different holiday cards all made from the same basic starting designs.  I hope these handmade cards inspire you to get in gear and start crafting your Christmas!

Sunday, November 10, 2013

Black & White Christmas Tree Card

Today, I am sharing another Christmas card I made for for the children at Toronto's Sick  Kids Hospital as part of the Smiley Team for Kards for Kids.

I had to go to the Michaels Craft Store to pick something up for a specific project.  Since when do I go to Michaels for something specific and not also look at EVERything else and pick up 3x the items I originally went for?  Yeah.

So, I picked up some cute holiday stamps by Studio G.  (I love that stand they have at Michaels - it always has SOMEthing good for $1.50!)  I got a swirly kind of tree and I used it to make some Christmas Gift Tags.  I liked how it looked so much I decided to use it on the next Kards for Kids challenge I've been meaning to tackle.  (Check out the full list of Holiday Card Challenges over at the Kards for Kids blog.)

The Black & White Challenge is from this inspirational photo. I kept with the black and white theme and thought my new tree would be perfect since there are also trees in the inspiration photo!

I didn't put a sentiment on this one so that it's not strictly the religious version of Christmas.  I tried something that's been on my technique bucket list for a while.  I followed a tutorial from Gina K. Designs for the pillow top stamped background.  The inner background is a stamp from Stampin' Up!  The tree is the stamp I got on the cheap at Michaels.  I stamped it right over the words in Versamark ink and then used black embossing powder.

I used a black card base from Michaels I picked up on a previous trip.  I didn't realize  I had grabbed a package without envelopes.  (That explains the great price! lol!)  Michaels' cards are not true standard sizes.  This one was 4.5 x 6.25 inches.  So, all I did was trim it down to 4.25 x 5.5 inches and then it will fit in any of my A2 envelopes.

I really liked how this designed turned out, so I tried it several different ways on some shaker cards.  (I'll post those at a later date.)  I hope you'll play along with the Kards for Kids Holiday Card Challenge!

Saturday, November 2, 2013

2013 Halloween Costumes

We had a costume contest and a pumpkin decorating contest at work on Halloween this year.  We had a decent number of people dress up.  I have two costumes that I alternate wearing when I give out candy: my demoness (favourite!) and my witch.  My witch hat doesn't fit, so I needed to get another.  I got one on sale today at Target for $0.90!!  It's a little too big but I can stuff something in the rim to make it sit better.  It's only plain, so we'll see if I feel like getting some felt and netting next year to dress it up.

The Most Creative Costume prize went to our IT person, Justin.  Take a look at his super creative, instantly recognizable character costume his wife helped him make:


It's BEAKER from the Muppet Show (if you are old enough to remember it).  It was a very well executed costume!  Here we are together:
Justin is already a tall guy so the mask made him very very tall.  Some smaller children were afraid to approach him (also not knowing who the character is).  Small children are sometimes afraid to approach with my wings and fangs too.

My husband doesn't give out candy - it's my job.  He did take our nephew out and around the neighbourhood though and he dressed up in his camouflage.  Our nephew was a red ninja this year.  Our nephews in a neighbouring city were a red army guy and a little lion, so I'm told.

Hope everyone had an enjoyable Halloween!  Now, on to Christmas!

Monday, October 28, 2013

Pink Christmas Card

It's another hand made Christmas card challenge creation here today.  This one is for a pink Christmas.  This card for for the children at Toronto's Hospital for Sick Children.

Here's the pink challenge inspiration photo:

Sweet, huh?  I used my the Sweet Shop house from my Close to My Heart stamp set and coloured it all pink!


I framed it on an Accucut Craft frame die and also used my new Accucut Craft mini ornament die on some old Bazzill "Swiss dot" embossed cardstock.

The Christmas in July card drive for the Sick Kids hospital raised 904 cards, 3 card kits and 20 notebooks for the parents!

The latest card delivery to the hospital were the not-so-spooky Halloween cards: 566 of them!  There were also items for the kids' treasure box and notepads for the parents.  If you are playing along with this holiday card drive, be ready to ship your cards to Bela by the end of November for delivery in early December.

Saturday, October 19, 2013

Wedding Layout from Scraps

A while back, I made a robot card from paper scraps.  I decided to repeat that design, but I used thinner scraps.  This time, I didn't use a focal image.  I used die cut dragonflies (from Accucut Craft) on this card layout from scraps.


I was quite pleased with how it turned out.  I made a few until I had run through a decent amount of scraps.  I corner punched this one on one side and I think that made it look a little classier or at least added some more interest.

When I was working on my wedding album for the crafting week I took last month, I found a scrap from the wedding mini album I had made for a co-worker.  It fit the picture I was scrapbooking perfectly in size.  I took that as a sign that I should find more scraps.  I repeated the layout from the card and all the scraps came from the wedding mini album I had done.  I am so pleased with how it turned out.

The top of the arch was a little boring, so I need to find something for it.  I didn't have a doily quite the right size, but I had this stamp set my sister had given me.  She accidentally bought two and gave me the extra set.  There's a flower that looks like a lotus flower in it and it fit so nicely at the top.  It looks a bit like a crown!  I embossed it in black to help it stand out from the pattern.

Slowly but surely (very very slowly!), this wedding album will get done!

Wednesday, September 25, 2013

Blue Christmas Card

Still following along with the Holiday Card Challenge for the Kards for Kids drive, this next colour scheme is my favourite!  I just love blue!  For the holidays, blue and white is just so calming to me.  That's right - the colour challenge I'm answering this time is blue, white and silver!

I followed the card sketch over at Clean and Simple Fall To Sketch #258 for this card.  It was seriously simple!  This one is going in my files for how to use up scraps!  I also played with my new Accucut Craft die.  (I won a pack of chipboard sheets for my "smart business tip" on their blog too! Visit their blog for all the smart business tips!)

The ornament on the right is my Accucut Craft one and the one on the left is a Quickutz die (which became Lifestyle Crafts which has been recently acquired by We R Memory Keepers).  The paper is a silver embossed snowflake paper from Hot Off the Press.  It's from their "Color Me" line.  This line of paper is ingenious for those people who don't want to stamp and emboss their own patterns (or don't have the stuff to do it).

The sentiment is from a Stampendous stamp set: 'Tis the Season.  That set has been lovingly used this season so far!  I just love how the embossing folders worked out on these ornaments.  I used a Quickutz folder on the larger ornament and a Stampin' Up! folder on the smaller one.  The ornament toppers and solid strips are a silver metallic paper.

Monday, September 23, 2013

Anniversary Card for my Husband

Today is your seventh wedding anniversary (although we have been together for 18 years).  I borrowed a stamp from my sister.  I knew I wanted it when I saw it in the Close to My Heart catalogue but my sister bought it, so I didn't have to.

I've been trying to think of ways to use black more as a base for cards.  I knew I wanted to use dark colours for this one to try and make the red really pop.  (My red ink is not the strongest though... maybe I should have embossed it.  Oh well!)  I do like how it turned out.  I really wanted this love-based card to not be frilly and girly.

I used some scraps from the two wedding albums I've worked on recently (one being mine - yes - STILL - after 7 years!)  I based this card on a sketch (but I can't find it now).


My husband is a definite keeper!  He's always thinking of me first - all day every day.  He has triple the energy I do - works all day (often more hours than I do) and does a lot more around the house than I do.  He takes extremely good care of me.  We are total opposites in all the little details but similar at heart in the ways that matter.  Our divergent details help us to balance each other out.  Without him, I would be completely off-kilter!

I do truly adore him!

Saturday, September 21, 2013

Purple Snowflakes Christmas Card

As part of the Smiley Team, I'm playing along with the Holiday Card challenges at Kards for Kids at Toronto's Sick Kids Hospital.  Still playing with my penguin set of stamps, I used the mini snowflakes to make a pattern.  (I threw in another snowflake from an HOTP stamp set too.)
I used three purple inks on this card and the purple paper is from DCWV (a stack I nabbed at Homesense for a great price).  It was quite enjoyable stamping the snowflakes wherever I felt like it.  There was no precision needed.  I didn't want to cover the sentiment, but I could have stamped right over it and have snowflakes overlapping.  They do that when they are falling anyway!

The sentiment is from Stampin' Up!  If you would like to learn more about this technique, Gina K. Designs has a done great tutorial recently on background stamping with snowflakes.

One challenge down - at least 4 more to go!

Sunday, September 15, 2013

Freshly Made Fairy!

So, my sister asked me to attend a free Copic Marker demo at a Michaels crafting super store this weekend.  I have a decent number of Copics, but I have never taken any particular Copic colouring classes, although I have watched many useful tutorials online.

Last weekend, we had a Holiday Card class with Close to My Heart and we made this really cute village scene to learn the technique of masking.  Well, I wasn't planning on buying any Copics, but my eyeball happened to fall on a colour that was just like the colour we used on the holiday village (which is a stamp set I bought too)!  The Copics were on sale as well, soooo.... I had to buy it.  And then.... I had to buy it a friend so I could blend too.

Next, I found a sweet little 
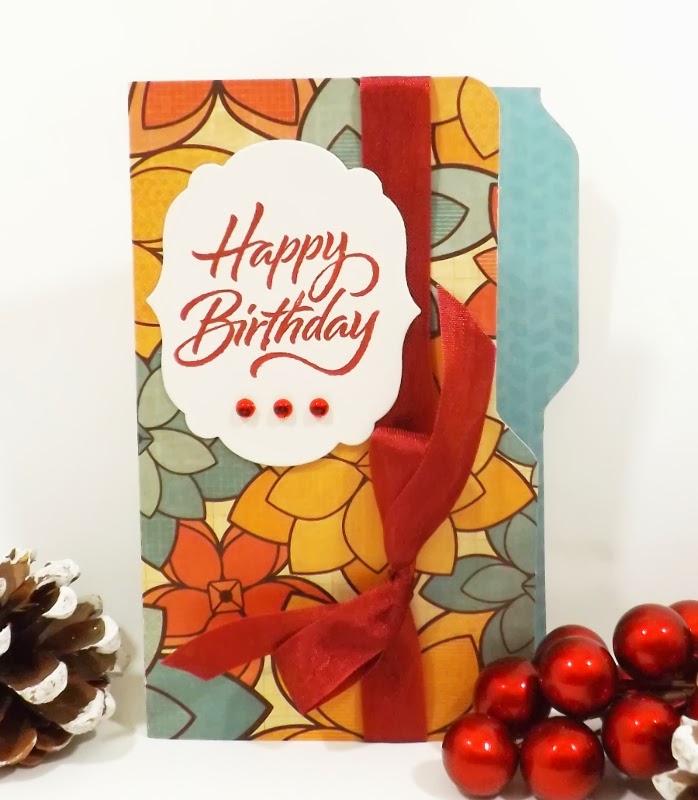
sketch challenge to allow me to play with my new Copic colours.  Here is the original sketch from Freshly Made Sketches Challenge #103:

Here is my entry:


It's clean and simple, which is right up my alley!  I used a digital fairy image from A Day for Daisies (which is no longer available).  The Copic colours BG72 "Ice Ocean" was the colour I had to buy and BG10 "Cool Shadow" is the friend I bought for it.

Now, the demonstrator at Michaels said she was told to use the dark colour first and then go back in with the lighter colours to blend.  I am used to starting light and slowly darkening an image.  So, that's how I do it.  I colour all over in the lighter colours first, leaving white where I want pure highlights (none in this case).  Then, I dab in some shadows and then I go back with the light marker to blend in that darker colour.

For this one, though, I tried it the other way: dark first and light after.  I left white when colouring with the darker marker for where I wanted the lightest highlights.  I found I had to go back over it a lot more than with my normal method in order to not have such a stark contrast where one colour ended and the other started.  But it still worked.
Click for larger view.

Personally, since these markers blend so well, I think it would work either way.

So, how well did I match the colour from last week?  (I should mention, Close to My Heart has alcohol markers too and I bought some, but they haven't been delivered yet for me to play with.  Their markers are much cheaper and come in blending pairs.  Since they are alcohol markers, I fully expect them to blend with my existing Copic markers.)

Here is the card we made last week.  The roof of the building in the middle is the colour I wanted to match.

This holiday card is designed for a No.10 (long, skinny) envelope.  I decided to try my masking on a regular small invitation size.  (Got lots of card and envelope sets on sale at Michaels when I went with my sister too!)  The original sample from our CTMH consultant was more monochrome, so I decided to try that out.  I haven't finished my card, but here is the village panel:
It's actually a very close match!  The colour I got has a little more grey undertone than the CTMH one.  The CTMH one has a little more green undertone.  You can't see the difference with the photo very well, but I can see it with my naked eye.
CTMH left; Copic right
I had fun playing with my new markers.  I love blues and teals!

Tuesday, September 10, 2013

Precious Penguin Stamps

I just had my annual crafting long weekend (which extends through the week for me).  I had Close to My Heart Stamp Consultant, Sheri, come to teach a holiday card workshop.  With the sales from the workshop, I was able to obtain an ultra adorable penguin stamp set that is a hostess set.


I just love this set.  It is so playful!  Plus, with penguins being naturally black and white, there's minimal colouring to do (even none if you prefer!).  Have a hard time making masculine cards?  Animals are a great non-gender specific way to pull off a card!

Sheri is sponsoring the Kards for Kids National Stamping Month card drive.  So, I just had to break out my new little buddies and make a card for the drive.  Here is my penguin card:


Easy Peasy!  Except for the card base, it's made entirely from scraps.  I really like this design and have repeated it a lot lately while playfully digging through my scraps.  For the penguin, I coloured the ear muffs and used a sparkle gel pen on the scarf.  Took all of 30 seconds!

The set comes with a couple of small snowflakes so, if you don't have any snowy paper, you could just stamp your own background strips on white paper.  It's just so simple and yet so sweet.

Check out the card challenge yourself for your chance to win some CTMH stamps!  I've already made a handful of Holiday and Halloween cards for the children at Toronto's Hospital for Sick Kids.  This batch will include some notebooks for the parents and a small mix of bookmarks and card kits for the treasure chest from which children can pull gifts after a difficult day of treatments.

I've been working on my wedding album this past weekend but these cute stamps have been a distraction for the last few days.  Aren't they darling?

Monday, September 2, 2013

Hand Made Christmas Cards Gone to the Dogs

Here are a few holiday cards that my friend Claire made for the Southern Ontario Animal Rescue to use this holiday season.  There were over 10 cards in total, but some of the design elements repeated so I have chosen just a few to showcase.  (The whole set has already gone to SOAR.)

Click any image for larger view.
Here, Claire used a tutorial to create a chevron without a die.  I think it turned out really sweet.

On these next two, Claire used the tags that already were part of the paper design.  She cut around the tags and mounted them as a focal piece on her cards. This technique is a great way to ensure all your design elements co-ordinate with each other.


These larger images were also part of the paper collection.  Here, Claire made her own backgrounds with some stamps and ink.

Overall, it was an adorable set and I am sure it will be entirely used up by SOAR this year!

Wednesday, August 21, 2013

Get Well Card - Happy Bear

Just a quick post of my hand made get well card.  My father-in-law had surgery today.  Everything went well, except for the waiting, of course.  Waiting is always nerve wracking for the family.  He was nestled in to his room around 9pm and fairly alert, so I'm told.  I will not see him myself until tomorrow.

Here is the card I made for him.
Click for Larger View

The bear stamp and sentiment is from Close to My Heart.  The bear set (which is retired) is utterly adorable.  I coloured it very simply with two shades of brown copic markers.

CTMH stamps  - click for larger view
I composed and wrote a verse inside for him.  I hope it will bring him a smile.