Sunday, December 31, 2017

Handmade Christmas Cards Received 2017

I received several lovely cards this year, some with sparkle, some with foil, many with lovely handwritten messages inside. Three cards I received were handmade.

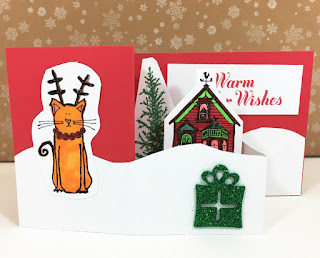
The first handmade card of the season was this one from my sister-in-law and family. We learned the z-fold box card in class. We had a use your holiday papers crafting day and she used that opportunity to do a bunch of stamping with the intention of making a large batch of this style of cards. She did the stamping (and the colouring, I believe), but her 11-year old son helped with the rest.
Here's another angle so you can see the dimension in this card.

The next one came from my mother-in-law. She used a paper tole kit to make this dimensional snowman scene.
The reindeer bust is a die cut. Here's a closer look at the snowman.

The last of the handmade cards to arrive was this delicate, die cut holiday wreath from a family friend.
This one has the sentiment heat embossed in white and lots of little rhinestones sprinkled throughout the wreath. Here's a closer look at that.

I appreciate ALL the cards we got over the holidays, as every one means someone was thinking of you, but I recognize the amount of effort that goes into handmade ones. I wanted to show them to you since maybe they will give you ideas for your holiday cards next year.

As we say goodbye to 2017, I hope everyone has a healthy and prosperous 2018!

Monday, December 25, 2017

Christmas Diorama Cards

Merry Christmas!

This year, I made several shadow box cards or, more properly named, diorama cards. These are little 3D scenes. The cards fold flat for mailing but pop into a box shape to display its dimension. These ones were A6 sized (6.25 x 4.5 inches when flat).

These are the first three I made.

I used a bunch of new purchases on these cards: The snow globe (by Creative Expressions), the village (by Your Next Stamp) and the snowman (by Yvonne Creations with birch trees from Lawn Fawn).

The penguin was the easiest (penguin stamp by Close to My Heart). I did stamp the snowflakes in the background. If I used patterned paper, I could have made the card faster.

I loved the snowman but it took the longest by far. It cut and embossed the bits but it was one solid colour. I coloured all the bits with my Copic markers. It was not easy to achieve definition in the snowman's body. It was also not easy to leave the thin lines in the snowman's hat. If I do that one again, I might try paper piecing the scarf and hat. The village was the most colourful, so I chose to make many more of that one.

On the next version of the village, I used Snowtex on the houses and trees. Snowtex is an opaque, bright white, textured medium. It dries hard and reminds me of popcorn ceiling plaster.


To show you the 3D nature of the card, here's the top view where you can see the 4 layers achieved with 2 benches between the front and back of the box.

You can see some of the dimension in this picture:

The last version I made for this year included my new Creative Expressions woodland creatures stamp and dies set, plus my Lawn Fawn birch trees. I made this one for my mother-in-law who likes deer. It took too long to colour the deer and trees so I only made a couple of those.

I really enjoyed making these cards this year. I will have to make some more in different themes.

I wish everyone a healthy, happy Christmas time and a prosperous new year!

Tuesday, October 31, 2017

Nuvo Embellishment Mousse Galaxy with Baby Wipes

Here's a link to the next video where I made the background for the moon card I posted earlier. I used baby wipes (and then my finger too). The mousse is water-based when wet but permanent when dry. So, the moisture in the baby wipe makes the mousse spread very easily.

Watch the galaxy mousse video on my Vimeo channel to see how it works!

Saturday, October 28, 2017

Joyful Homes Holiday Z-Fold Box Card

Here's another of my box cards that we made in a workshop. It's another Z-Fold box card with holiday homes. I really like the large "Joy" sentiment on this one. It's one of the latest Stampin' Up! purchases I made.


This card is a mash up of many stamp companies! "Wishing you" is an old woodblock stamp I got at Michaels. "From our home to yours" and the winter trees are from The Old Island Stamp Company (in B.C. Canada). The houses are from a Hot Of The Press set. The snowman is from Your Next Stamp.

I like how the "from our home to yours" hides when the card is closed but reveals when the recipient opens it. This card has 4 layers from front to back.
I wanted to go with traditional reds and greens for this card but the background looked plain to me, so I splattered it with snow. Is a green sky weird? I think it still turned out nice.

I think I prefer a true card-in-a-box style of card over this version that combines with the z-fold card. Second to that, I like the shadow box card over this one too. What kind of 3D card is your favourite? Feel free to share with me in the comments below!

Saturday, October 7, 2017

Birthday Bears: Z-Fold Box Card

I've been on a 3D card kick. I first started making the card-in-a-box style cards. Then, I made some shadow box cards. Now, I've made a set of Z-fold card-in-a-box cards!

Here's one of them: birthday bears. I just love these tiny bears from Dreamerland Crafts. They are just perfect for scene building, like in this card.
This card type is easier to make than it looks! Basically, take your base card with the inside facing up and fold it in half with the open side on the right. Then, take the top piece and fold it back on itself in half again. For the bottom strip, start with the right side face down. Fold it in half with the open side on the right. Then, fold the top piece back on itself in half again. That's what forms the box shape.
Then, you just put in some "benches" to layer up some depth for your card. The grass is a border die I have from Top Dog Dies (no longer in business). Since the blue was supposed to be the sky, I added an extra strip of green grass on the card base in the corner, or else blue sky would show on the inside of the box shape. This card did not originally include the clouds but the sky background seemed so empty. One of my creative friends suggested adding some clouds, so I did! I used a small scalloped scissors I have and free handed them. I like it much better with them!

I made the cupcake (or bonbon or truffle) with paper scraps. It's just a scalloped circle punch and a rectangle with a strip and a heart. After I layered the scalloped circle behind the rectangle, then I angle cut the bottom. If you have a paper crimper, you could crimp the rectangle first, to give it that cupcake wrapper look.

I popped one bear up on acetate so it looks like it's floating with the balloon. I coloured all my bears with alcohol markers - mostly Copic markers but some Spectrum Noire too.
I added sparkle to the balloon with my Wink of Stella glitter brush.
I like that these cards fold flat to mail in a regular envelope, but stand up easily for the recipient to display and enjoy for a few days. Do you have a favourite "fun fold" type of card?

Monday, September 25, 2017

Making a Galaxy with my Fingers - video

I recently acquired some pots of Nuvo Embellishment Mousse. I wanted them to make a shiny galaxy. My issue with using ink pads is that the ink will run when they get wet. Yes, some inks, like distress inks and distress oxide inks, have a really neat effect when activated with water, but they are never made permanent. (I suppose you could use a sealant afterward.)

Nuvo Embellishment Mousse is permanent once dry. It will never run and blur if it gets wet. So, I really wanted to try them out. Also, they are opaque and can layer over each other, so its harder to "make mud" out of the colours.

I experimented many different ways and filmed them to share. Here's the first: Making a galaxy using my fingers as the applicator.

To show you something what it looks like, from a different experiment (mousse and baby wipes) I made this card.
The mousse cleans off my fingers easily with a baby wipe (or water and a cloth) when wet. Your finger gives a strong colour, but I found the mousse dried really quickly, so I had trouble spreading it nicely. (Luckily, that matters less when making a galaxy since most of it gets covered up at the end.)
One thing I like about the black is that it's not a solid black. It's more like a very dark, smokey grey. (It's called black ash, so that makes sense!) If you spread it thin or water it down a bit, it allows the colours below to shine through.

I made this card with a Tonic Studios moon die. I plan to give it to my sister-in-law for her son. They often say this phrase to each other. I found the "I love you" and the "To the moon & back" stamps as separate stamps in the same sale bin at Michaels craft store. I knew I had to buy them as a set, specifically to make something like this for my sister-in-law.
I also tried a (yet another) new way of splattering the stars onto the galaxy. I have finally found a way I like - minimal mess, maximum effect, acceptable control. I saw other crafters doing it this way so I tried it and am so happy!

Use this link to go to my Vimeo channel to see how I made this galaxy background and my new favourite way to splatter stars/snow!

Stay tuned for future galaxy background experiments and other ways of using the mousses!

Thursday, September 7, 2017

Photo Sizing for Mini Albums

Ever wonder what size is best for a mini? Some mini albums are really mini (even pocket mini), but some mini albums are not very mini. I think the expression of "mini album" originally meant anything smaller than a 12 x 12 inch album (or perhaps an 8.5 x 11-\ inch album). Lots of brands carry 6 x 6 inch and 8 x 8 inch albums.

Then, Project Life took hold and pocket scrapbooking became popular. 4 x 3 photos are all the rage because of it. Then Instax took off and now there are super mini albums.

Me, I like to work with the standard photo size that the average Joe would get from a photo printing place: 4 x 6. If I have a really nice picture, I might get it in a 5 x 7. So, those are my two basic sizes. From there, you can cut them in half or in quarters.

I show in this video what those sizes look like on an 8.5 x 11 inch piece of paper. Many of us have home photo printers, so we can collage several photos in different sizes and print them together on one piece of 8.5 x 11 inch photo paper. My printer also allows me to put 4 x 6 inch paper or 5 x 7 inch paper in it too.

I also cover how to protect your photos in mini albums. One of the biggest deterrents to making mini albums (other than pocket page albums) is the lack of a photo sleeve to protect your pages. Well, I have a solution that will protect the most important part of your page: the photo. They are called Crystal Clear Photo Mounts and they are sold online by Clearbags.ca. (I am not affiliated with them. I just really like their stuff.)

Head on over to my PHOTO SIZES video on my Vimeo Channel to get the full scoop!

Wednesday, August 30, 2017

Honeymoon Scrapbook Mini Album

Last Scrapfest, in Kitchener, I attended a mini album class where we assembled an album from a kit made from mostly Heartfelt Creations supplies. The base album, page assemblies, paper collection and stamps were from Heartfelt.

I only finished about 50% of the album in class. Since I finished the rest at home, I was able to swap out some papers for ones in my stash that I liked better. I also changed or added some embellishments.

You can see a full walk-through of this scrapbook mini album on my YouTube Channel. I also give my personal review of the album base (starting at the 8 minute mark).

Sunday, August 27, 2017

Flower Fairy in a Box Card

While I've been working with Shadow Box Card sizing lately, I still think the Card in a Box is my favourite type of 3D card. So, I returned to that style to make a birthday card for a friend.

The darling fairy is from A Day for Daisies. I just love the artist's line art, storybook style.

The other flowers are from a Kraftin Kimmie (a Canadian company) set and the sentiment is from C.C. Designs.

I coloured everything with my Copic and Letraset alcohol markers and used my Spectrum Noire sparkle brush on her wings.

I really like how it turned out, so I'd like to make some more in this style with a bunch of different colours.

Sunday, August 6, 2017

Taught my first Shadow Box Card class!

Last post, I showed you the first shadow box card I ever made. That was experimentation to figure out the dimensions to use for a shadow box card class. In class, we made two "versions". Both cards are the same size and orientation. However, one has an inside full panel, like the anniversary card I made (except the anniversary card had 2 inside panels). One has a shaped "wall" inside, instead of a whole panel.

Here's the paneled one.
I was going to put a cupcake inside - and I may still make that variant, but when I was leafing through my stamps, I found my trusty monster. I really love this guy! Since he was holding a balloon, it went well with this card! I coloured him with my alcohol markers.

So, the balloons are out front, with their twine strings, the gifts are in the middle layer and the monster is in the back.
And, since it was July when we had the class, it was time to start on the holiday cards! So, here's the shadow box card I made with a partial wall, instead of a whole panel for the middle layer:
I also bought a cheapo paint brush to do the snow speckling more cleanly (for my fingers) than the toothbrush method.
I love the look of the silver glitter trees! You can see the hill in the middle is the half panel and the house was stamped, cut out, and placed on the back wall of the card.

I especially like that these fold flat for mailing!
Do you have a favourite type of 3D handmade card? What is it?

Saturday, July 1, 2017

Happy 150th to Canada and Happy 50th to a family friend!

50 years ago, on Canada's 100th birthday, some friends of ours got married. (You know who you are!) I made this shadow box card for you with the measurements I worked out myself (for our next class!). I made this card specifically for you (and it took me ALL DAY):

I put 5 roses on the front - one for each decade of your marriage.
I put 3 hanging hearts on the next layer - one for each of your lovely three sons.
I put 3 blue dots on the next layer - one for each of your lovely three grandsons.

And course, you two are in the centre!

There are three layers of frames on this one, each with a different shape. I didn't have any nesting dies that really fit the bill. I used blue in the middle because (I was told) that was the wedding colour.
I made a frame for the back to stick on the little anniversary poem I wrote. It folds completely flat to fit in an envelope. That's where the math came in. I had to make sure the flat dimensions were right for the envelope. This card went in a 5 x 7 inch envelope.

I was pleased with how it turned out. I hope our friends were too!

Saturday, June 17, 2017

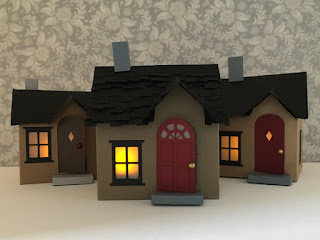
House Box Paper Luminaries

I have been house building! It took me 3 obsessed days to work out the perfect measurements to make a house box luminary out of one 8.5 x 11 inch paper. And then, I spent another 2 days making it bigger. I was inspired by a gingerbread house die by Tonic Studios which then lead me to the Sizzix Village Dwelling die by Tim Holtz. That die set is what ultimately inspired my final prototype. (That die is the base for a bunch of add-on dies which transform the base house into different themes and additional shapes, like a dormer or bell tower. It's a seriously genius product!)

Several things contributed to the way I figured out how to make these from scratch:

  1. A tutorial on how to make a house box with the envelope punch board by Paper Passions. This is what started it all. Seriously clever!
  2. I have an envelope punch board but what if you don't? I love watching videos by Pootles Papercraft (a UK Stampin' Up! Demonstrator). I've seen her make milk carton boxes before and she shows how to get the angled top. I decided to follow that instead of using the punch board.
  3. The Sizzix Village Die set (including add ons). People have created amazing stuff with them. I was going to purchase it but I didn't want to wait for shipping! I wanted to see if I could DIY my own version.

At the end of the experiments, I have 10 prototypes to show you! Let me take you on my journey.

During the prototype sizing stage, I was working only on sizing: how big of a box I could get from a full sheet of paper. Then I went down to half-sheets of 8.5 x 11 inch paper. How big could I get those? Therefore, there was pretty much no decorating at this point.

Here are the combinations I came up with:

I did a few with the flat of the roof as front-facing (boxes 1 and 5). The rest have a side-facing roof. I also did a few with the chimney to one side and some with the chimney straddling the roof fold. Keep in mind, these are totally unfinished. I was just going for size here.

However, just to show how it might start to look like a house, I put windows and a door on one. The door is actually a little foyer (a mini house attached to the front) with a little roof of its own. The porch posts are designed the same as the side chimney, only up-side down so that the angle part attaches to the underside of the roof.

Imagine! Here are some possibilities:

  • Decorate the side-facing roof lines with a border punched trim (boxes 2, 3, 4, 6 and 7)
  • Add a porch step
  • Add window boxes
  • Add snow to the chimney tops and roof tops
  • Add cotton coming out of the chimney as smoke
  • Use paper straws, mini dowels or even round toothpicks as porch posts
Of course, there are a myriad of finishing touches too (e.g. use embossing folders, create a base for the house to sit on so that you can put a fence around the yard and greenery in the yard, use patterned paper to create a theme: gingerbread, Christmas, cottage, beach, haunted house) but there are too many to list.

Here's how the sizing worked out. Once I determined the size of the base I liked best, I could then experiment with the height. The heights shown in the previous picture are what you get when you maximize the paper you started with (8.5 x 11 inches or 5.5 x 8.5 inches).
8.5 x 11 inch sheets:
Box 1: Base 2.5 inches square, Height 6 inches to highest point of roof
Box 2: Base 2.25 x 3 inches, Height 6.25 inches to highest point of roof
Box 3: Base 2 x 3 inches, Height 6.5 inches to highest point of roof
Box 4: Base 2.5 x 2 inches, Height 6.75 inches to highest point of roof

5.5 x 8.5 inch sheets:
Box 5: Base 1.75 inches square, Height 3.75 inches to highest point of roof
Box 6: Base 2.25 x 1.75 inches, Height 3.75 inches to highest point of roof
Box 7: Base 2.25 x 1.5 inches, Height 4 inches to highest point of roof

My favourites were boxes 2 and 4.

So, I started with box 2 (2.25 x 3) and made this prototype at 3.75 inches tall.
Again, this is largely unfinished! I just took the prototype a little further by embossing the roof, cutting out the doors and windows, and adding a porch step. The windows are covered with vellum.
I wanted my boxes to open. So, on this prototype, I used magnets on the back of the roof. I had to use a side chimney because a centre chimney (that straddles the roof) would block the roof from unfolding to open the box.
I was very very happy with this box! However, it felt a wee bit small to me. It is hard to reach in there - and I have little fingers!

So, I decided to abandon my obsession with making it fit on one piece of paper. I went with 1.5 pieces. Doing this allowed me to make a bigger base. This house box is 3.25 x 3.5 inches and 4.25 inches tall.
Using separate pieces of paper also allowed me to have one wall totally separate from the house. By doing that, I could attach it at the floor and have the whole back of the house open up! (You can still choose to adhere it shut, however.)

Magnets are expensive though. So, I also experimented with tabs to tuck the back wall and the roof in as a closure. Lastly, I wanted to use a centre chimney, so I also used tabs to hold it on. The chimney pops out to open the box.
I liked this size much better! But... I felt like this house was "fat". The side wall was too wide. So, I played with the dimensions once more. This is it. This is the size I like the best!
I also experimented with my own doors. The windows and doors to this point came from a Top Dog die set. (Top Dog dies was the wafer-thin die arm of Accucut Craft but it has since closed down.) I used free clipart online and altered it in Inkscape to create my own die cut door to cut on my Brother Scan'N'Cut. I made matching round-top windows, but I didn't cut those for my prototype. (If the door worked, the windows should work.)

(By the way, you can DIY your own round top door using a circle punch and cutting only one end of a rectangle - the same way I made my Popsicle shape. You can use a small circle or square punch to make a hole for a door window, if you want too. And you can use a score board to emboss some planks in the door.)

I also did up the roof differently. I know I plan to use my scalloped border punch to make scalloped shingles (especially for a gingerbread house!) but I liked the whimsical look from odd-sized shingles. (It is an add-on to the Sizzix house die.) I used my Accucut Craft 3/8ths strip maker die to cut evenly spaced slits in paper strips. Then I randomly cut the ends shorter and longer to get this textured roof. I also "beat up" the paper a little before sticking it down. (This roof took a really long time.)
Lastly, I didn't want the chimney to get lost when you open the box. So, I attached it with ribbon. You can pull it up to open the roof, but the tabs won't come all the way out.
There you have it! My final prototype! Here's the best part. I put battery-operated flickering tea-light candles inside!
Of course, if you want to make it a gift box, you don't need to cut out the windows and doors. You can just adhere them straight on to the house so that your box will be solid for whatever it holds. (Looking at them this way, I'm liking the side chimney more.) Here's the back view of the houses:
Now that I have 10 pages of notes, sizes and diagrams so that I can make a whole village of various-sized house boxes, my obsession has subsided. (Once the idea is made real, I can let it go.) Maybe (just maybe) I might make one house per year and slowly build a village. (I have a prototype for a pyramid topped roof tower percolating in my mind - to mimic the church bell tower add-on in the Sizzix set.)

You could seriously go to town decorating these things. Again, these are my prototypes with pretty much no decoration - just structure. Google search for the Village Dwelling die. You will see amazing things. Tim Holtz also has a house box called the Brownstone. My tall, skinny box #3 looks like it. One person attached one of those to the squatter house as an addition. It's so cool. Oh, the possibilities!

Saturday, May 27, 2017

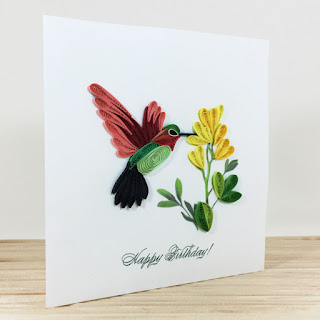
Paper Quilled Humming Bird Card

My sister-in-law gave me this lovely card for my birthday this year. I've dabbled in paper quilling but I haven't made any for quite some time. I've always wanted to try filling a whole shape like this but it's so much work! I'm sure it's worth ever second though, to get a result as stunning as this!

I love the detail and the colours. Paper quilling is surprisingly sturdier than it looks once it's glued down to the page.

The crafter who made this uses a unicorn for a seal. A little unicorn faux wax seal (made of plastic) was on my envelope. I kept it and now it's a badge on my craft room door!
If you would like a lovely card like this, it came from Quilling Card LLC.