Showing posts with label Christmas. Show all posts

Sunday, June 2, 2024

Heat Embossing Techniques on Handmade Cards

 Hello crafty world! My creative crew wanted to practice some heat embossing techniques, so I've made some kits for 4 cards. These cards include:

  • A regular, heat embossed sentiment
  • A coloured, stamped sentiment overlaid with clear heat embossing
  • Emboss Resist
  • Watercolour emboss resist and lift
  • A DIY embossing powder enamel shape
  • Water splatter embossing
  • Water coloured focal images with each image heat embossed on watercolour paper 
  • Watermark stamping
My favourite is the water splatter embossing. The bear from Penny Black stamps is just so amazing. Penny Black makes great stamps for colouring because the spaces are big. I think that if you swap out the sentiment on this card, it could make a great sympathy card too.

The teddy bears from Penny Black are just adorable, including this tea cup one. This card features the emboss resist lift. First you colour the background, then you clear emboss on it, then you mist it with water and sop up some of the exposed colour. 

 
This one is the watermark - no embossing powder.


And this one is the same background stamp but as emboss resist. I clear embossed on plain white cardstock and then inkblended over top after. I put the house die cut in my mini pancake maker and melted gold embossing powder on it. Then I sprinkled on some white embossing powder and swirled it with a toothpick.


 Which one is your favourite card? Which technique is your favourite heat embossing technique?

Saturday, December 2, 2023

Scrap Paper Christmas Cards

If you're a paper crafter, you have scraps! I've been working away at my Christmas paper stash for a few years. I finally finished one pad off and another is about halfway there. I'm not going to buy pads again unless I love a lot of it or I'm making a mini album and I will use most of it for that singular project. I'm finally "low" on Christmas paper, but I picked up more from others who were offloading them, so it's still on the no-buy list unless I'm making an album.

So, this year, I've been saving up these scrappy card ideas and I made some Christmas and winter cards! I think they turned out great!


I started with the envelopes. Spellbinders has an "Envelope of Wonder" die set that is popular right now. But I knew I could make mini-envelopes on my own with my score board. I also knew I had tonnes of little shapes and stamps that I could stuff the envelope with. So, this is my take on it!


The first one is stuffed all with die cuts and a branch punch. For the second one, I cut out the snowman and ornaments from a paper pad. The trees, greenery, bird, and garlands are other die cuts I have. I used an embossing folder in the background for interest. The greeting is a hot foil stamp. I hot foiled it on the left and letterpressed it with pigment ink on the right. I don't have the matching die, so I cut it out by hand.

I had so much fun making envelopes in different sizes. The one above and the tiny mini envelopes were my favourites. The larger envelope uses a 4.5 inch square and the smaller one uses a 2.5 inch square. These use a decent amount of scraps! For the mini's, I coloured up a whole stamp set with my Copic markers and stuffed them inside the envelopes.

The next thing I tried were strip clusters. I had some left over strips and I've seen lots of YouTube videos for making your own cluster embellishments. Clusters are not my strong suit. I lean to clean and simple. I started with just layering up the strips. I made some paper stockings and these were the left overs. When I sat down to make cards, I pulled out the layered strips (pictured on the right). Then I just tried to match them with a focal image and a sentiment.

Although I tried to add some interest with the softly ink blended circle frame, this card still felt a bit too plain for me. It's fine for a masculine card, but it needed something more. So, for the next one, I embossed the background again and it made a big difference!

Then I did one more step with the embossing folders and used white pigment ink on top.

The last of the scrappy Christmas cards I made use the tried and true scrap strip background technique. You just keep layering strips next to each other to cover some amount of the background. Then I used an idea from Jill Foster (from the Penny Black YouTube channel). Penny Black has some sentiment dies that cut out only the top part of the word. So, I did some partial die cutting to mimic the effect. Their dies do a swooshy line. I could only achieve a straight line but I think it looks fine.

The "joyful" die by Hero Arts has a shadow. The shadow is what I partially die cut and then I cut the word from red foil cardstock. For the next batch, I don't have a shadow die. So, I just manually cut around the words. It's easier with words like these (from C.C. Rubber Stamps) that are not too frilly.

I finished all the cards off with some enamel dots - except the deer. It has flat stickers (I think they are vinyl). The "candy" style dots are from Queen and Co. and were actually marketed as beach balls. But I think they look like candies. The glitter dots are from my Your Next Stamp stash. (Your Next Stamp is closed now, sadly.)

I hope these scrap paper Christmas cards inspire you to work your stash this holiday season! I really like the bear on the strip cluster and the partial cut words on the strip backgrounds. What's your favourite?


Friday, December 31, 2021

Handmade Holiday Cards Received for 2021

 I thought I would show off the handmade cards I received for Christmas 2021 as my last post in the year. I love getting cards from my Creative Crew. I get to see their learning in action!

The first to arrive was Debbie's card. It's super glittery with a patterned glitter paper as the background. I cut tiny cardinals for Debbie. She just loves them. So, she made me a cardinal card!


The sentiment was left from the last card class we had together. The cardinal has glitter accents and the poinsettia is made from foiled paper. On the inside, she stamped an evergreen, put a golden start sequin at the top and put one of the tiny die cut cardinals inside.

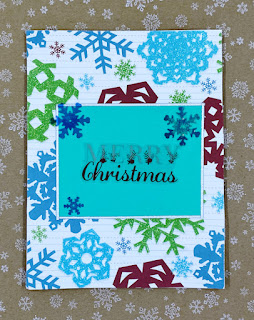
The next card was from Norma. I seem to have a weakness for snowflakes so she made me a card full of them! Plus they have glitter accented ones in the paper too. Teal (leaning to blue) is my favourite colour, so this card speaks to me (and has only nice things to say)!


I got a lovely snowman card from Claire. Our last card class was an easel card class. So, she made a easel card to showcase what she learned! She stamped a happy snow-family and coloured it with alcohol markers.


You can see how the easel card stands in this image:

She put a die-cut greeting on the inside and her heartfelt message on the back of the card. I have the same die-cut greeting. I just love die-cut greetings. I think they stand out so well. You can also see in the second image how Claire added just a touch of sparkle to the snow with a glitter pen. All the falling snow is coloured in and there's some on the ground too.

The last handmade card I got was from Maria. Maria lives farther away so she doesn't get to come to the crafty classes, but she attends some near her with a local Stampin' Up! demonstrator. The colours are just gorgeous. It looks like she die cut some evergreens from some ink-smooshed papers. 

She arranged them on an embossed panel of trees. You can see the embossing better in the second photo. Her sentiment has been placed behind some vellum for a soft look and popped up on foam tape for dimension.

It's a very soft and serene card - also clean and simple looking, which is totally up my alley!

I am happy to have so many creative people around me. How about you? Did you get any handmade goodness this holiday?

Sunday, December 26, 2021

Husky Christmas Card

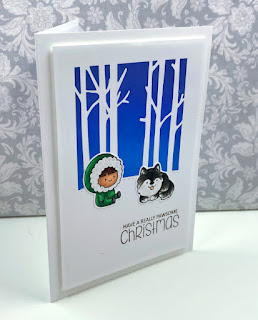
 Our doggy had a big budget this year! I made a card for my husband to go with the gift our doggy bought him. The gift had to do with walking together in the winter, so I made a nice little winter scene.


Now, I don't ink blend often, but I do admire it! So, I decided to try it out. I bought this Clearly Besotted Holiday Huskies stamp set last year but didn't end up using it. I based my card off of a sample in another Clearly Besotted stamp set called Prancing Plushies. (Click the link to see their samples. Their plushie sets are adorable!)

I started out by cutting my tree masks. I used Avery Repositionable Labels from Staples (Business Depot). I bought a pack of it as 8.5 x 11 full sheets. This stuff is great! I used birch tree dies from Joy Crafts and a stitched hill from Creative Expressions.

Then I used mint tape from Scrapbook.com to mask a half-inch border on my card front. (Mint tape is like Post-It tape.) I used my glass mat grid lines and a ruler to help me get it straight. When the masking was done, it looked like this:

I used 3 colours of Distress Oxides to blend the sky (Salty Ocean, Blueprint Sketch, Chipped Sapphire). I bought these three colours years ago specifically for sky blending. This might be the 3rd time I've used them. (As I said, I'm not big on blending!) I used my make-up brush tool to blend. It look a long time to get a solid blend. In retrospect, I wish I had tried a foam dauber. It would put down ink faster, I think.

Here's what it looked like when the blending was done:


And then.... the big reveal!

From the Holiday Huskies stamp set, I chose two images and coloured them with my Copic Markers.

I had to colour the husky to look like our dog, Shadow! I cut out the images with scissors and then added a sentiment from the same stamp set to finish off the card.

Hubby liked it!


Do you make cards from your pets?


Sunday, November 22, 2020

Got Large Image Stamps? ...

 ... Make bridge cards!! Continuing my experiments with bridge cards, I figured they would be a fantastic way to employ the large image stamps I've struggled to use in the past. You know, the ones that take up an entire A2 card front. Of course, I could make 5 x 7 inch cards, but it's a pain to make envelopes for them because an 8.5 x 11 inch sheet of paper is a smidge too small for my large envelope die.

Enter, the bridge card.

I have some stamps from High Hopes Rubber Stamps. I've had them a long time. I bought them because I believed larger images would be much easier to colour. I failed to account for the fact that large images would be harder to incorporate on a regular sized card.

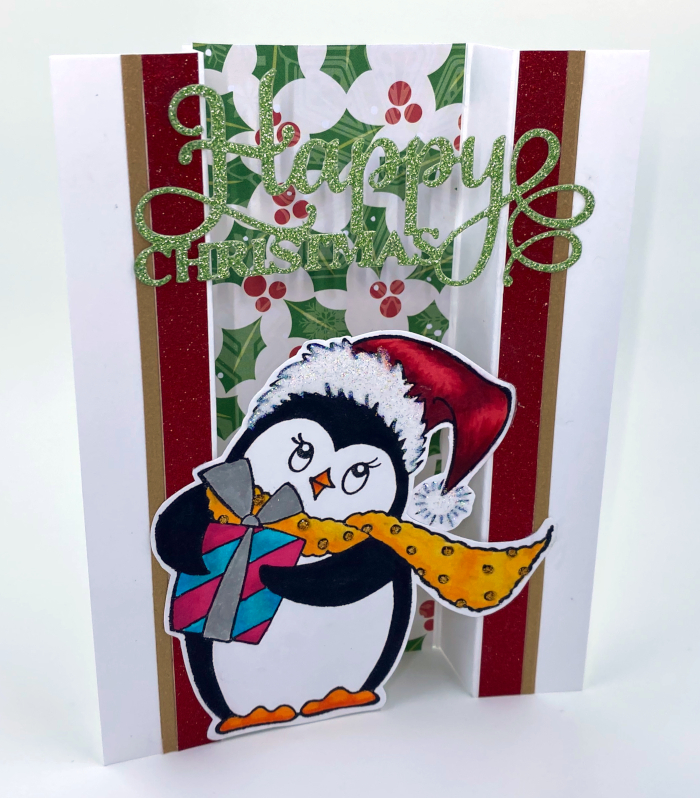
Well, they are perfect for bridge cards! The image spans the gap in the front to create a free-standing card with dimension!

I really like how this one turned out. I coloured these cards with my Copic Marker alcohol markers. These cards are also a fantastic way to use up scraps! The paper in the centre is a scrap as well as the two, half-inch strips along the sides! Plus, it still folds flat to put in the envelope.

I really enjoyed colouring this Santa with the kittens.

The only thing about the vertical bridge cards is that it leaves only a tall skinny space to write on the back. So, I figured out the dimensions for a landscape version. I coloured another image from High Hopes Rubber Stamps for this card.

The sentiment on this card is from a stamp set by Dreamerland Crafts. Both High Hopes and Dreamerland are small Canadian businesses. I know huge sentiments are all-the-rage right now, but if you are using a huge image stamp, a small sentiment is just what you need - and we all probably have heaps and heaps of those!

Boy, it took me a long time to colour this one just-so, that's for sure! I used a stitched hill to bridge this card, even though Santa and the reindeer would have been wide enough on their own. I had thought about doing a roof top with layered scallops. I might try that next time. For this Santa, I added some sparkle on his coat trimmings and hat with Nuvo glitter drops. (Stickles would work just as well.)

So, bust out your BIG stamps and dig into your scraps. Have a ball creating bridge cards for all occasions!

Friday, November 6, 2020

Bridge Cards for the Holidays

 I was inspired by the talented and clever Jennifer McGuire to try my hand at some bridge cards. [Click to see her bridge cards.] I don't like tent fold cards because they flatten out when you try to display them. Therefore, I rarely make cards in landscape orientation. These bridge cards create a way for cards to stand freely, no matter the orientation!

I worked out dimensions different from Jennifer's so that I could maximize the writing space on the backs. I started with some portrait orientation slimline (or tall skinny) cards. The door wasn't quite wide enough to span the gap, so I put a banner behind it. The one with the row of houses was definitely much easier. I really like how Santa and his reindeer turned out. They are from the North Pole Littles stamp set by Hello Bluebird who have such sweet storybook style images. I mounted them on acetate and then strung paper twine between them to be the reigns. (And, of course, there is glitter on Santa's hat!)

These are how the landscape versions of A2 (4.25 x 5.5 inch) cards turned out.


I used a heat embossed Christmas tree stamp and coordinating die, plus a die cut sentiment to span the gap. On the silver tree, I used multi-colour homemade enamel dots as the ornaments (or baubles).

Then I tried it in portrait orientation. This tree has white blizzard Nuvo drops as the baubles. I die cut the sentiment three times from thick cardstock, layered it up and then die cut it from silver glitter cardstock for the top most layer.

I finally have a way to use some of my GIANT stamps! They can span the gap on these cards! This penguin is sweet, but so big. My sister has a similarly big snowman stamp. So great to find ways to use what we've got!


These bridge cards are truly economical on patterned paper. What a fantastic way to use up scrap strips in the centre panel! The downside to it, thought, is that the portrait versions have such a narrow space on the back to write. There really isn't a lot of room. I could put a tent-fold flap back there to create more room, but I decided to work out the dimensions for "open front" shadow box cards (as opposed to diorama-style cards with a framed window, like I made before). These achieve the same dimensional effect but offer more writing room on the back than the bridge cards. This one isn't quite the one I was aiming for. I will try some more where the "front bench" is really a scene that spans the gap. But this was the one I made to test the sizing.


Have you started your holiday cards?? With the postal service expecting to be more overwhelmed than normal, we'd better aim to get our cards in the mail earlier than normal. (I'm always late to the post office with my holiday cards. To be truthful, I probably will be again this year, despite the best of intentions!)

Sunday, January 19, 2020

Crocheted Christmas!

I am definitely one of the crazed Baby Yoda fans sweeping the internet. We have really enjoyed the first season of The Mandalorian on Disney+ and we are looking forward to the second season! My sister made me a couple crocheted dolls of the Yoda-esque youngster for Christmas. She used a combination of doll ideas to build her Baby Yoda.

She did make this one with the baby's signature brown robe, but she also made me a Santa outfit to dress him seasonally.


Isn't he cute! In this picture, his hat pushes his hears down a little. Normally, they stick out more, like the character's. And, since I couldn't decide what shade of green to make him, I also got one made in this very soft green gray yarn:


Since this one is a soft yarn, the ears are floppy. He is adorable! I like the embroidery floss around the eyes better than the thicker ones.

These guys stand about 13-13.5 inches. Here's the small version, which is more like 8 inches.
The yard around this one's eyes is split to make it thinner too, like the floss version. My husband favours the dark-side, so my sister made a dual-ended light saber for this doll. He's currently at the office on display for the week.

Handmade Holidays are the best!

Sunday, November 17, 2019

Stash Busting - using scrap paper strips and a card sketch

The papers in the rubber stamping and scrapbooking scene are so pretty. Sometimes, it's hard to part with even the scraps! In the beginning, I had so few supplies, I always salvaged all the scraps I could. Today is a different story, but I still have that mindset of needing to hoard my scraps.

I find card sketches are a great way to use up scraps! On these cards, I used Little Tangles Sketch #72 by Neat and Tangled.


I made this one for my husband's birthday. He was born on Halloween, so the monster theme works. This monster stamp set is by C.C. Designs. I added a balloon die cut from a Stampin' Up! punch. I used my fancy gold mirror card for the oval on this one.

I love that stuff! That's the kind of thing I would hoard, so I've been making a conscious effort to use what I love. What good does it do if it just sits in my stash? (Other than make me happy when I open my drawers and see it - but the point to cardmaking is to make other people happy too!)

I made two other cards with this sketch too.
I used a Spellbinder's oval die on this holiday card. (I think I know who will get this one!) I have tonnes of Christmas paper scraps. I think I could make my entire holiday card list out of scraps alone! Again, I used some precious specialty cardstock, this time in a satin finish rose gold. I also used a very lovely, thick gold metallic cardstock as the mat. I like that stuff so much, I cut the centre out of it with a stitched rectangle to keep. I cut a second stitched rectangle out of white cardstock to fill the void so that my striped piece wouldn't sink.

The stamp is a retired image by Your Next Stamp. (Luckily, the still have the same bunny available, just holding a heart instead of a gift.)

On the last card, I used non-shedding glitter paper. (I somehow acquired so much glitter paper, it doesn't all fit in my drawer, which means I'm over the limit!)
This bear stamp is a retired one from Kraftin' Kimmie stamps. I coloured it with my Copic markers on Bazzill Kraft cardstock. (In fact, all three cards were coloured with my Copic markers). If you use a base colour that is close to your lightest Copic shade, then I find there's less work in getting a good blend because the base colour will hide those imperfections. It's a good tip when colouring die-cuts to add depth. (OR, you could just make all your die cuts white all the time to save on cardstock and colour them all yourself.) I think using a coloured base adds something different - makes it a smidgeon more visually interesting.


And while I'm proud of using up some scraps, these three cards hardly made a dent! I've been making cards with sketches for quite a stretch now, trying very consciously to use up scraps. I'm making progress (but it's not nearly as fast as I accumulate new stuff. Shhh! Don't tell!)

Tuesday, August 13, 2019

Fetching the Christmas Tree

Here's another Magic Picture Changer card I made using the Lawn Fawn Die. I'm putting this one into the Interactive Card challenge for Lawn Fawn too. For this one, I used Lawn Fawn's row of houses snow-capped from the Simply Celebrate Winter stamp set.
I don't have a Lawn Fawn car, but I have one from Hot Off the Press. So, that's what I used to put in front of the houses. I coloured everything with my Copic Markers and I used my newest holiday die-cut sentiment.
I set the card on glitter snowflake cardstock and used a gorgeous red glitter cardstock for the sentiment. I got the snowflake glitter in a paper pad from Michael's one year (on sale after Christmas) and the red cardstock was from Dollarama. I really like the contrast between the snowflake paper (especially the navy stamping I did) and the red sentiment.
Now, the Magic Picture Changer die is a little pricey. So I did not buy the add-on die that creates a nice front panel with a window for the mechanism piece. (I'm glad Lawn Fawn separated those pieces to help keep the main die cost down.)

I have a set of stitched rectangles from Your Next Stamp. So, I used the one that matched the width of the Magic Picture Changer, but it's a bit longer. My panel is the piece with the navy blue snowflakes. I stamped white cardstock with a background snowflake stamp to make that piece. I cut a window in it with a 2 inch square die. Then I used the frame from the main Magic Picture Change die set to cover the window. That inside space is about 1.75 inches.

I really like my homemade cover panel. The extra length makes it fit with an even border on the front of the card base.

This picture changer is next level! I love having an interactive surprise waiting for the recipient. I have seen tutorials on how to do it with an Xacto knife, but my blade skills are not nearly good enough do that! Especially after colouring up the images, you want something that is sure to cut perfectly! I definitely would not ever attempt a card like this without the Lawn Fawn die!