Sunday, November 22, 2020

Got Large Image Stamps? ...

 ... Make bridge cards!! Continuing my experiments with bridge cards, I figured they would be a fantastic way to employ the large image stamps I've struggled to use in the past. You know, the ones that take up an entire A2 card front. Of course, I could make 5 x 7 inch cards, but it's a pain to make envelopes for them because an 8.5 x 11 inch sheet of paper is a smidge too small for my large envelope die.

Enter, the bridge card.

I have some stamps from High Hopes Rubber Stamps. I've had them a long time. I bought them because I believed larger images would be much easier to colour. I failed to account for the fact that large images would be harder to incorporate on a regular sized card.

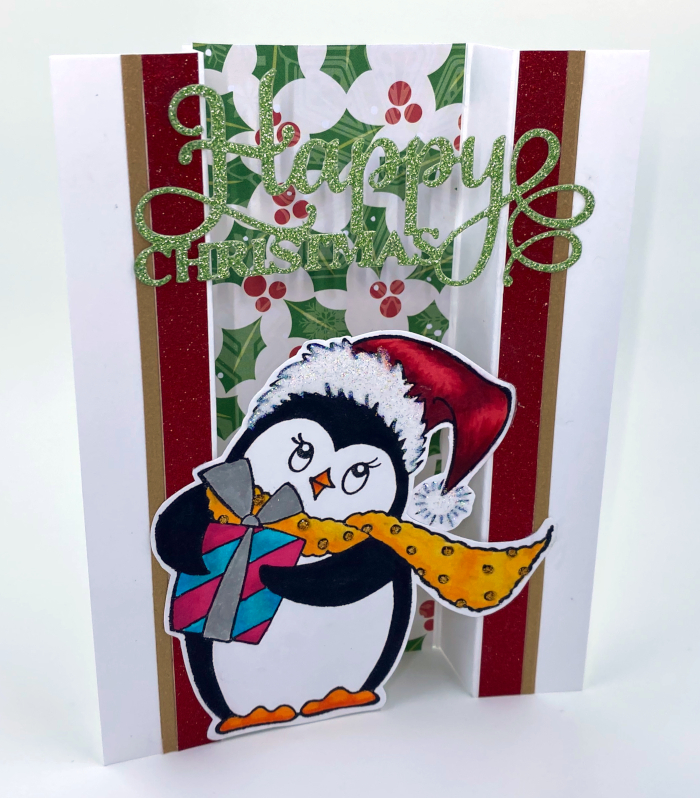
Well, they are perfect for bridge cards! The image spans the gap in the front to create a free-standing card with dimension!

I really like how this one turned out. I coloured these cards with my Copic Marker alcohol markers. These cards are also a fantastic way to use up scraps! The paper in the centre is a scrap as well as the two, half-inch strips along the sides! Plus, it still folds flat to put in the envelope.

I really enjoyed colouring this Santa with the kittens.

The only thing about the vertical bridge cards is that it leaves only a tall skinny space to write on the back. So, I figured out the dimensions for a landscape version. I coloured another image from High Hopes Rubber Stamps for this card.

The sentiment on this card is from a stamp set by Dreamerland Crafts. Both High Hopes and Dreamerland are small Canadian businesses. I know huge sentiments are all-the-rage right now, but if you are using a huge image stamp, a small sentiment is just what you need - and we all probably have heaps and heaps of those!

Boy, it took me a long time to colour this one just-so, that's for sure! I used a stitched hill to bridge this card, even though Santa and the reindeer would have been wide enough on their own. I had thought about doing a roof top with layered scallops. I might try that next time. For this Santa, I added some sparkle on his coat trimmings and hat with Nuvo glitter drops. (Stickles would work just as well.)

So, bust out your BIG stamps and dig into your scraps. Have a ball creating bridge cards for all occasions!

Friday, November 6, 2020

Bridge Cards for the Holidays

 I was inspired by the talented and clever Jennifer McGuire to try my hand at some bridge cards. [Click to see her bridge cards.] I don't like tent fold cards because they flatten out when you try to display them. Therefore, I rarely make cards in landscape orientation. These bridge cards create a way for cards to stand freely, no matter the orientation!

I worked out dimensions different from Jennifer's so that I could maximize the writing space on the backs. I started with some portrait orientation slimline (or tall skinny) cards. The door wasn't quite wide enough to span the gap, so I put a banner behind it. The one with the row of houses was definitely much easier. I really like how Santa and his reindeer turned out. They are from the North Pole Littles stamp set by Hello Bluebird who have such sweet storybook style images. I mounted them on acetate and then strung paper twine between them to be the reigns. (And, of course, there is glitter on Santa's hat!)

These are how the landscape versions of A2 (4.25 x 5.5 inch) cards turned out.


I used a heat embossed Christmas tree stamp and coordinating die, plus a die cut sentiment to span the gap. On the silver tree, I used multi-colour homemade enamel dots as the ornaments (or baubles).

Then I tried it in portrait orientation. This tree has white blizzard Nuvo drops as the baubles. I die cut the sentiment three times from thick cardstock, layered it up and then die cut it from silver glitter cardstock for the top most layer.

I finally have a way to use some of my GIANT stamps! They can span the gap on these cards! This penguin is sweet, but so big. My sister has a similarly big snowman stamp. So great to find ways to use what we've got!


These bridge cards are truly economical on patterned paper. What a fantastic way to use up scrap strips in the centre panel! The downside to it, thought, is that the portrait versions have such a narrow space on the back to write. There really isn't a lot of room. I could put a tent-fold flap back there to create more room, but I decided to work out the dimensions for "open front" shadow box cards (as opposed to diorama-style cards with a framed window, like I made before). These achieve the same dimensional effect but offer more writing room on the back than the bridge cards. This one isn't quite the one I was aiming for. I will try some more where the "front bench" is really a scene that spans the gap. But this was the one I made to test the sizing.


Have you started your holiday cards?? With the postal service expecting to be more overwhelmed than normal, we'd better aim to get our cards in the mail earlier than normal. (I'm always late to the post office with my holiday cards. To be truthful, I probably will be again this year, despite the best of intentions!)

Saturday, August 8, 2020

My Experiments using Hockey Tape in Scrapbook Mini Albums

Hello world! Sorry that I've been MIA from the blog! I am fortunate enough to be able to work full time during the world-wide pandemic, so I haven't found myself with a bunch of free time. But that doesn't mean I haven't been crafting! I have tried to use up supplies and work on projects that I always meant to do but never got around to.

One of those projects I've been working on for several years now is perfecting the mini-album build. Hinges have been the last sticking point: both for the pages and for the album cover. In the last few months I have solved both! I have a walkthrough video of these (scroll to the end), but here are some pictures too.

I found a way to stitch-bind ribbon hinges. I tried a few ways that were not quite perfect but I have tweaked it and now I am happy. For the covers, I found the ribbon too thin. I really liked the versatility of duct-tape for album cover hinges but, after trying it once, I decided against it. It was not quite right.

I've seen people using a "black construction tape" which looks good but you can tear it with your fingers - like masking tape or painter's tape. That seriously worries me. So, I went looking for a cloth tape and, being in Canada, the first thing that popped up was hockey tape!

EDIT: I thought I was the first to think of this supply for paper crafting, but Following The Paper Trail on YouTube used it in Feb 2019. Her video is here: https://youtu.be/f4tMFVxapD4 .

Three of these albums use hockey tape for the spine hinges. I wrapped the outer spine on all but one (the blue one). So, the blue one shows the hockey tape all around the edges. The album on the left is included because of how I've used hockey tape on the inside.

First, let's take a closer look at the hockey tape on the outside covers. (Keep in mind, only one album is actually finished, so you're looking different stages of progress here.)

The blue one shows fully exposed hockey tape hinges. You can see the seams, but if I had made the cover paper a little bigger, you wouldn't notice as much. The flexibility of this cover is amazing!

The black looks particularly good, in my opinion. I wrapped the outer spine of this album with thin paper, but I did not wrap the inside. That hides the hockey tape seams on the outside, but doesn't make the cover too stiff with paper.

I did the same on the red one, but this one I rubbed gold Nuvo Embellishment Mousse on with my finger to give an aged distressed look. The hockey tape takes mediums very well!

Hockey tape comes in "white" too, but it's not a pure "white". I show you in the video. I'm not going to use the white. If I want white covers, I will use kraft-tex. I also show you in the video that I think my new favourite combination is kraft-tex for the covers and hockey tape only on the pages. But the hockey tape on the album cover hinges is far more flexible than the kraft-tex and far more affordable. So, once my stash of black kraft-tex runs out, I use the hockey tape and only buy the kraft-tex in white. (I show you a kraft-tex one in the video.)

Here's how the inside spines look. All three have the hockey tape exposed on the inside. I think it looks just fine!

As you can see, I also used hockey tape on the insides to edge the pages! Since these are proto-type experiments, I needed them to be quick and use materials I have a lot of. Well, I have A LOT of business envelopes. But, envelopes are not very durable, so I used the hockey tape to reinforce them and it looks great, feels great on the fingers, and makes the pages match the cover! Triple win!

On one album (on the left), I painted the hockey tape with a red acrylic, metallic paint. It makes the page feel a little rough - exactly like painted canvas. Once mostly covered by the decorated pages though, I'm not worried about it.

Here's a close up of the flexibility of these spines. I can turn the book right inside out! Because the black one has paper on the outside, it's a little bit stiffer trying to turn it inside out. However, all of these albums stay shut very well when standing up - i.e. no alligator mouth!!

I'm so happy I found this medium! Hockey tape is hard to tear and pretty cheap! It comes in a small range of colours - but that doesn't matter if you can paint it! I forgot to say in the video, it comes in two widths too but I found the narrower one was enough.

CLICK to watch the VIDEO of these prototypes!

Sunday, March 15, 2020

Pop Up Slider Easter Card

There's a new pop-up slider die cut on the market that creates a mechanism for the pop up feature. This one does not involve a slit in your card, so it's different from the others. I very nearly bought it the day it became available! BUT... as I DIY'd the slit version, I decided to attempt a DIY version of this one first too.

And it worked. And it was easier than the slit version! So, I used it on this Easter card.

The bunny's ears are peeking out of the wagon. Pull the tab at the bottom and UP pops the bunny with its Easter message!


I think it's fun! I used distress oxide ink for the sky, splattered it with water for texture, and then sealed it with a Vaseline-glycerine mixture that is similar to micro-glaze. The stitched hill is raised on foam tape to hide the pop-up slider mechanism. (I have a second design like this in mind but I don't know if I'll get to it.)

I coloured my bunny with my Copic markers.


I like this new style of slider. I will have to experiment with it more in the future.

What's your favourite style of interactive card?

Saturday, February 8, 2020

Scrapbook Mini Album - Black and Rainbow - Video!

I made this scrapbook mini album from #10 business envelopes for a friend. This album would work well for pictures of family, or school pictures, or a specific event like a trip or a play day or summer time, etc. Also makes a nice brag book for the mantle or to gift to grandma and grandpa!

The album is stitch-bound with ribbon page bindings and embroidery floss thread. I followed a video tutorial (in a language I didn't understand) for making the stitches and worked out my own dimensions.


For landscape photos, it holds wallet photos: 3.5x2.5 inches or the smaller 2x3 inches. These sizes are 1/4 of a 5x7 and 4x6 photo respectively. It will also hold half of a 4x6 (at 4x3) in but portrait orientation only. It can hold these in landscape if they are not stuck down (i.e. rest the photo inside the pockets and pull them out to see). With 20 pages, this album will hold at least 35 photos.

The cover includes a homemade polaroid-shaped embellishment. I painted a chipboard dragonfly and then stamped on it. I stenciled a heart in the centre with platinum embellishment mousse coloured with paint.

I tried out some different page styles in this album. I liked this one the best. It's a slide-lock closure. Slide the butterfly embellishment to the left and the belt opens so you can lift the page flap. The other style I tried was a slot-lock, but I didn't like that one as much.

I've posted a video walkthrough of this envelope scrapbook mini album on my YouTube channel. There's a reveal of what I used to edge my covers. (I also put it on the pages to make them more durable.) I made a few of these covers before determining I liked it. I hope to do a future video on those practice models one day.

Tuesday, February 4, 2020

Tall Skinny Dragon Birthday Card

I'm going to host a tall, skinny card class. So,  I thought I would practice on my nephew's birthday card. I love how it turned out! I broke open some NEW supplies for this one.

I started with an ink-blended sky. I used my home-made cloud stencil and my new, make-up brush ink-blending brushes (that I got from Amazon for Christmas).

I have SO many #10 business envelopes still from when my old firm existed. When it merged with another firm, their old business envelopes with the name and address became useless. They let me have them and I have many (hundreds). I've been meaning to try tall, skinny cards for a while. Mojo Monday has some sketches for some.

I modelled this handmade birthday card after >>>this card (click to see!)<<< by Kristina Werner, blended with a >>>dragon card I made (click to see!)<<< before with the same style of sky.
I also used my new Dragon Plushies stamp set from Clearly Besotted. (The set in the link is not the same as mine. I got one with a cloud stamp instead of the one in the link with the really cute sentiments. I would have preferred the cute sentiments.)

I coloured the dragons with my Copic markers, using my new favourite dragon-green combination (YG03, YG09, C5). I used my sparkle pen on the horns and candles. I've tilted this picture so you can see the shimmer.
The sentiment is white embossed on black cardstock for high contrast. I used my cloud border die to cut the base cloud.

I think it turned out cute! And, you know what? This card is the perfect size to hold cash or a cheque - the oft-preferred gift of teenagers!

Sunday, January 19, 2020

Crocheted Christmas!

I am definitely one of the crazed Baby Yoda fans sweeping the internet. We have really enjoyed the first season of The Mandalorian on Disney+ and we are looking forward to the second season! My sister made me a couple crocheted dolls of the Yoda-esque youngster for Christmas. She used a combination of doll ideas to build her Baby Yoda.

She did make this one with the baby's signature brown robe, but she also made me a Santa outfit to dress him seasonally.


Isn't he cute! In this picture, his hat pushes his hears down a little. Normally, they stick out more, like the character's. And, since I couldn't decide what shade of green to make him, I also got one made in this very soft green gray yarn:


Since this one is a soft yarn, the ears are floppy. He is adorable! I like the embroidery floss around the eyes better than the thicker ones.

These guys stand about 13-13.5 inches. Here's the small version, which is more like 8 inches.
The yard around this one's eyes is split to make it thinner too, like the floss version. My husband favours the dark-side, so my sister made a dual-ended light saber for this doll. He's currently at the office on display for the week.

Handmade Holidays are the best!