
I have been house building! It took me 3 obsessed days to work out the perfect measurements to make a house box luminary out of one 8.5 x 11 inch paper. And then, I spent another 2 days making it bigger. I was inspired by a gingerbread house die by Tonic Studios which then lead me to the Sizzix Village Dwelling die by Tim Holtz. That die set is what ultimately inspired my final prototype. (That die is the base for a bunch of add-on dies which transform the base house into different themes and additional shapes, like a dormer or bell tower. It's a seriously genius product!)
Several things contributed to the way I figured out how to make these from scratch:
At the end of the experiments, I have 10 prototypes to show you! Let me take you on my journey.
During the prototype sizing stage, I was working only on sizing: how big of a box I could get from a full sheet of paper. Then I went down to half-sheets of 8.5 x 11 inch paper. How big could I get those? Therefore, there was pretty much no decorating at this point.
Here are the combinations I came up with:

I did a few with the flat of the roof as front-facing (boxes 1 and 5). The rest have a side-facing roof. I also did a few with the chimney to one side and some with the chimney straddling the roof fold. Keep in mind, these are totally unfinished. I was just going for size here.
However, just to show how it might start to look like a house, I put windows and a door on one. The door is actually a little foyer (a mini house attached to the front) with a little roof of its own. The porch posts are designed the same as the side chimney, only up-side down so that the angle part attaches to the underside of the roof.
Imagine! Here are some possibilities:



Several things contributed to the way I figured out how to make these from scratch:
- A tutorial on how to make a house box with the envelope punch board by Paper Passions. This is what started it all. Seriously clever!
- I have an envelope punch board but what if you don't? I love watching videos by Pootles Papercraft (a UK Stampin' Up! Demonstrator). I've seen her make milk carton boxes before and she shows how to get the angled top. I decided to follow that instead of using the punch board.
- The Sizzix Village Die set (including add ons). People have created amazing stuff with them. I was going to purchase it but I didn't want to wait for shipping! I wanted to see if I could DIY my own version.
At the end of the experiments, I have 10 prototypes to show you! Let me take you on my journey.
During the prototype sizing stage, I was working only on sizing: how big of a box I could get from a full sheet of paper. Then I went down to half-sheets of 8.5 x 11 inch paper. How big could I get those? Therefore, there was pretty much no decorating at this point.
Here are the combinations I came up with:

I did a few with the flat of the roof as front-facing (boxes 1 and 5). The rest have a side-facing roof. I also did a few with the chimney to one side and some with the chimney straddling the roof fold. Keep in mind, these are totally unfinished. I was just going for size here.
However, just to show how it might start to look like a house, I put windows and a door on one. The door is actually a little foyer (a mini house attached to the front) with a little roof of its own. The porch posts are designed the same as the side chimney, only up-side down so that the angle part attaches to the underside of the roof.
Imagine! Here are some possibilities:
- Decorate the side-facing roof lines with a border punched trim (boxes 2, 3, 4, 6 and 7)
- Add a porch step
- Add window boxes
- Add snow to the chimney tops and roof tops
- Add cotton coming out of the chimney as smoke
- Use paper straws, mini dowels or even round toothpicks as porch posts
Of course, there are a myriad of finishing touches too (e.g. use embossing folders, create a base for the house to sit on so that you can put a fence around the yard and greenery in the yard, use patterned paper to create a theme: gingerbread, Christmas, cottage, beach, haunted house) but there are too many to list.
Here's how the sizing worked out. Once I determined the size of the base I liked best, I could then experiment with the height. The heights shown in the previous picture are what you get when you maximize the paper you started with (8.5 x 11 inches or 5.5 x 8.5 inches).

8.5 x 11 inch sheets:
Box 1: Base 2.5 inches square, Height 6 inches to highest point of roof
Box 2: Base 2.25 x 3 inches, Height 6.25 inches to highest point of roof
Box 3: Base 2 x 3 inches, Height 6.5 inches to highest point of roof
Box 4: Base 2.5 x 2 inches, Height 6.75 inches to highest point of roof
5.5 x 8.5 inch sheets:
Box 5: Base 1.75 inches square, Height 3.75 inches to highest point of roof
Box 6: Base 2.25 x 1.75 inches, Height 3.75 inches to highest point of roof
Box 7: Base 2.25 x 1.5 inches, Height 4 inches to highest point of roof
My favourites were boxes 2 and 4.
So, I started with box 2 (2.25 x 3) and made this prototype at 3.75 inches tall.

Again, this is largely unfinished! I just took the prototype a little further by embossing the roof, cutting out the doors and windows, and adding a porch step. The windows are covered with vellum.

I wanted my boxes to open. So, on this prototype, I used magnets on the back of the roof. I had to use a side chimney because a centre chimney (that straddles the roof) would block the roof from unfolding to open the box.

I was very very happy with this box! However, it felt a wee bit small to me. It is hard to reach in there - and I have little fingers!
So, I decided to abandon my obsession with making it fit on one piece of paper. I went with 1.5 pieces. Doing this allowed me to make a bigger base. This house box is 3.25 x 3.5 inches and 4.25 inches tall.

Using separate pieces of paper also allowed me to have one wall totally separate from the house. By doing that, I could attach it at the floor and have the whole back of the house open up! (You can still choose to adhere it shut, however.)
Magnets are expensive though. So, I also experimented with tabs to tuck the back wall and the roof in as a closure. Lastly, I wanted to use a centre chimney, so I also used tabs to hold it on. The chimney pops out to open the box.

I liked this size much better! But... I felt like this house was "fat". The side wall was too wide. So, I played with the dimensions once more. This is it. This is the size I like the best!

I also experimented with my own doors. The windows and doors to this point came from a Top Dog die set. (Top Dog dies was the wafer-thin die arm of Accucut Craft but it has since closed down.) I used free clipart online and altered it in Inkscape to create my own die cut door to cut on my Brother Scan'N'Cut. I made matching round-top windows, but I didn't cut those for my prototype. (If the door worked, the windows should work.)
(By the way, you can DIY your own round top door using a circle punch and cutting only one end of a rectangle - the same way I made my Popsicle shape. You can use a small circle or square punch to make a hole for a door window, if you want too. And you can use a score board to emboss some planks in the door.)
I also did up the roof differently. I know I plan to use my scalloped border punch to make scalloped shingles (especially for a gingerbread house!) but I liked the whimsical look from odd-sized shingles. (It is an add-on to the Sizzix house die.) I used my Accucut Craft 3/8ths strip maker die to cut evenly spaced slits in paper strips. Then I randomly cut the ends shorter and longer to get this textured roof. I also "beat up" the paper a little before sticking it down. (This roof took a really long time.)

Lastly, I didn't want the chimney to get lost when you open the box. So, I attached it with ribbon. You can pull it up to open the roof, but the tabs won't come all the way out.

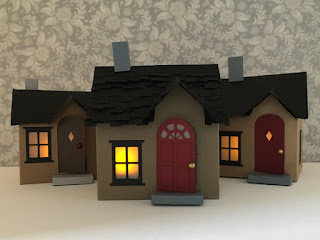
There you have it! My final prototype! Here's the best part. I put battery-operated flickering tea-light candles inside!

Of course, if you want to make it a gift box, you don't need to cut out the windows and doors. You can just adhere them straight on to the house so that your box will be solid for whatever it holds. (Looking at them this way, I'm liking the side chimney more.) Here's the back view of the houses:

Now that I have 10 pages of notes, sizes and diagrams so that I can make a whole village of various-sized house boxes, my obsession has subsided. (Once the idea is made real, I can let it go.) Maybe (just maybe) I might make one house per year and slowly build a village. (I have a prototype for a pyramid topped roof tower percolating in my mind - to mimic the church bell tower add-on in the Sizzix set.)
You could seriously go to town decorating these things. Again, these are my prototypes with pretty much no decoration - just structure. Google search for the Village Dwelling die. You will see amazing things. Tim Holtz also has a house box called the Brownstone. My tall, skinny box #3 looks like it. One person attached one of those to the squatter house as an addition. It's so cool. Oh, the possibilities!


