Tuesday, February 21, 2017

Birthday Cake Card with icing and sprinkles!

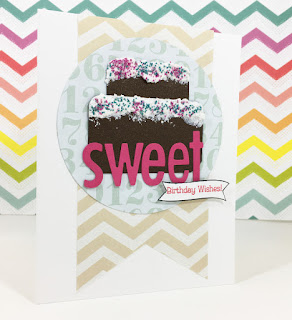
I put a big ol' iced birthday cake in the last custom baby album I made. I liked how it turned out so I used the idea for my nephew's birthday card.
I used my trusty ol' Studio alphabet dies from Quickutz to cut out the word "Sweet" and I used a die and a stamp from Close to My Heart for the "Birthday Wishes". The icing on the chocolate cake - now that was messy but worth it!

I used Snow Tex. It's a paste that dries hard and bumpy and looks like snow. While it was wet, I sprinkled micro beads in it. The Snow Tex holds them quite well! I did smoosh them in a little bit with my finger.
I made it in time for his birthday but my husband wanted to wait to the weekend when he could put the gift in to give it. Then, the weekend came and went, so the card was handed over quite late, but it was ready before! (Of course, I wrote a custom sentiment for the inside too!)

I like how this can be a unisex and any age card. Everyone likes food, right? You can change up the colours to make it more feminine or masculine as desired too.

Have you tried Snow Tex? I've seen winter scenes with it where some glitter was dropped in while it was wet. Really pretty effect. (I mean to try it.... someday!)

Wednesday, February 15, 2017

Speed Coloured Reindeer in Alcohol Markers

(It's still winter, so I'm still posting Christmas stuff!) This year, my "quasi-mass production" Christmas card was new a baby reindeer die cut from Tonic Studios. I'd been waiting for the right outline dies for trying the stained glass technique with. I found it at Tonic Studios.

But, I didn't do stained glass with this one. I coloured it with my alcohol-based markers. I started out with my Copics, but my E37 (Sepia) colour started to run dry. So, I swapped it out for E57 and that worked okay. Then I decided to try it with my Bic Mark-It alcohol markers and they turned out beautiful too!

(This one used Copic markers.)
I made a video of me colouring these: one with Copic marks and one with Bic markers. You can see the video on my Vimeo channel here ** Speed Coloured Reindeer Video **. (The video is silent and commercial free.) Or, you can watch the HD version on Youtube here ** Speed Colouring Reindeer ** (Youtube has commercials).

Here's how I used them on my finished cards. I started with this more involved version that includes a Spellbinders die cut mat and a bed made from my Martha Stewart Branch Punch. The sentiment I stamped from a Close to My Heart set.

(This one uses Copic Markers.)
Inevitably, as time grew shorter and shorter to get these to the post (yes, several were mailed on December 23rd), I started simplifying the card. So, some people got this version:

(This one uses Bic Markers.)
Since the Bic set had fewer browns, I used two shades per area. Since I have a lot more Copic browns, I used three shades per area. Hence, the Bic version went faster. The Bic version also came out darker just because those were the only colours I had. The lightest brown seems to have a yellowish undertone that I thought gave it a suede look (on the foot pads and the muzzle). It was a nice look.

I really like both markers! I had to lay down a little more ink to blend the Bic markers because I had fewer shade options, but it still worked!

Hope you enjoy the video! Feel free to comment and share if you do!

SPOILER ALERT! I had trouble with my video, so I actually coloured extra reindeer. So, friends and family, some of you who didn't gt this card this year could get it next year!

Wednesday, February 8, 2017

Winter Trees

The holidays are over, I know. But it's still winter! So, I'm still going to post holiday cards!

I received a small handful of handmade cards this year. This one really stood out. It has textured embossing (inside and out!), heat embossing and glitter!


This came from my friend and creative crew member, Claire! It's seems simply stated but there's a lot going on in it. The gold ink was sponged on, the ribbon adds even more texture and the inside has gold metallic paper and embossing.

Can you see the glitter in the trees glisten? (Click photo to enlarge.) That's my favourite part!

This is a particularly lovely image with the realistic trees.

Claire didn't stop on just the outside. The golden theme carried through to the inside as well, along with a texture embossed border and golden heat embossed sentiment.

It definitely made me smile! So pretty! (I can't seem to find the rest of my pile of cards, so they may or may not make an appearance on the blog!)