Thursday, August 8, 2019

Dragon's Birthday Gift

Here's another challenge card. This one is for the Kraftin' Kimmie Stamps Challenge #492: Green. I will be going to my first Kraftin' Kimmie stamping/scrapbooking retreat this year. I have a few Kraftin' Kimmie sets and one is these Darling Dragons. Dragons + Green works perfectly for this challenge entry!

I used Paper Craft Crew Card Sketch # 325 for this card. I added a little gift from the dragon using a stamp in a Hello Bluebird set of stamps that I have.
(Click photo for larger view.)

I used a scrap strip of patterned paper. The sketch called for a bigger piece at the bottom but my strip was narrower. I chose to place it higher and border it with two 1/8th strips of metallic black cardstock. I used my 1/8th strip cutting die from Accucut Craft to make the strips perfect.

I coloured this dragon with Copic markers and also added the iridescent medium to its spine and tummy. I used a Sakura sparkly pink gel pen on the gift's ribbon.
(Click photo for larger view.)

I masked the gift first and then stamped the dragon after so that the gift would be in front. I heat-embossed the sentiment in white on the dark navy paper. The paper scrap has glitter in it as well, but I didn't get it in the photo. A tiny scrap of silver glitter paper finished the card off.

Monday, August 5, 2019

Shimmer Dragon

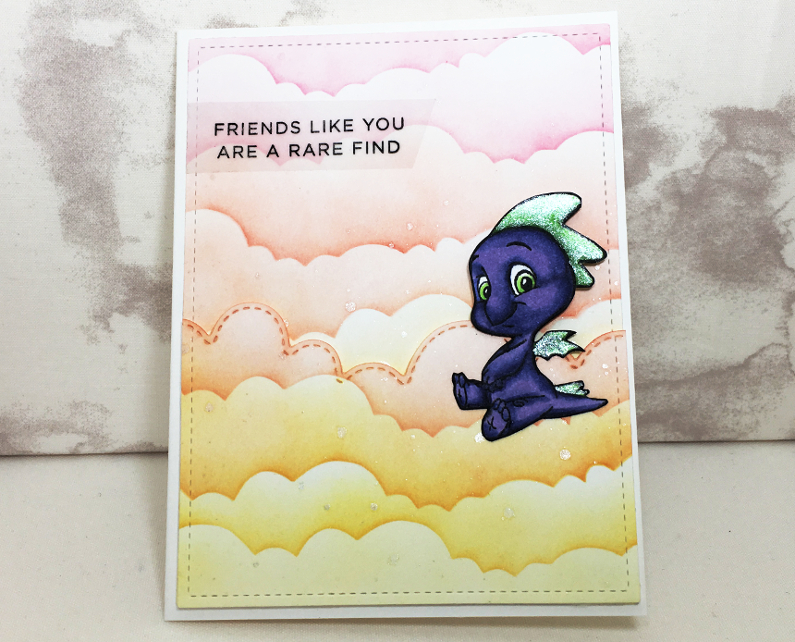
It's been a long time since I have participated in any card challenges. I saw the current CASology challenge #348: Shimmer and knew I had lots of stamps I could make shimmery! I like the CASology challenges because clean and simple is my style. I like to minimize bulk so that my cards are more mail-able. I am too late to actually join the challenge, but it's fun to play along nonetheless!

I have fairies, unicorns, and dragons that I can add shimmer to. I chose the very cute C.C. Designs Rubber Stamps dragons for this card. I've seen many rainbow ink-blended cloud backgrounds and I decided it was time to try one myself! I used my homemade cloud stencil and 3 colours of dye inks. I coloured the dragon with my Copic markers.


For shimmer, I used an iridescent medium by Liquitex that is designed to be mixed with acrylic paint. I applied it with a paint brush to the dragon's spines and wings. I tilted the card in this picture so you could see the shimmer. I also splattered some among the clouds. It comes in a large bottle and you can get it at Michaels with a coupon. When my Wink of Stella pen runs out, I think I'm going to put this stuff in it! It has the same effect. The only differences to me are that 1) it doesn't come in a waterbrush, 2) it has more of a white or silver shine, 3) it's cheaper by volume.


The bottom section of cloud is a panel I used a cloud border die on and then popped up on foam tape. The sentiment is from a Hello Bluebird stamp set with a Yeti. I stamped it on vellum and and ran it through my Xyron 1.5 inch sticker maker to adhere it.

It was nice to be inspired by a challenge to make this card. I think it turned out pretty cute!

Saturday, July 13, 2019

Christmas in July Shaker Cards

I try to sneak at least one Christmas card into my workshops each time. Those are by far the biggest batch of handmade cards I send in a year. So, for our July shaker card class, I made sure one was Christmas.

Another could be Christmas but it could work for a winter birthday too. The summery card is a "just because" kind of card.

I was inspired to make shaped shaker kits like the ones from Queen & Co. If you've got a Xyron sticker maker and some nesting dies, you're good go. Else, you can buy the whole kit and kaboodle from Queen & Co.

I really liked Queen & Co.'s All Bundled Up kit. I love the chubby little penguin in it. But it also has this cute winter hat, or tuque we would call it here in Canada. I like watching CardsandCoffeeTime's youtube videos. She's on the Queen & Co. design team and I really liked her version of the hat card (<--- click="" her="" p="" post="" see="" to="">
I don't have the kit or dies, but I have a half circle by Frantic stamper. So I used that and made my own shaker hat!
This shaker is filled with seed beads from Dollarama or Dollar Tree.

For card number two, I've been a fan of collage front cards for a long time, but never wanted to invest in the cost of the dies. I finally bought a couple when I found a good sale on Accucut Craft's website. I got the dies for only a little more than the wafer thin, chemically etched dies, but these are steel rule. So, I can cut chipboard and thin wood and other materials if I wanted to collage a home decor piece or something.

These are colour blocking dies, but they are also called collage dies or cover panels. I bought one in A2 (4.25 x 5.5 inches) and one in A6 (4.75 x 6.25 inches) as I make my cards those two sizes almost exclusively. Here's the A6:
I *love* how this card turned out. I used glitter cardstock from Dollarama or Dollar tree. It's thin, but pretty and doesn't shed. I used a handful of paper scraps for the backdrops and then a mix of beads and sequins inside. This type of collage card is *excellent* to use up small scraps! I coloured the bunny with my Copic markers.

Here's the A2 card. I just had to use these penguins from Hello Bluebird. (I love the storybook style of drawings for Hello Bluebird's stamps!) This one is not a shaker. I wanted to see how well it looked just flat instead of a shaker. Isn't it cute? Mommy and Daddy penguin are by the mistletoe while the kids have a snowball fight.


Back to the shaker cards! Our last shaker card for the workshop was a springtime Yeti (a.k.a. abominable snowman, a.k.a. sasquatch). I could have coloured him brown like a sasquatch but I didn't.

He is also a Hello Bluebird stamp, along with the sentiment. I wanted to show my creative crew how, if you use vellum instead of acetate for the shaker window, you can tone down what's behind it. Here, we stamped on the vellum, but you could stamp on a strip of paper and lay it across the vellum. (If you stamp on vellum, you must use Stazon or other archival/permanent ink because vellum is non-porous.) Because the vellum tones down the shaker filler, we used all sequins in this shaker. There's a mix of 5 warm coloured sequins in there.

We used my homemade cloud stencil and some Dollarama make-up brushes to create the sky. The round balloons are from a Stampin' Up! punch that I have and the heart shaped one is from a Marianne Design die set. Again, I used Copic markers to colour the Yeti and the bluebird.

The crew enjoyed this workshop. Having the shakers as a whole kit really made them go faster for the participants. Hooray for Queen & Co. for doing the heavy lifting and offering simplicity to their shoppers which inspired me to do the same for my creative crew.

Sunday, June 16, 2019

Give a Poem a Home - Father's Day 2019

Hi Crafty Internet!
Happy Father's Day to all the dad's, grand-dad's and guardians out there. For my dad this year, I made an interactive handmade card. I've seen these referred to as flip it cards and also as Swing Cards, but there are other kinds of swing cards out there now.

The interactive part comes from a shape cut in the front. You fold the card front one way and the shape the opposite way so that, when you open the card, the shape rights itself into a flat sheet of paper, revealing the back side of the shape.


So, on the front, my card says "You're out of this world." On the back, it says: "Happy Father's Day."

Most swing cards do not have the extra flap. But I didn't like the idea of squishing my sentiment behind just 1 half of the shape. So, I put a flap on mine so I could fit a larger sentiment. I used Lawn Fawn's "Open Me" stamp on it so that my dad will know it's a tri-fold card.


The inside reads:
With lots of love
And happy thoughts
We hope you know
We love you lots!

Have a very
Happy Father's Day!
We hope good things
Will come your way!

I made the galaxy background on the outside and framed it in my hexagon nesting dies from Marianne Design. (Purchased from Ecstasy Crafts online store.) If you would like to see, I made a video of my galaxy background process on YouTube. I didn't have a big enough Father's Day sentiment stamp, so I dug out my old Quickutz Empire font dies to make this one. I used a star embossing folder instead of patterned paper on the outside. The rocket is a die cut that I cut from some self-adhesive silver metal sheets (also from my very old Quickutz stash.)

I worked out the dimensions for 4 of these flip it cards:
  • A6 (4.75 x 6.25 inches) in portrait and in landscape (portrait one shown here)
  • A2 (4.25 x 5.5 inches) in portrait and in landscape
Actually, I discovered the pattern for making these so that you can make this kind of card in any size. All you really need to know is the starting point and that number is one half the width of your card front.

I had an urge to make a girly version of this design, so I made a birthday card.


I used no patterned paper again. I use more of my galaxy piece and I stamped the pattern. I didn't have the right pink colour for cardstock, so I made it by inking white cardstock with pink ink and added some iridescent acrylic medium to make it sparkly.

I also made the sentiment area so that you can slide the sentiment in or out in case you mess up and need to turn it over or cut a new piece and start again.


These little critters are stamps from Hello Bluebird that I coloured with my Copic Markers. I think they are sweet.

Have you made Flip It cards before? What's your favourite kind of interactive cards?