Sunday, May 11, 2014

Recycled Beverage Can Bouquet

 HAPPY MOTHER'S DAY!
Here's a Mother's Day bouquet that will never die! This project is made from recycled beverage cans using my Accucut GrandeMark die cutter.
The vase is a Tetley Tea canister with tissue paper butterfly. The flowers are glued to barbeque skewers, and stuck in a Styrofoam ball glued to the bottom of the canister.  The canister is filled with plastic vase filler beads to cover the ball.

My sister cut the flowers from my Accucut Craft holiday flower die and layered them with dimensional foam tape. She used her Stampin' Up ornament die for one flower and my Accucut Craft Christmas light string bulb die for the petals of another. Here's a close up of the Christmas bulb flower:
The intricate butterfly is a Memory Box die.  My sister reclaimed some tissue paper from a gift bag to make the translucent base and used a scrap of patterned cardstock for the intricate top layer.  You can see the leaves on this bouquet are also from my Christmas die: it's a pointy bottom ornament shape.  The other flowers were made with my sister's Stampin' Up! ornament die. It's the blue one in the back.  It's a dark blue tissue paper alternated with white cardstock for more stability.

Here's a picture of the other critter in the bouquet: a dragonfly.
The small dragonfly is also an Accucut Craft die. These dies cut the thin metal beautifully and help to create a more finished edge than cutting only with snips. I entered this project for my sister into the Accucut Craft Grandemark challenge (contest closed May 4).

Friday, May 2, 2014

New Cat Die Cut!

Well, I made a new dog die cut not long ago. I used it for a dog scrapbook mini album.  (It's not that mini. It's a pretty decent size at 5x7 inches, actually.) I figured it's only fair that I make a cat album too, and that means - a new cat die cut!
Why didn't I do this one first?  It was way simpler than the dog one!  Anyway - I have used this die cut on my first ever cat themed scrapbook mini album. (Video link at end.) I made this one specifically to benefit animal charity.  35% of the proceeds of this album will go to the Etsy for Animals Charity of the Month in the month it sells and 15% will go to the Southern Ontario Animal Rescue (a local dog rescue and registered Canadian Charity). (Right now, for May 2014, the charity of the month is a kitty charity - how fitting! Want to support animal charity? Click the picture below to go to my Etsy shop and buy this album!)

https://www.etsy.com/ca/listing/188332126/cat-envelope-mini-album-with-50-percent?

I really like this envelope album style because it sits so nicely flat.  (My first one was a love themed envelope mini album.) On this one, I reinforced the spine with Tyvek, which is a very thin plastic-like material that is water resistant and tear resistant. The spine allows for a small amount of expansion to accommodate filling the pages with photos. The album pages are made with business reply envelopes, which allow for 4 x 6 inch pages. So, the photo mats are a little bit smaller than a standard 4x6 inch photograph.

In the preceding picture, you can see the small sized die cut cat.

All the inside pages are the same: Two pockets on the left - one larger tag and a smaller tag (for most pages); one large space on the right with a pocket for a double-sided photo mat. All-in, there are a total of 48 spots of various sizes for photos or stories.

The tags are a great size for a wallet photo (2 x 3 inches) and they are all blank on the back for writing down the photo's story, or facts and thoughts about the photo's subject.

I wanted to show you my fish die cut too.  I made it some time ago, but I found it fitting for this album.
 If you would like to see the WHOLE album, you can watch the mini album flip through on my Vimeo channel.

Tuesday, April 29, 2014

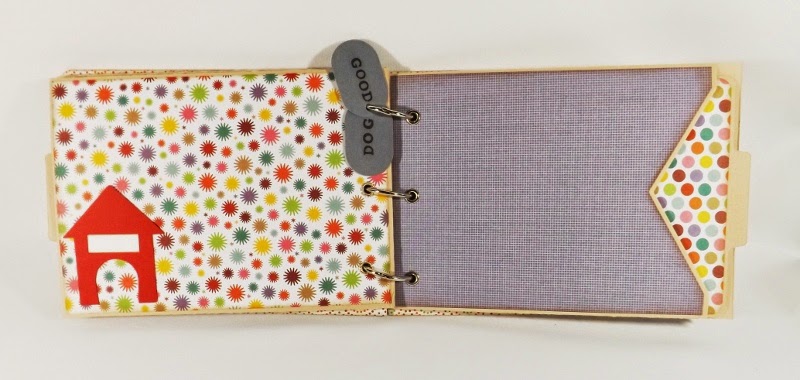
5 x 7 Dog Scrapbook Album

I finally decided to try a ring bound album with eyelets protecting the holes in the pages.  I like this look on the albums I check out but, boy, I am disastrous with eyelets! [I've definitely got to abandon that binding system when the last of my eyelets are gone.]

I started this album with the intention of donating it to the Speaking of Dogs fall online auction. I thought I had lots of time to finish it, but then the Accucut Craft GrandeMark challenge snuck up on me [with a much earlier deadline that I remember last year!]. I like this challenge because it makes me find more ways to use my dies!

So, for the base of this album, I used a 5x7 inch pocket card. Every pocket has a large photo mat that will fit a standard print 4 inches by 6 inches here in Canada) without any trimming needed. Same for the backs of the pages and, on the fronts of the pockets, a little trimming it needed or a 3x5 inch photo will fit just fine.

I put my original die cut dog on the front.
Another of my original die cut designs is the bone.  It's really simple: two hearts and a rectangle welded together. I cut this big one and I also put a couple smaller ones in the album.


I coloured this stamped out dog with my Copic alcohol markers.
I made this dog house on my electronic cutter too. I designed two houses: a 2 storey and a bungalow.  All I did to make it in to a dog house was welded an oval on for the door and cut it off at the bottom.
I recorded a video for this album showing all the rest of the pages [about 5 times]. I outline all the Accucut Craft dies I used in there.  I will upload it another day, because I am limited in the uploads per week that I can do.

I need to make another album to list for animal charity in my Etsy hand made card shop.  I was going to make another dog one but I started realizing how many cat people I know.  So, I decided to make a cat album. Once I made that decision, I realized I don't have a lot of cat embellishments. Well, that meant, I just had to make some.  I already had a die cut fish (which I made for a "Birthday Fishes" card). I also already have a die cut cat, but it's very cartoon-ish.  So, I made a kitty cat silhouette die cut.  STAY TUNED to see it in a future unveiling!

(If you already like my die cut dog, I have some available in my shops!)

Sunday, April 20, 2014

Bunny Birthday Card

In the spirit of Easter, I thought I would post this bunny birthday card I made for my sister.  Her birthday is in early April, she loves all manner of animals and she was born in the year of the Rabbit, so I thought it was appropriate for her.

I designed this die cut rabbit on my Boss Kut Gazelle. It was the first step towards designing my custom dog die cut. I cut it out of Bazzill Swiss Dot cardstock. Polka dotted cardstock is so simple but always so cute!
The doily is a Lifestyles Crafts die I got on sale at Michaels Craft Store.  Lifestyle Crafts was previously Quickutz and, more recently, purchased by We R Memory Keepers. We R Memory Keepers needs to re-brand the packaging, so there was a whole stand of 4x4 Lifestyle Crafts dies on sale at Michaels a while back and I picked up a few!

TIP: The sentiment is a machination of stamps.  I used an alphabet stamp by Studio G that I bought at Michaels for cheap to spell "Hoppy" and then I used a "Happy Birthday" stamp from Close to My Heart for the Birthday part. I put tape over the "Happy" part so that only the word "Birthday" would receive ink. I learned this tip from my Close to My Heart consultant, Sheri Ballantyne.

I composed a little poem for the inside too. My sister really liked it. I used papers from a Recollections paper pad I bought at Michaels.  Paper pads are on my "no buy" list, but I really liked how well coordinated this pad was, so I caved and now I feel obligated to use it up!  Do you ever have those days? I think half the fun of any hobby is accumulating all the goodies that go with it!

HOPPY EASTER to everyone too.