Saturday, May 27, 2017

Paper Quilled Humming Bird Card

My sister-in-law gave me this lovely card for my birthday this year. I've dabbled in paper quilling but I haven't made any for quite some time. I've always wanted to try filling a whole shape like this but it's so much work! I'm sure it's worth ever second though, to get a result as stunning as this!
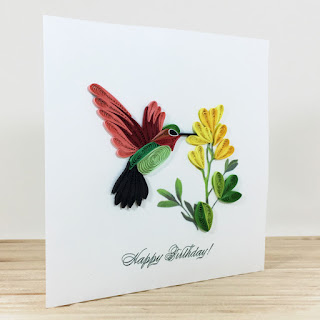
I love the detail and the colours. Paper quilling is surprisingly sturdier than it looks once it's glued down to the page.

The crafter who made this uses a unicorn for a seal. A little unicorn faux wax seal (made of plastic) was on my envelope. I kept it and now it's a badge on my craft room door!
If you would like a lovely card like this, it came from Quilling Card LLC.

Monday, May 8, 2017

Sweet, Summery birthday cards!

I hosted a Stampin' Up! party in January and we did a card swap. In a swap, each participant makes multiples of 1 card design. You pass yours out to other guests and get their design in exchange. For my card, I decided to use scraps.

 Buy this card on iCraftgifts!

I die cut some circles from rainbow chevron paper and offset them over the side of the card. Then I dug through my stash for some metallic strips and put them through my 2.5 inch circle punch. I pulled the end through the punch so I would punch only one end to get the curved side. Then I used my scalloped circle punch to take a "bite" out of it. A little more digging through my scraps yielded some strips to ground my sentiment. Then I sprinkled some star sequins on it.

The Popsicle stick is the Word Window punch from Stampin' Up! (now discontinued), but you could make it the same way I made the Popsicle - just use a smaller circle punch!


On some, I used regular cardstock for the Popsicle but then coloured over it with my Wink of Stella / Spectrum Noire clear glitter pens. I think they turned out just as good, but the metallic pearl paper looks more "real". Here's a vanilla Popsicle with a different background circle:


I made some chocolate ones too, of course! It was really quick to put these together (except if I used the glitter brush - they take a while to dry!). I think they turned out fun and cheery!

Friday, March 17, 2017

Poinsettia Christmas Card Received - 2016

So, I'm in the middle of a major paper studio overhaul. And, when clearing up some piles of paper (read: moving it from pile-up A to temporary pile B), I found the other handmade holiday card I received this past Christmas. My mother-in-law, Norma, made this one for my husband and I.


It has a doily-wrapped cover. The doily wraps around the left side which which keeps the card shut. That's right, this one opens on the left! There's a hand stamped sentiment inside too. We all liked that stamp at Scrapfest and had to resist fighting over it!

My MIL also used Stickles glitter glue on it to add some sparkle. I took a close up so that you could see. (Click picture for a bigger view.)


I didn't receive as many handmade cards this year as last year. No matter - it's wonderful to be thought of during the holidays that every card brings a smile! Thanks to everyone who keep us in their thoughts!

Tuesday, February 21, 2017

Birthday Cake Card with icing and sprinkles!

I put a big ol' iced birthday cake in the last custom baby album I made. I liked how it turned out so I used the idea for my nephew's birthday card.
I used my trusty ol' Studio alphabet dies from Quickutz to cut out the word "Sweet" and I used a die and a stamp from Close to My Heart for the "Birthday Wishes". The icing on the chocolate cake - now that was messy but worth it!

I used Snow Tex. It's a paste that dries hard and bumpy and looks like snow. While it was wet, I sprinkled micro beads in it. The Snow Tex holds them quite well! I did smoosh them in a little bit with my finger.
I made it in time for his birthday but my husband wanted to wait to the weekend when he could put the gift in to give it. Then, the weekend came and went, so the card was handed over quite late, but it was ready before! (Of course, I wrote a custom sentiment for the inside too!)

I like how this can be a unisex and any age card. Everyone likes food, right? You can change up the colours to make it more feminine or masculine as desired too.

Have you tried Snow Tex? I've seen winter scenes with it where some glitter was dropped in while it was wet. Really pretty effect. (I mean to try it.... someday!)