Thursday, September 24, 2015

Glitter Butterfly

Today, a long-time colleague retired. It was a bit of an emotional affair for her. She held up quite well though and gave a little story about the fit with the firm. We also go to hear what brought her to the firm in the first place (or what made her leave her previous job!).

Her absence will be felt. Although the firm got a card for her, I made one too.

It's a version of a Z-fold card. I folded the front panel back on itself and added a large circle. Inside the circle, I added a glittered circle with a die cut butterfly in it. I coloured the butterfly with my Copic Markers.


I got this glitter from Michaels - Recollections extra fine. It did not stay down as well as the Glitter Ritz microfine glitter does when colouring over it with alcohol markers. But it did the job.

I really liked how the purples turned out with this citrus green.

The solid green pattern is actually the inside of the card. I cut another circle for my sentiment and placed it so that the outside circle covers it. She has taken the cards home with her, along with an armful of flowers and a head full of memories!

Wednesday, September 9, 2015

Sheltering Tree Sympathy

I made this card for someone who suddenly lost his wife. She was fairly young (40's, I think) and leaves behind two children. There are rough days ahead for the family, so I wanted to make a card, even though I am not close to them.

I'm not the greatest with sympathy cards. It's for a man, so flowers were out. I saw a lovely card made with a white die cut tree. I just got the Stampin' Up! Sheltering Tree, so I knew I could do that with white embossing instead of a die cut.

Here's how mine turned out.

I backed it on a metallic brown cardstock and punched out a foil red heart to put on it.

The sentiment is from a Close to My Heart stamp set. I put a personal message inside, attached on a separate piece of folder paper. From my own experiences, words may fall on numb ears at this time, but cards are patient and have the ability to be read again later in a more receptive mood. They'll wait until you are ready.

Saturday, August 29, 2015

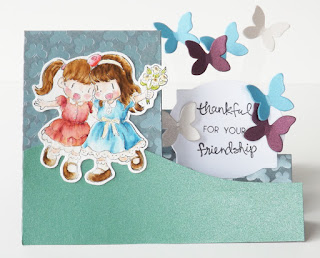
Thankful Friend Side Step Card

Here's a friendship card I made with my Accucut Craft Side Step Card. I know how to do a Side Step card by hand with a scoreboard, but I'm not that great with an Xacto knife, so having the die is a big boon to me.


I bought this stamp of the two girls on an impulse. I thought of my sister and myself as soon as I saw it and I just had to have it. [Have a made a card for my sister with it? Nope (not yet).] This is the first card I've made with it! The image looks watercoloured on the front of the packaging so I tried to mimic that with my Tombow watercolour markers. This stamp line comes from a shop in Markham, near Toronto. It's a line the owners illustrate and produce. The designs are quite darling - it reminds me of old fashioned children's story books!

The side step card folds flat for mailing.

The sender's sentiment goes on the back.

I made another side step card for my nephew's birthday a few weeks ago. As soon as I find time to edit the pictures, I'll show you that one too. Personally, I'm having a lot more fun with the box cards right now than the step card! What's your favourite kind of dimensional card?

Thursday, August 20, 2015

Friends Scrapbook Mini Album - video

I'm still experimenting with binding systems! I like the ribbon binding on my "triple envelope" albums. So, I want to do that on individual pages. I did it once for a birthday album and I really liked how that turned out.

I was going to do a video on it, but I found one that was fairly close to my method. (You can see her mini album binding method at about 14 minutes in to her video.) I am not very good with an Xacto Knife though, so I bought a strip making die that makes 1/2 inch strips. I can use 1/2 inch spaces or I can scoot the paper over and create 1/4 inch spaces.

This album is my first try of that binding system. I had to try 3x before I got the measurements all right. The pages turn very easily. I like to line my hinges with Tyvek for an anti-tear enhancement but that sometimes makes them stiff. Using ribbon prevents that.

I used an 8.5 x 11 paper stack by DCWV. (It's taking me a LONG time to get through this stack, I tell you!) The pages are actually no. 10 business envelopes that I cut down. I put the ribbon in the open end. I didn't open the other end to make pockets. The envelopes feel a little thin when you  open them. Leaving it sealed on the outer edge feels like a sturdier page.

I used a whole lot of Accucut Craft Dies in this album. I've entered it in their August 2015 Challenge for Friendship themed creations! I love using die cuts. One of my custom made ones appears in this album as well.

I used to hate stamping, but now I like that too. Just as I started taking a shine to stamping, stamps and co-ordinating dies sets have become popular! Woo hoo! Wish I were the genius who thought of that!

You can see the full video walk-through of my Friends 4 life scrapbook mini album on my Fairycardmaker Vimeo channel.