So, I was asked if I could make elephant thank-you cards – just as an experiment for a possible custom order if I could do it cost-effectively. My first inclination was to make solid die cut elephants that are like my
die cut dinosaurs: one piece in silhouette. To be honest, handmade mini thank-you cards are not that cost effective unless you make them yourself because the labour investment is still pretty high for such a small thing. I don’t even use them myself. I’ve been meaning to try something, but never got around to it. I’ve learned a few things from this exercise in elephants, so even if I don’t sell any, it has not been a waste of time in the least sense! When my existing thank-you cards are gone, I now have some skills to tackle the thank-you card issue in the future.
Now, elephants are not the easiest thing to draw for me. I love elephants. It was one of my mother’s favourite animals (along with the snowy owl, gecko, and komodo dragon). Elephants are steadfast, unhurried, and strong family units (at least amongst the females). The famous elephant memory, where they pause at the bones of the dead, is awe-inspiring. (I have wondered, though, are they remembering? Or have they forgotten that they came across those bones before and have to examine them every time?? Who can really say?)
A friend once asked me if I could quill an elephant. I said I would try, thought about it for a while and then forgot because no ideas were coming to me. (Sorry, Debbie!) The only way I can draw something (or quill it) is if I can picture it in its basic shapes. Besides, to translate them to the computer, I have to start with basic shapes. I’ve had trouble figuring out elephants for as long as I can remember. What are those ears? Are they ovals? Are they triangles? Why can’t I figure out the proportion of the legs to the body? The knees always confuse me too, for some reason. I think of elephant legs as tree trunks, but often the back knees are bent so there are two shapes in there, not one tree trunk!
I started sketching some shapes and ended up with the first in the picture below. (I actually drew the elephant 6 times but the other 3 are on a different piece of paper. And, yes, I left the legs as single tree trunks!) I didn’t like how the front legs were going right in to its neck. What to do there? So, I went online to look at elephant art and one of them struck me. The body is a turtle shell shape (a half oval, not a full oval). That was infinitely helpful to realize! So, I sketched some more and ended up with the last version in the picture below.
So, now I needed to transform this elephant sketch into an elephant die cut. Normally, my drawings on the computer do not end up anything like the ones on paper. I get some good shape ideas from sketching but am rarely able to reproduce it on the computer. Not this time. I got it right!
This is the die cut elephant. (Excuse the grid dots!) It looks pretty close to the sketch, doesn’t it? Here it is all cut out.
(Please note, the “thank-you” sentiment and the green cardstock in all images are from Stampin’ Up! ©)
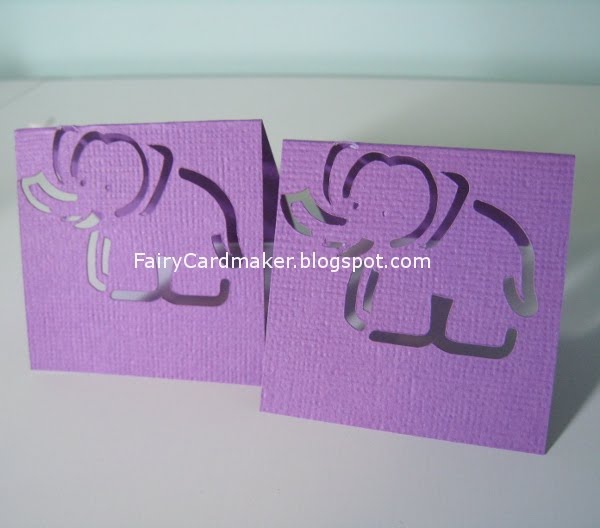
Now, this elephant die cut is in two pieces: the head, and the body. I did leave the option for myself to cut the tusks in white if I wanted to, but that would be a third layer for a little thank-you note. So, the next day, I decided to figure out a way to cut the elephants directly on the card fronts. I broke up all the lines and made them all 3-D so they would cut. This version is more akin to a tribal tattoo elephant (a cutesie one though!).
And here it is cut out:
The idea here would be to put a backing, either white, black or grey, inside the card cover to make the cut lines more visible. Unfortunately, these did not cut very cleanly, due to their small size, and required clean up with my scissors/exacto knife. Plus, the card front becomes flimsy and is hard to fold it in to a card. (Well, maybe not if I had lined it first.) Anyway, this was not ideal for production, so I didn’t even bother to line these ones. Then I had an idea. What if I just drew these lines so it really did look like a tribal elephant tattoo?

I LIKE IT! But, when I draw with my machine, I still have to colour in all the parts. I included two raw ones in the image so you can see what I mean. Colouring is as big a time investment as paper piecing. I tried putting a bold marker in my machine so the lines would close themselves. They did for the most part, but I still had to colour a few places and the tail got squeezed out. (I widened it to make it work after.) I could continue to massage the design so that there would be no colouring, but would it destroy the ability to cut this design out if the lines got thinner? I decided to let it sit in my head for a day.
The next day, it hit me. If I’m trying to make an elephant line drawing, why not use the original elephant die cut? Cut lines make thin draw lines. I don’t NEED it to be a bold drawing. The only reason I made the lines bold and broken was for cutting purposes. So, I went back to the original design. I massaged the lines a little, so that the head and body were one part instead of two, and voila!
I LIKE THIS ONE TOO! I’m very happy with my die cut elephants – all three versions: die cut, tattoo-ish drawing, and line drawing. I can now make elephant cards! My sister bought some cute zoo papers for her baby’s album so die cut elephants would go well with that too. Oh what fun! I love getting challenges from customers! (Well, they’re inquiries, but I look at them as challenges!)
I hope you enjoyed following along with my elephant experiment!
 I just adored the chocolate mint paper line from SEI. The foiled swirls were so vivid against the chocolate-striped background. I called the design on the right the "milk hot chocolate" design. It's hard to see in the photo, but the design on the left has sparkles applied to the snowflakes.