Tuesday, November 25, 2014

Pet Christmas Angel

This was the first stamp I ever bought from High Hopes Rubber Stamps. They have a whole collection of named angels and this one is Delia Angel. The challenge this week is to add silver to your card. I added my silver by using a silver glitter cardstock to mat this angelic image.


(Click image for larger view.)

 I also used a silver metallic pen on the flecks of Delia's dress.

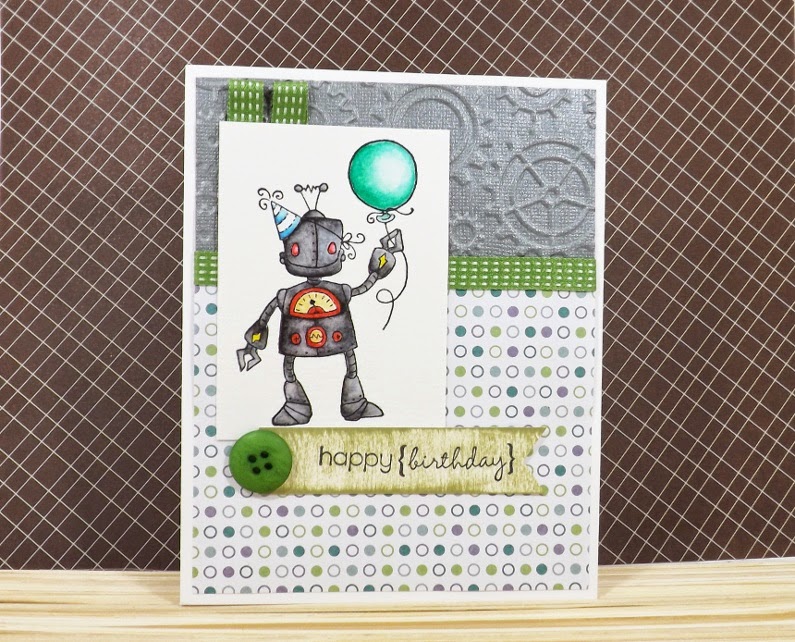
I've been on a Christmas mini album making binge of late, so I had all these holiday scraps. I layered some strips up to mat one side of this card and I embossed the other side with a CTMH Quarterfoil embossing folder.
(Click image for larger view)


I have to admit, this stamp image is quite large and there are a lot of things to colour, so I haven't used it as much as I thought I would.  Enter: Watercolouring!  I actually found it much faster to watercolour this image than to use my alchohol markers.  The key was to first emboss the image. Once I embossed it, I didn't have to wait for sections to dry and the raised embossing acted like a little fence for the water. Fantastic! I used my Tombow Dual Brush tip water colour markers. I also used a larger card: 4.5 x 6 inches.

Some of my other favourite High Hopes Stamps angels include Kathy Quilting Angel and Charity Winter Angel but they have several more.

I hope you'll join in the challenges over at the High Hopes Stamps blog!

Friday, November 21, 2014

Sweet Christmas Envelope Scrapbook Album

I wanted to make an envelope scrapbook album in portrait orientation. All the ones I've made in the past have been landscape orientation. I know that most people take pictures in landscape orientation, but albums look more book-like when they are in portrait orientation. So, I went ahead and did it and I love how it tuned out!  I tried a new style of binding too: ribbon!


This is my "Triple Envelope,
Single Signature, Ribbon bound
Christmas Scrapbook Mini Album!

I really enjoyed making this album. [Spoiler: I have two more like it on the go and one with a 1/4 inch guttered spine.]

I used all sweets related pages from a Recollections paper stack to make this album. My Accucut Craft gingerbread man die cut makes three appearances in the album! This cover cluster is my first cluster-style embellishment attempt. I love the look of them but find them hard to accomplish given my clean and streamlined style. Therefore, my version of a cluster embellishment is of the flat variety, as opposed to the bulky, three dimensional style. I popped up a single gift on foam tape.

I did a video walk-through of this album so you can see all the pages and interactive bits. I even included instructions on how to tie a bow at the end! You can see my Sweet Christmas Envelope Mini Album on my Vimeo channel. I love the thinness of this album (clean and streamlined!). Despite being made from only three envelopes, it holds a surprisingly decent number of photos! Something like 15 full-sized 4 x 6 inch photos and 20 or so wallet sized ones (the mini 2.5 by 3.5 inch ones). (That's the count if you do zero journalling in the album though.)

Hope you enjoy the video!

Saturday, November 15, 2014

Mittens Winter Card

It's mitten wearing weather, these days! Challenge #242 over at High Hopes Rubber Stamps is "Winter Mittens". High Hopes have A LOT of winter themed characters, many with mittens! There are all kinds of images to choose from.

I used Snowlady Surprise. From what I've seen, High Hopes is a trend setter in having so many snow people of the female persuasion. (Yeah!) They have a whole line of snow people - even a cowboy! I really like this particular snow lady image though because of the dress coat. I love those kinds of jackets!


Even though the snow lady is wearing mittens, I added a die cut pair too with some twine. This shape is one of my old Quickcutz shapes that I haven't used in forever (mostly because I forgot it had it). I love how challenges help me to rifle through my stuff and use up those oldies-but-goodies.


The background is another patchwork scrap paper mat, the full size of the card. (Yep, I'm still going strong with my scraps!  I really like the randomness of the look!) I added some twine and the mittens to the background. I coloured Snowlady Surprise in alcohol markers: both Copic and Letraset Tria markers. The mittens were entirely Trias - three shades of cool grey.

There's still time to enter the challenge yourselves! I'd love to see more participation in the High Hopes challenges. They have so many great images and they are a family-owned small business. I admit, their stamps tend to be on the bigger side, but that just makes them great focal images (and a touch easier to colour)! The size of this snow lady works for cards, but it also large enough to work on a scrapbook page. Check them out!

Wednesday, November 12, 2014

Pretty Patchwork Cards

I've been having a lot of fun mixing up my scraps to make patchwork backgrounds.  When I am able to trim the edges of my patchwork piece and see only slivers left, I am finally comfortable throwing those pieces away.

Apparently, the feeling is catching. Here's are some cards my friend Claire was inspired to make with her scrap pieces. (Click any photos for a larger view.)
This Christmas card would be perfect for giving to a man with its plaid and darker colours. I always find those among the harder kind of cards to make!

On this blue one, Claire used some glitter cardstock scraps. I know how reluctant I am to get rid of specialty paper scraps. This idea works well for those!  In the corner, she clear embossed a nativity stamp image over the blue cardstock. I like the subtle look of it.

This one is my favourite! The penguin is adorable. The green and red papers on the sides plus the green bunting that the penguin in the patterned paper holds all echo the colours of the focal stamped penguin image.  This is a truly pieced patchwork card card too. I like the coverage from the mixed patterned papers.

I've been sifting through my scraps too. I'm making some cards for my grandmother. I showed you some I made with my black and white scraps before, and here I have another!

My grandmother does not like dimensional elements on her cards, so I used black Stickles glitter glue instead of brads or buttons at the sides. I coloured the balloons with my alcohol markers and then added the polka dots with a white gel pen.

If you haven't tried making "Scrap Mats" out of your paper scraps, you should! Even though I'm using different colours (all in monochromatic themes per card right now), the cards are unified by their patchwork style. You could easily make some gifts sets this way!

Saturday, November 8, 2014

Robot Birthday Card for Guys

Today, I have a robot birthday card for guys to show you! I used "Robot with Balloon" from High Hopes Stamps and I'm entering it in their Button Up challenge #243. Previously, I coloured the robot with Crayola watercolour markers (see the Crayola watercolour version in my past post). This time, I used Tombow dual tip watercolour markers.

I only have a very pale, barely there grey and black, so I used the black very sparingly and lots of water. I think it turned out nice and crisp!


I used a Darice embossing folder on the top to emboss the gears into Bazzill Tungsten metallic grey cardstock. I added some Stampin' Up! gumball green ribbon to hide the paper seam. I like the smaller polka dot paper with this one. It reminds me of those tests where you had to circle the dot for the answer and the cards got fed into a machine for reading.


I'm telling you, though, red is hard to work with. Whether it's watercolour or alcohol markers, red is my nemesis. I had to do so much fixing when the red bled into my robot's body! I do like how the balloon turned out on this one, though. I finally got the "fade to white" look to work!


Robots definitely make "boy cards" a whole lot easier to make!  There are plenty of fabulous robot stamps on the market, but I particularly like this one. It reminds me a little of the Tin Man from The Wizard of Oz. Don't you think?

Monday, November 3, 2014

Video Tutorial: Altered Notepads

Hello to the Creative Community!

I have a new video today about how I alter notepads. Most of mine go Toronto's Hospital for Sick Children via the volunteer group: Smiles4SickKids. We make cards for the children to brighten their day and also Thank-You cards for the nurses. The nurses like to get altered notepads too so they can hand them out to parents who need to write down important medical information.
I get notepads from donating to charities. I keep them by the fridge for lists, by the phone for messages, and also by my computer for ideas. However, I still have more than I will use myself. I'd like to give them away but they have my name on them. Solution: alter them!

You can see how I do it by tuning to my Vimeo Channel to watch my altered notepad video tutorial! It's easy peasy!